Cell type annotation refers to the process of categorizing and assigning cell types to individual cells based on their gene expression profiles. These annotations are needed for understanding the cellular composition and diversity within a sample.
Cell Ranger v9.0 introduced support for automated cell type annotation as part of cellranger multi and cellranger count commands and as a standalone command, cellranger annotate. Cell Ranger v10.1 added support for the Pan-Human Azimuth model, which runs locally and does not require a 10x Genomics Cloud Analysis account.
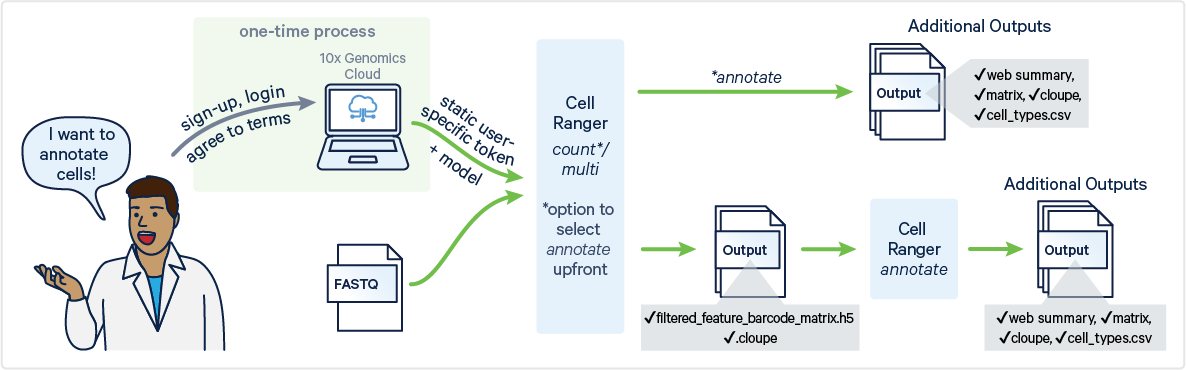
To generate automated cell type annotations, ensure your analysis includes a Gene Expression library.
For cloud-based models:
- Your sample must be from a human or mouse.
- The total number of cells in your analysis should range from 100 to 1.2 million.
- You must have a 10x Genomics Cloud Analysis account.
For the Pan-Human Azimuth model:
- Only human samples are supported.
- A 10x Genomics Cloud Analysis account is not required.
To run automated 10x Genomics cell type annotations with the cellranger annotate command, you will need to access the 10x Genomics Cloud CLI Access Token.
There are two ways of accessing the token:
- Run
cellranger cloud auth setup(recommended):
Cell Ranger v9.0 introduces a new command, cellranger cloud auth setup, to simplify the process of authenticating with 10x Genomics Cloud Analysis. This command provides an interactive walkthrough that guides you step-by-step through the setup.
When you run the command:
- You will be prompted to visit the 10x Genomics Cloud Analysis site, where you can generate an access token.
- After copying the token, paste it back into the command prompt, allowing Cell Ranger to save the token locally.
Once saved, the token is automatically reused for future requests, making it easier to access Cloud Analysis services without needing to repeatedly enter credentials.
- Manually create a token file
The token is located on the security page of your Cloud Analysis account: https://cloud.10xgenomics.com/account/security.
You have the option to either generate a new token or copy an existing one.
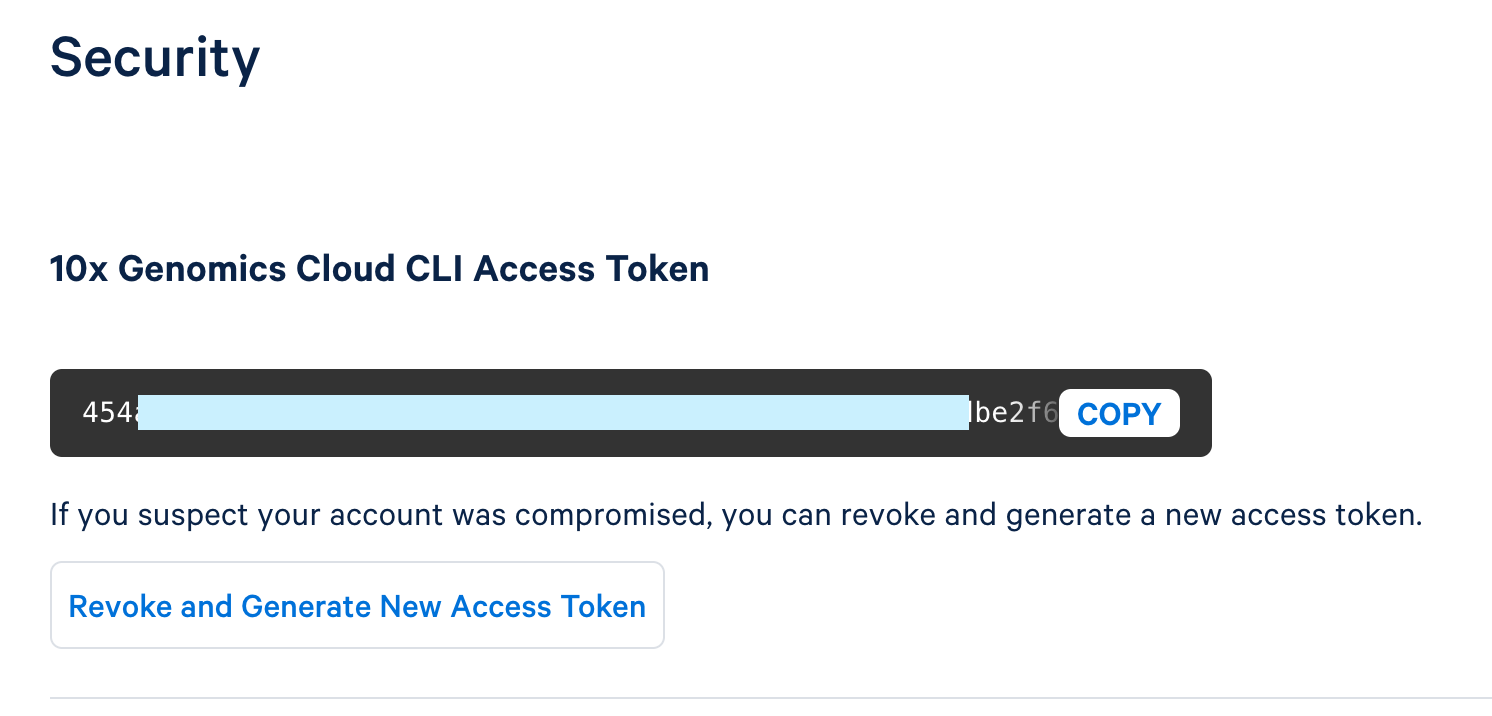
To create a new token, click "Generate New Access Token."
Once the token is generated, use the copy button to copy the entire token and save it as a plain text file in a secure location that others cannot access. This token controls access to data stored in your 10x Cloud Account.
This token file is required as an input with a local installation (i.e., not running in 10x Cloud) to run cellranger annotate, cellranger multi, and cellranger count. When using these pipelines, you will provide a path to the token file via the --tenx-cloud-token-path argument.
The inputs for cellranger annotate are files generated by the cellranger count, cellranger multi, or cellranger aggr pipelines (v5 or later). Therefore, before running cellranger annotate, you must first run one of these pipelines.
Specifically, cellranger annotate requires the following files, located in the outs/ directory of a typical cellranger count or cellranger multi run:
- Filtered feature-barcode matrix in H5 format
- Loupe Browser file (
.cloupe) (Optional): If you wantcellranger annotateto generate an annotated.cloupefile as part of the output, you need to include this file as an input. The .cloupe file provides a visual representation of the gene expression data, which can be used in the Loupe Browser to explore the results interactively. If you do not provide a.cloupefile,cellranger annotatewill still run, but it cannot produce an annotated.cloupeoutput.
Visit the command line arguments page for a full list of accepted arguments.
An example command looks like this:
cellranger annotate --id=sample123 \
--matrix=filtered_feature_bc_matrix.h5 \
--cell-annotation-model=auto \
--tenx-cloud-token-path=/path/to/10xcloud_token.json
In this example:
--matrixspecifies the path to the filtered feature-barcode matrix in H5 format.--cell-annotation-modeldetermines the 10x Genomics cloud-based model used for cell type annotation. When set toauto, the pipeline automatically selects the appropriate model(s). Currently available models arehuman_pca_v1_beta(10x human model),mouse_pca_v1_beta(10x mouse model).--tenx-cloud-token-pathis the path to the 10x Genomics Cloud Access Token, which is necessary for communication with the cloud-based cell annotation model. If not supplied, will default to the location stored through cellranger cloud auth setup. If the token file does not exist, there is an error.- If you do not provide
--cell-annotation-modeland your sample is derived from a human, the Pan-Human Azimuth model will still be run locally.
When run as the standalone cellranger annotate command, cell type annotation writes a dedicated web_summary.html. As of Cell Ranger v10.1, no pipeline produces a web_summary_cell_types.html file; when annotation is enabled within the cellranger count or cellranger multi pipelines, the annotation summary is instead embedded as a tab in the main web_summary.html. Annotation outputs are organized into a subfolder per model (Azimuth and 10x_Cloud) within the cell_types/ directory. The cellranger annotate outputs are shown below:
outs/
├── cell_annotation_sample_cloupe.cloupe
├── cell_types
│ ├── 10x_Cloud
│ │ ├── cell_annotation_differential_expression.csv
│ │ ├── cell_annotation_results.json.gz
│ │ └── cell_types.csv
│ └── Azimuth
│ ├── cell_annotation_differential_expression.csv
│ └── cell_types.csv
├── web_summary.html
For more details about these output files, see the Cell Type Annotation Outputs page.