Planning your single cell experiment with Flex: FAQs for fresh, frozen, and FFPE samples
Since the writing of this blog, we have introduced the new Flex which enables unprecedented scale with plate-based sample handling and includes the lower input requirements and additional performance gains that come with GEM-X technology. Click here to learn more.
How can you ensure that your single cell RNA sequencing (scRNA-seq) studies have the best chance of success? As with so many things at the bench, your first few steps can have strong influences on the results. In a recent blog, we discussed how sample preparation plays a fundamental role in these outcomes and highlighted some frequently asked introductory questions to help you become an expert at this key part of your single cell journey. What makes for a good-quality sample? Why are sample handling logistics important for downstream success? You'll find helpful discussion on these points and more in the first article from our sample prep blog series.
Now, we're moving further into the realm of sample prep options for single cell, turning to protocols that make different starting points available to you, and, therefore, bring up new questions around best practices. What if you’re unable to work with fresh samples, or immediate processing of those samples presents too big a challenge? Maybe your ideal research involves archived tissues or samples collected at multiple locations and/or timepoints.
In this blog, we’ll explore those situations and walk through some basic questions about sample prep with Chromium Single Cell Gene Expression Flex, a single cell assay that lets you profile fresh, frozen, and fixed samples—even FFPE—on a flexible schedule. We’ll be discussing compatible sample types, best practices for storage and transport, QC considerations, optional stopping points, and more. Read on for helpful tips and valuable resources. With all this information at hand, we hope you become comfortable and confident with these methods as you learn about this flexible side of single cell.
Already know which question(s) you need answered? Jump ahead to any of these topics:
- Compatible sample types
- Sample prep methods
- Working with organoids
- Stopping points & storage conditions
- Best practices for FFPE tissue
- Sample transport considerations
- Sample input amounts
- Counting fixed cells/nuclei
- Improving cell/nuclei recovery
Looking to add spatial context to your single cell analysis? Stay tuned for an upcoming blog discussing sample prep guidelines for Visium Spatial Gene Expression.
What types of samples can I profile with Single Cell Gene Expression Flex?
There’s a lot of flexibility here. You can start from fresh, frozen, or fixed cells, nuclei, or whole tissue from human or mouse. The protocol has been extensively tested with a wide range of tissue types across these conditions, and you can easily access summaries of the results through our support documentation for fresh and flash frozen samples or FFPE tested tissues.
Which sample prep method should I use?
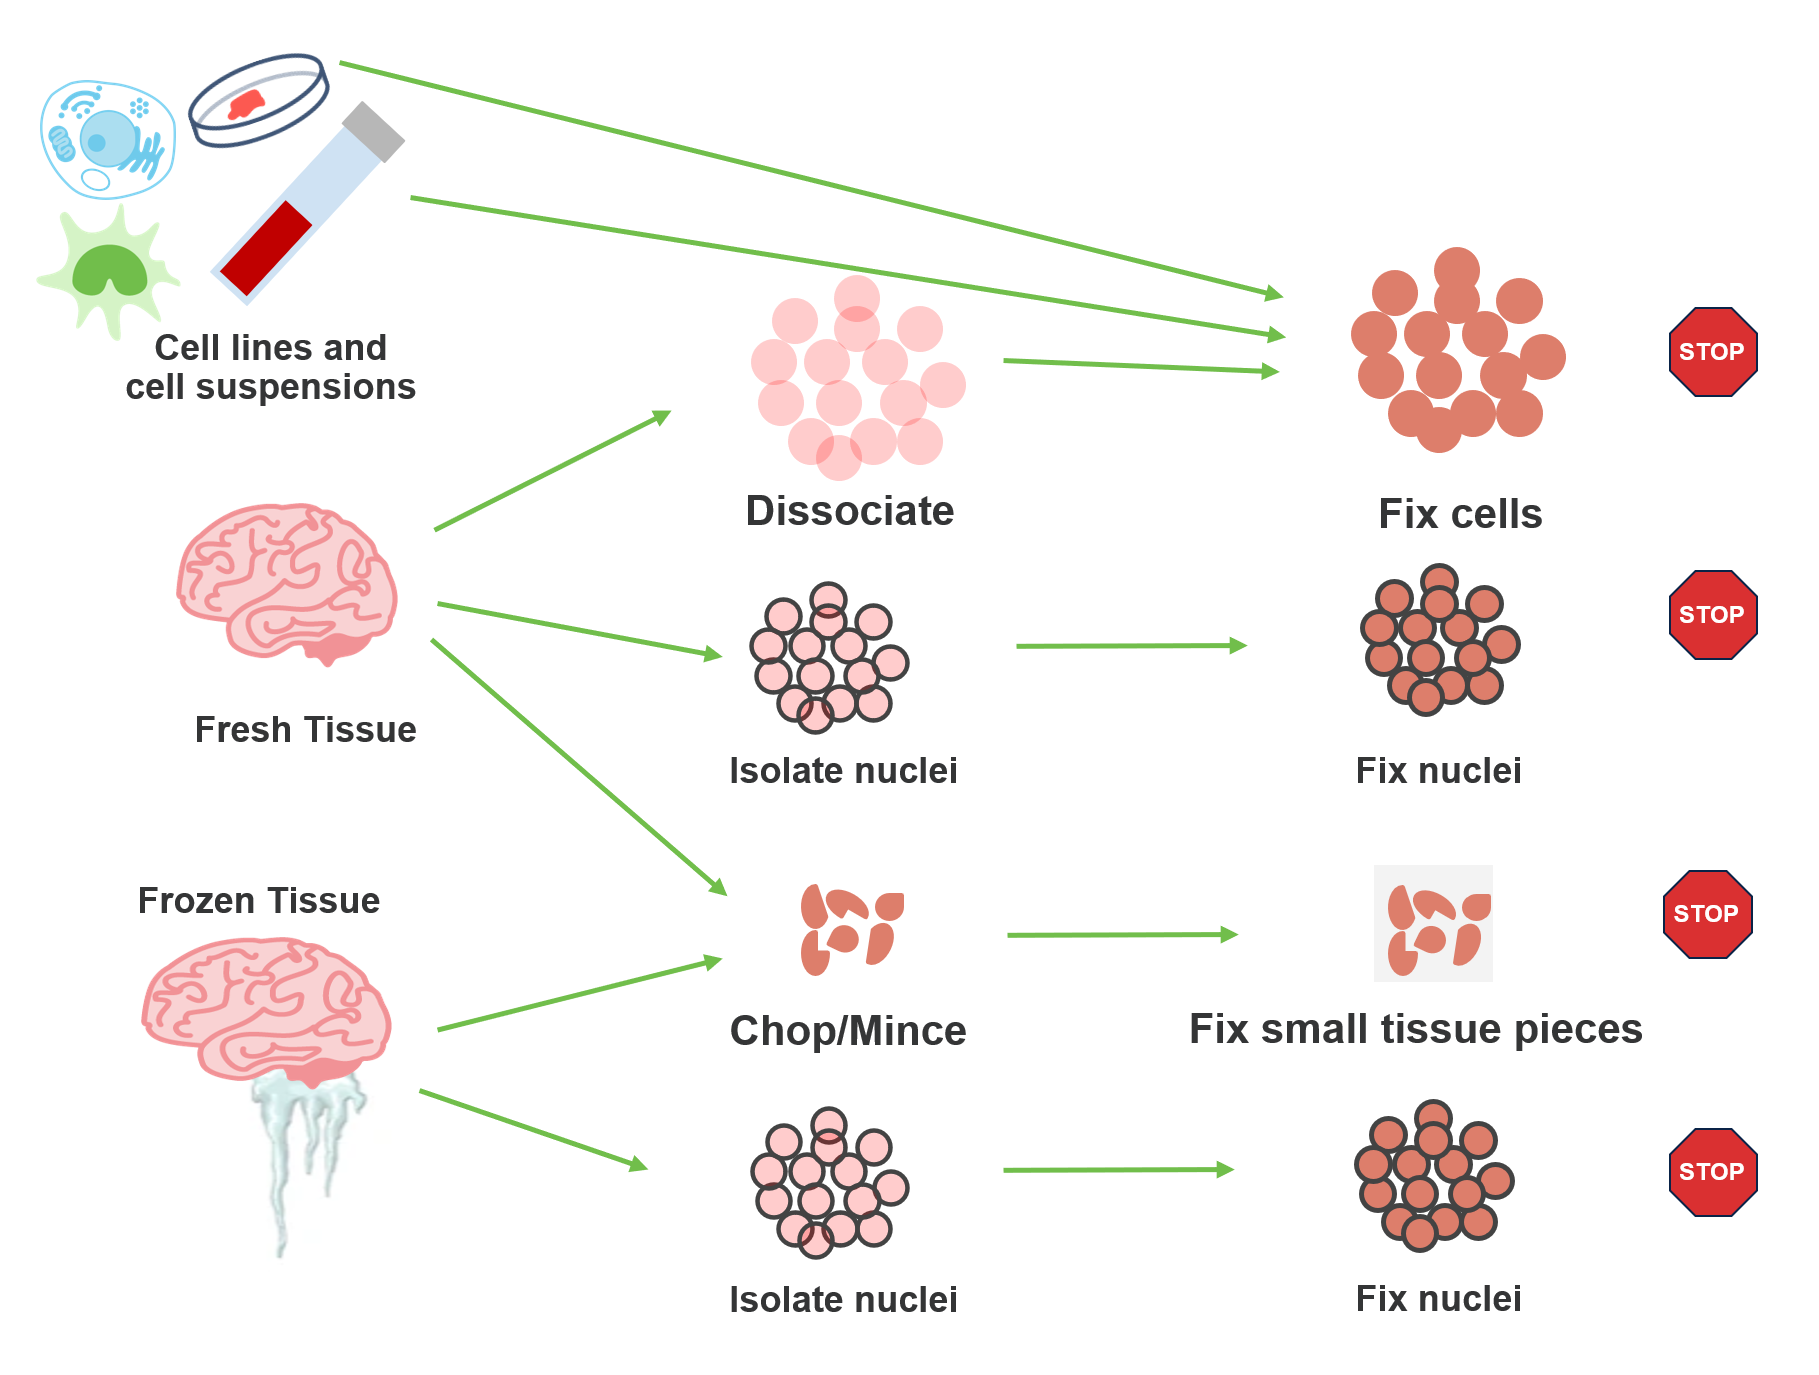
The short answer? It depends. As part of the Flex protocol, samples go through a fixation step prior to hybridization with transcriptomic probes. But sample handling prior to fixation has a lot of built-in flexibility. What sample type are you working with? What is your timeline for sample processing? What cellular features are you interested in? All of these details determine your starting point. Let’s take a look at the options for various sample types.
Cell lines and cell suspensions
These sample types are rather straightforward in that you will want to follow standard guidelines for working with fresh cell suspensions prior to fixation with the Flex protocol. For optimal results, we recommend your starting suspension have high cell viability (~80%), but the Flex workflow has proven compatibility with more challenging samples, and we have observed good data from samples with lower viability. This is possible because the subsequent fixation step enables chemistry that is more forgiving of these input conditions, making it easier for you to work with difficult samples.
Fresh tissue
If you’re working with fresh tissue, you have several choices. Prior to fixation, you can dissociate into a cell suspension, isolate nuclei, or mince the tissue into small pieces. Standard best practices apply for dissociation and nuclei isolation. Fresh dissociation does require viable cells as input for the fixation protocol, so careful handling is a must. The same viability recommendations for cell lines and cell suspensions (above) apply here. That said, fresh dissociation does come with several advantages:
- Multiomic readouts: Working with whole, fresh cells provides the opportunity to profile cell surface protein expression alongside gene expression.
- Enriched samples: You can choose to perform antibody staining to enrich for cell types of interest before proceeding with fixation.
- Optimized protocols: If you already have an optimized protocol that yields high-quality cells for your sample type, you can use that here.
If you are isolating nuclei, your required input level for probe hybridization will likely be higher than for cell suspensions, depending on the yield. For those who do not already have a tried-and-true protocol for nuclei isolation, you may want to check out our Nuclei Isolation Kit, which has been designed to offer an easy and reliable starting point for many human and mouse tissues. Information on tested tissues and expected yield is available on our support site, providing a helpful guide as to recommended starting weight for your sample.
Let’s now turn to that third option—chopping your tissue sample into small pieces. This brings you to a protocol that we informally refer to as our Chop/Fix protocol, in which these small pieces are fixed prior to dissociation into a cell suspension. Several benefits are at work here:
- Chop/Fix can lead to better assay performance versus nuclei isolation due to higher yield and reduced clumping.
- The process of fixing your tissue before dissociation can help you preserve fragile cells that would not survive other dissociation methods.
- Decoupling fixation and dissociation eases logistical constraints, letting you fix samples at the point of collection, transport to a central location, and dissociate later.
- Two protocols are available for the downstream dissociation itself: an instrument-based version that uses the gentleMACS Octo Dissociator and a manual version that uses no additional lab equipment.
We have tested and optimized these steps to work with a variety of tissue types and have made data on expected yield available as part of the protocol documentation.
Frozen tissue
For experiments with flash frozen tissue, two options are available to you: nuclei isolation and the Chop/Fix method. The same benefits and considerations that we discussed for these workflows with fresh tissue also apply here.
FFPE tissue
Yes—your archived tissues can be profiled with single cell analysis! FFPE samples can be used as input for the Flex workflow. As with the Chop/Fix method above, dissociation protocols for FFPE sections are available for manual and instrument-based workflows, both of which were tested with blocks ranging 1–10 years old. In our experience, both methods yield similar numbers of cells, cell-type proportions, and assay sensitivity, but you may find that results vary based on tissue type.
We have compiled a list of FFPE tissues tested with the Flex workflow, available here. If your particular tissue is not included, other tissues with similar characteristics could provide guidelines on how your tissue of interest may perform. In general, FFPE preservation is not standardized, so we expect that some blocks may perform better than others, regardless of tissue type. Low-quality blocks could lead to more variable cell calling and lower sensitivity.
Additionally, based on limited internal testing, we have observed successful generation of transcriptomic libraries from dissociated tissue obtained from twenty 5 μm FFPE sections on glass slides. When using twice the amount of sample input, we found results comparable to those generated with two 25 μm FFPE curls in terms of assay sensitivity, usable data, and cell-type annotations, with a modest decline in cell yields. A detailed workflow for working with sections on glass slides can be found in this article.
Can I profile organoids with Gene Expression Flex?
Yes, organoids are compatible with the Flex workflow. We recommend enzymatic dissociation of organoid tissue into fresh cell suspensions. Take care to optimize digestion time to yield healthy cells. From there, single cell suspensions can be fixed as per the cell-specific fixation protocol for the Flex assay. We do recommend running a pilot study before moving to your full-scale experiment, and our general guidelines for organoids and all 10x Genomics single cell assays can be found here.
What are the validated stopping points for sample storage? How long can samples be stored?
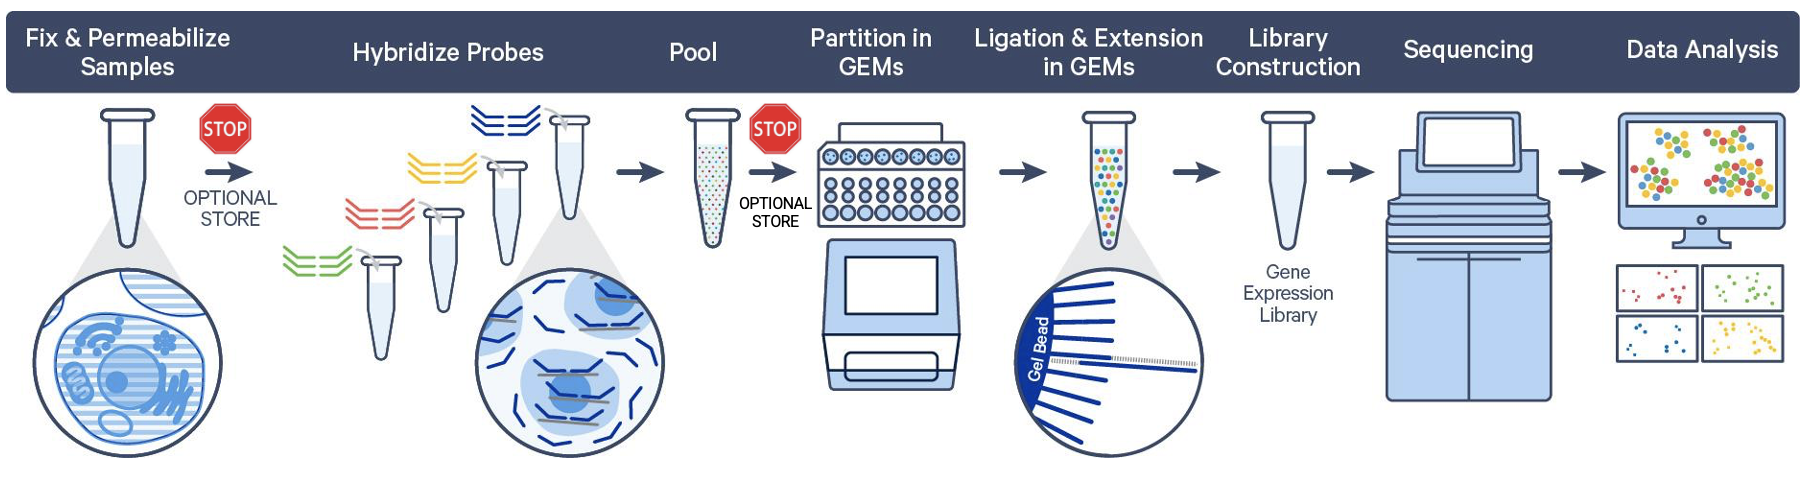
As we discussed above, sample fixation is an integral part of the Flex protocol, and the resulting fixed samples can be stored without compromising downstream data quality. This means you can customize your workflow with multiple, optional stopping points.
What practical impact does this have on your experiment? You can process samples in batches—even from multiple collection sites—and then run them all together at a later time. You can save extra portions of your samples in case you need to troubleshoot or perform repeat runs. You can easily run pilot experiments because you will have convenient access to more of your samples that were processed the same way at the same time.
So, where are these stopping points in the Flex workflow?
Post-fixation
Fixed cell or nuclei suspensions, fixed chopped tissue pieces, and dissociated FFPE samples can be stored short-term at 4°C for up to 1 week, and up to 6 months at –80°C.
Note that the Chop/Fix protocol also lets you stop the protocol after fixing small tissue pieces. You will still need to dissociate these pieces to produce a fixed cell suspension before proceeding to hybridization. The resulting fixed cell suspension is a second stopping point for the Chop/Fix method.
Post-hybridization
There is one final stopping point in the Flex protocol before partitioning your cells or nuclei. After fixation, samples are permeabilized and then hybridized with probe sets. At this point, you can store your hybridized samples for up to 6 months at –80°C or proceed directly to cell/nuclei capture on the Chromium instrument.
What are best practices for handling FFPE samples in preparation for single cell experiments?
Storing FFPE blocks
FFPE tissue blocks can be (and typically are) stored at room temperature. However, for optimal single cell performance, we recommend storage at 4°C, and away from light sources, if possible. These conditions can minimize or slow RNA degradation and help ensure success with NGS applications like single cell gene expression profiling.
Sectioning FFPE tissue
Be sure that your equipment is free from RNase contamination and that you use new clean blades for sectioning. Ensure sufficient time for block rehydration before sectioning. These steps will help ensure the generation of intact and high-quality curls. For any transfer steps, be gentle with handling to avoid damage or breakage. If you are unfamiliar or not yet comfortable with sectioning FFPE tissue, we recommend practicing before moving forward with generating curls for your single cell experiment.
Handling FFPE curls
Be gentle with your FFPE curls; an intact curl can help you maximize cell recovery. If you need to transfer the curl to a different tube, we recommend tapping the tube to encourage the transfer. Avoid using forceps. Also, when adding reagents to the tube, make sure to pipette onto the wall of the tube, not directly onto the curl. These practices should minimize potential damage to your sample.
Working with clinically relevant FFPE tissues? Check out our blog summarizing key insights into this topic from a recent webinar with Q2 Solutions, a clinical research organization and 10x Genomics Certified Service Provider.
How should I transport samples after collection, but before fixation?
If you are using the Chop/Fix protocol, you can prepare fixed samples for short-term storage (up to one week) at 4°C or long-term storage (up to six months) at –80°C, prior to dissociation. Fixed tissue pieces prepared for short-term storage can be shipped with cold packs, and those prepared for long-term storage can be shipped on dry ice.
Otherwise, we recommend that tissue be flash frozen in liquid nitrogen and then shipped on dry ice. For durations of less than 24 hours, it may be possible to use cold preservation reagents prior to storage and shipping at 4°C. However, if proceeding with shipment at 4°C, we strongly advise you to start with a pilot experiment because a number of factors can impact your downstream data quality, including: tissue type, disease state, and how much time has passed between collection and storage.
Transport of FFPE tissue blocks is preferred over that of FFPE curls because curls are more vulnerable to damage and can decline in quality. That said, if you are unable to ship FFPE blocks, you can place curls in individual, tightly closed, 1.5 ml Eppendorf tubes. We advise you to secure the tubes to minimize shaking during transport, and to include cold packs if a significant temperature change is expected. As with storage of your FFPE samples, we recommend shipment at 4°C.
How many cells or nuclei do I need as input? How much tissue do I need to start with?
This depends on your starting point, i.e., the sample preparation method you have chosen. For fresh cell suspensions we recommend an input of at least 300,000 viable cells for optimal cell recovery. Suspensions with over 80% viability will yield the greatest sensitivity in single cell profiling, but we have still observed successful results with low viability (50% or less). If you are isolating nuclei, your input level should be a bit higher than it is for fresh cell suspensions, with a recommendation of at least 500,000 nuclei to maximize recovery. In this last case, you may need to start with higher quantities of tissues, depending on observed yield.
Experienced users can consider moving forward into fixation with fewer cells or nuclei (as low as 100,000 cells or nuclei is safe), but should be aware that some cell loss throughout the assay is expected, and you may run the risk of not having enough cells or nuclei for the downstream assay. Proper sample handling and accurate cell counting can help minimize these losses (see recommendations in additional sections below).
For the Nuclei Isolation Kit and the Chop/Fix method, we have found 25 mg to be sufficient for most tested tissue types, typically yielding enough cells or nuclei to meet our hybridization recommendations. Information on the cell yields we have obtained from 25 mg of various mouse and human tissue types (flash frozen or fresh) can be found in this summary table.
If you are profiling FFPE samples, we recommend starting with two 25 µm sections. However, the number of sections you need will depend on your tissue type, tissue size, and throughput considerations. For example, tissues that are cell-dense (like lymph nodes) might only need one 25 µm section to reach the required input amount, whereas smaller samples (like punch biopsies) could require more than two sections.
How can I ensure an accurate count for fixed cells or nuclei?
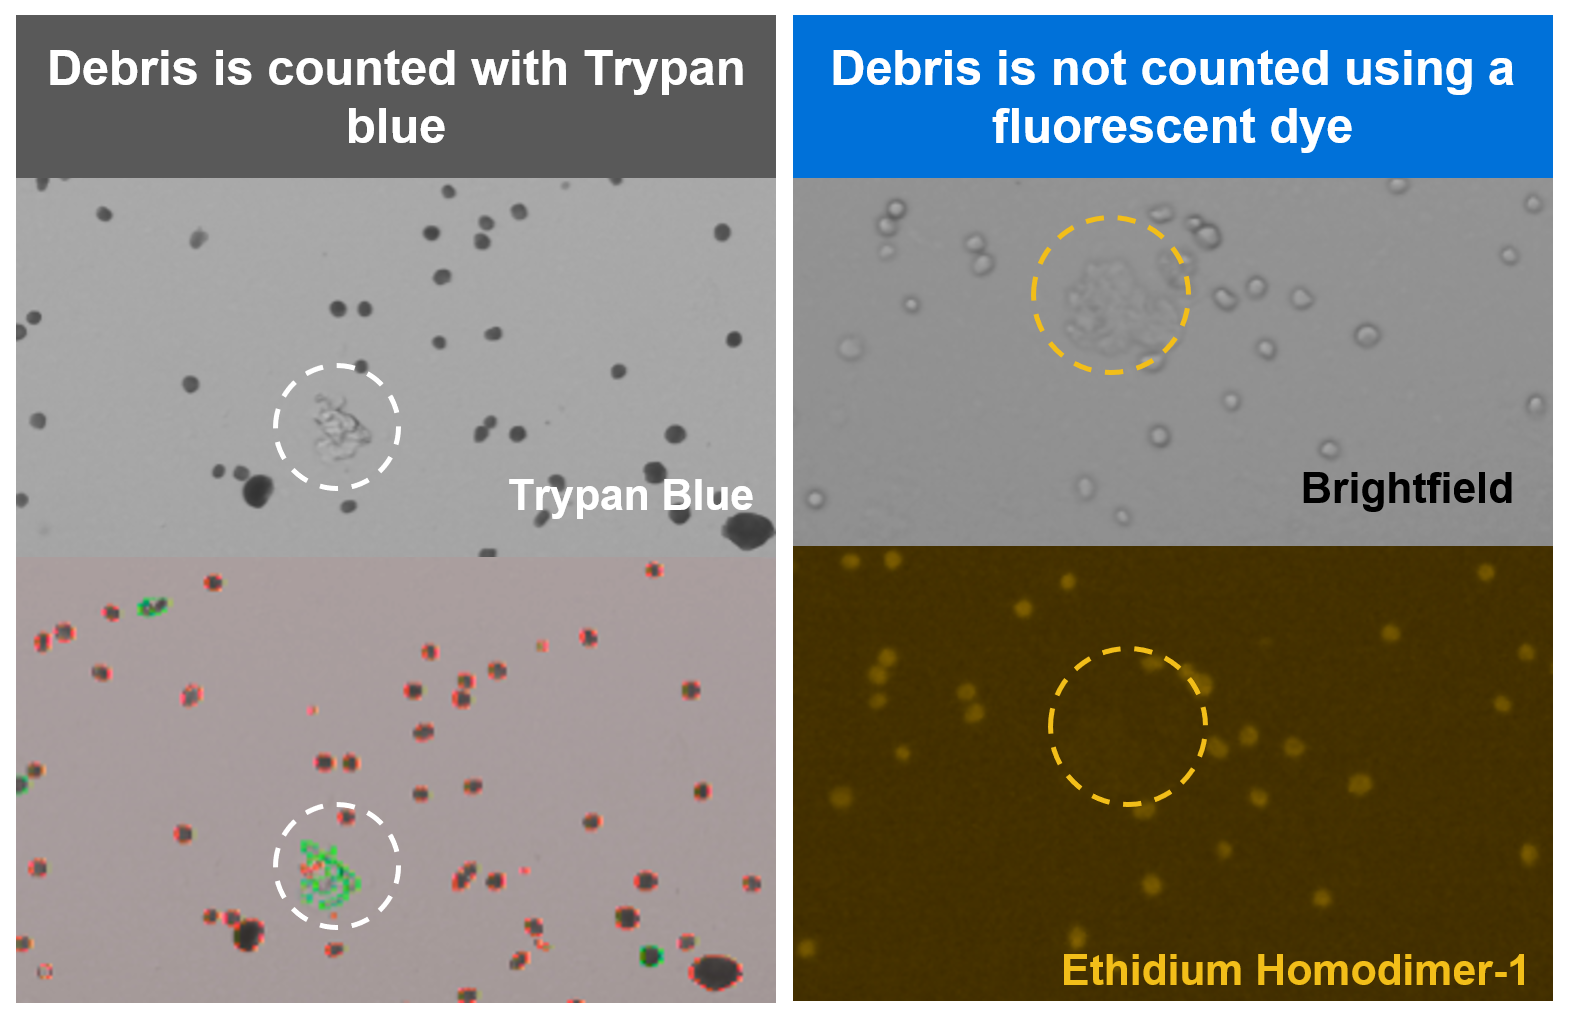
Cell counting is a critical step in getting to the best possible assay performance, helping to ensure your cell recovery meets your experimental needs. In general, best practices for cell counting still apply for work with Gene Expression Flex, but with one important note: we strongly recommend staining fixed samples with a fluorescent dye instead of Trypan blue. Fixed cells will take up Trypan blue and be stained as dead cells. Trypan blue can also contribute to inaccurate cell counts by staining cell debris, which is likely to be present in dissociated tissues.
For these reasons, we strongly recommend staining with a fluorescent dye like ethidium homodimer-1 or propidium iodide (PI) staining solution and then using an automated fluorescent cell counter for improved accuracy. Debris-free samples, such as cell or nuclei suspensions, can still be counted using Trypan blue, if preferred.
Be sure to pay attention to the specifications for your cell counter, including optimal cell concentrations and cell size limitations. Maximum cell size is an obvious concern, but minimum size limits also warrant your attention as some instruments may not be compatible with small cells or nuclei.
How can I improve my cell/nuclei recovery?
A few basic principles apply here, as they do for all single cell studies. Be sure to start with fully dissociated samples. It is also important to minimize the presence of aggregates and debris in your suspensions, in order to optimize cell recovery.
Some cell or nuclei loss is normal as you proceed through the workflow, with the exact percentage depending on several factors, including cell type, cell number, and cell density of your starting material. From sample fixation through chip loading, you can expect anywhere from 10 to 50% cell or nuclei loss, but there are some rather simple equipment decisions and handling techniques that can help maximize recovery.
Equipment
- Use low binding microcentrifuge tubes to reduce the binding of your sample to the tube surface
- Use a swinging bucket rotor centrifuge to yield a tighter pellet and minimize loss during washes
- Increase the speed and/or time of centrifugation to improve sample pelleting
Technique
- Remove supernatant with a transfer pipette and avoid pipetting near the pellet to limit the possibility of aspirating cells
- Leave up to 30 μl of supernatant during wash steps so as not to disrupt the pellet
- Perform a pilot experiment to optimize dissociation of fixed tissue before moving on to your larger study
The key to success? Make a plan.
Your single cell options have come a long way, with access to more sample types and the flexibility to determine a schedule that best fits your experimental needs. Along with those options come more varied questions on how to best proceed. Our advice? Make a plan. Consider your sample type, define your experimental goals, and outline the logistics for each step. We hope we’ve given you the important information you need to get started, and invite you to check out additional resources to help you choose a single cell assay and move forward with success.
Want to revisit the basics of single cell sample prep? This blog has you covered.
Want to see every Chromium product broken down by feature, with side-by-side comparisons? The Single Cell Buyer’s Guide has been updated with our current product offerings.
About the author: