Note: 10x Genomics does not provide support for community-developed tools and makes no guarantees regarding their function or performance. Please contact tool developers with any questions. If you have feedback about Analysis Guides, please email analysis-guides@10xgenomics.com.
This article outlines steps to test a tissue image without a fiducial frame through Loupe Browser manual alignment and spaceranger count and covers the following scenarios.
Space Ranger, the 10x Genomics pipeline for analyzing Visium data, supports TIF and JPEG images as well as pyramid TIFFs. If your slide scanner is an unsupported platform or produces an unsupported image format, and adheres to the imaging resolution guidelines given in Visium Spatial Gene Expression Imaging Guidelines, then you can test whether the resolution and contrast of the image allows for automation as well as spatial data exploration.
- Does the image resolve tissue features of interest towards spatial data correlation? This article outlines steps to test this.
- Does the image allow for Space Ranger automatic frame and tissue detection? This requires mostly visible Visium slide fiducial frame spots with sufficient contrast and also sufficient contrast between tissue versus non-tissue areas. You will have to obtain a Visium slide to test this. If automation is not possible, then you can perform manual alignment.
Sections 4 and 5 outline steps for researchers to convert an image to single resolution TIFF using external tool Fiji (ImageJ) v2.3.0/1.53f, downloadable from https://imagej.net/software/fiji/downloads. Section 4 illustrates Carl Zeiss CZI format conversion and section 5 illustrates Aperio SVS (ScanScope Virtual Slide) format conversion. After conversion, section 6 runs the image through Loupe manual alignment and section 7 checks spaceranger count acceptance and quality of image conversion.
- For official imaging guidelines, see the imaging guidelines technical note. See also the Space Ranger image input recommendations. Check the Space Ranger release notes for any updates to supported image formats.
- Fiji is an external public tool, originally developed as ImageJ by the NIH. If you have questions about the tool, please see the ImageJ website. Here are some links to get started.
- The article does not cover use of command line tools for image conversion, e.g. Bio-Formats bftools’ bfconvert. For more information, see the Bio-Formats site. Fiji uses Bio-Formats as a plugin, so if conversion in Fiji is possible, then conversion with bftools is also likely possible. Bio-Formats v6.7.0 supported formats are available here.
- The 10x Genomics support team is unable to help with unsupported image formats, and so we provide this article to researchers to enable use of available microscopy systems with the Visium platform. That said, if you have a conversion solution that works for an unsupported image format, it would be great to share these with other researchers. Towards this, we suggest use of a public forum, e.g. Stack Overflow, and use of tags, e.g. [imagej] and [visium] in Stack Overflow. As of this writing, you can view stackoverflow.com questions tagged imagej at https://stackoverflow.com/questions/tagged/imagej.
- If you contact support@10xgenomics.com about an unsupported image format, we will note the format for consideration in future development.
Space Ranger accepts TIF format images. Follow the steps for testing in sections 6 and 7.
If the underlying format is TIF but the extension is not .TIF or .TIFF, first try adding the .TIF extension to the file. Then follow the steps for testing in sections 6 and 7. Loupe Browser and Space Ranger accept TIF and JPG file extensions and pyramid format TIFs, which are explained at the bottom of this page.
- QPTIFF is in this category.
Consider conversion with Fiji as illustrated in sections 4 or 5 if any of the following apply.
- The image format is non-TIFF.
- The test fails.
- Results show odd color channels.
- You wish to work with a single image resolution from a pyramid TIFF. In general, we do not recommend any transformations that cause loss of data, including loss of resolution. Given that Loupe Browser allows toggling each color layer of a multi-stack or multi-page TIFF, we recommend retaining layer information if possible.
We recommend imagemagick to confirm a file is TIFF.
To start, first try your system’s file utility. Below we see the results of file on QPTIFF, Aperio SVS, Mikroscan TIF and CZI format images.

The file utility considers all but the CZI file a TIFF. However, if we add a .tif extension to the SVS file and load it into Loupe Browser’s manual alignment wizard, we see a blank image, which is unusable.
Next, download the command line tool imagemagick from https://imagemagick.org/script/download.php and run the magick identify command. Below we see results from the four image types.
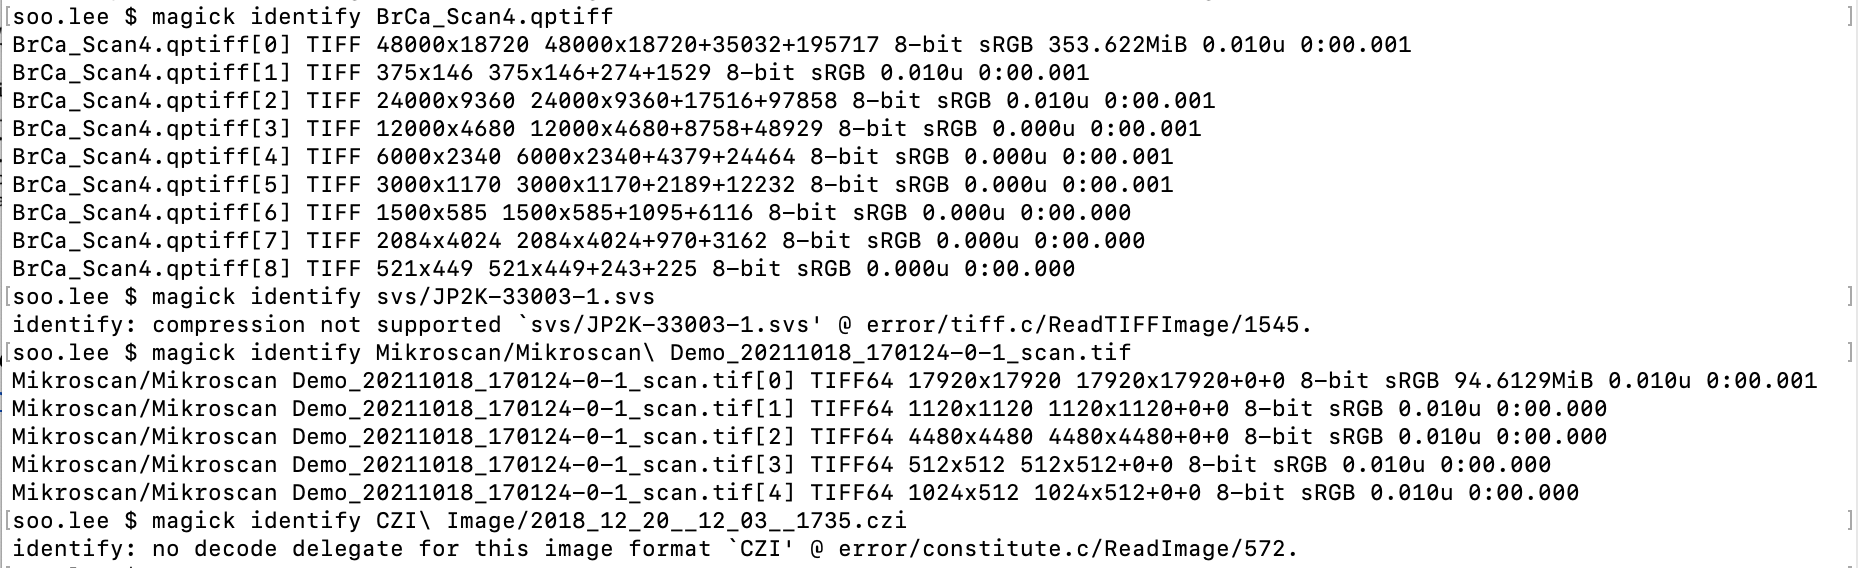
Here we see metadata associated with the image files. Two of the formats, QPTIFF and Mikroscan TIF show TIFF layer details, while the other two, Aperio SVS and CZI, give messages about unsupported compression and no decode delegate, respectively. The CZI result confirms it is non-TIFF. The SVS result is explained here. Given this, we also consider SVS non-TIFF.
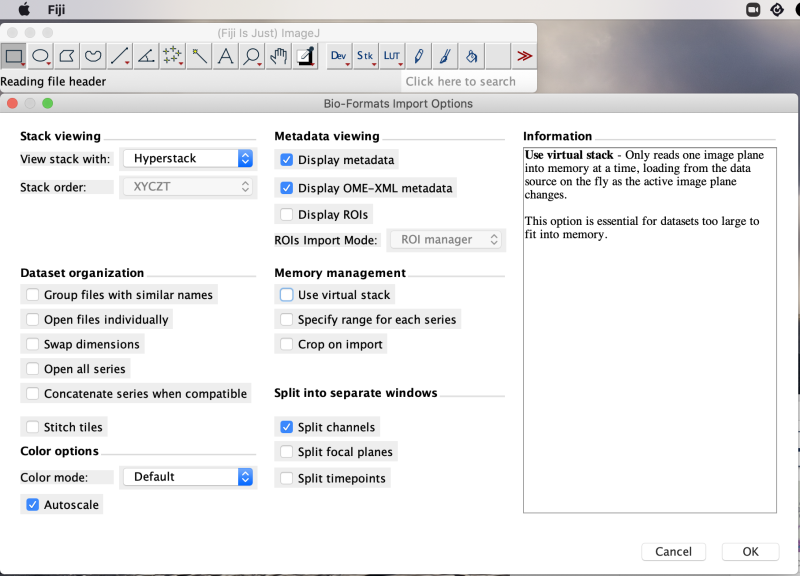
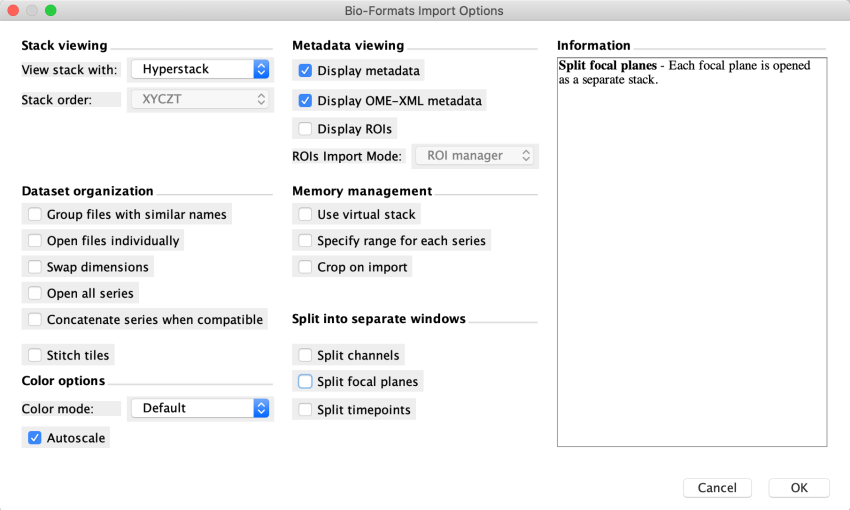
Open Fiji. Load the CZI file in Fiji with File>Open. For the example file, we see an import options panel. Hovering over elements shows information about the element, e.g. the ‘Use virtual stack’ option’s information is on display.
Here we use default parameters, which include Split channels. Clicking OK brings up another options panel showing six series, each with multiple planes.
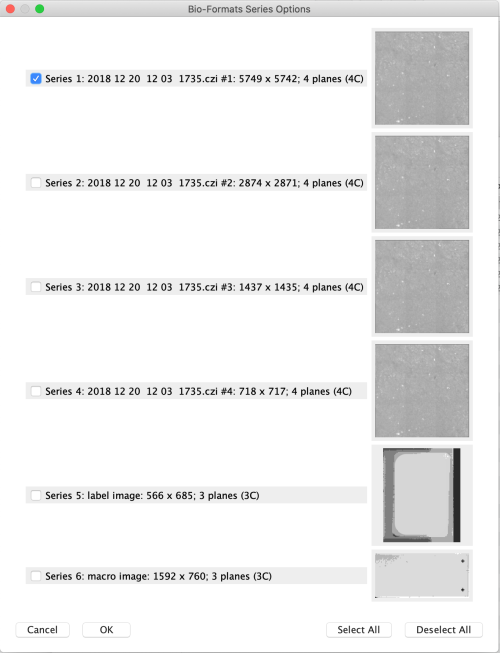
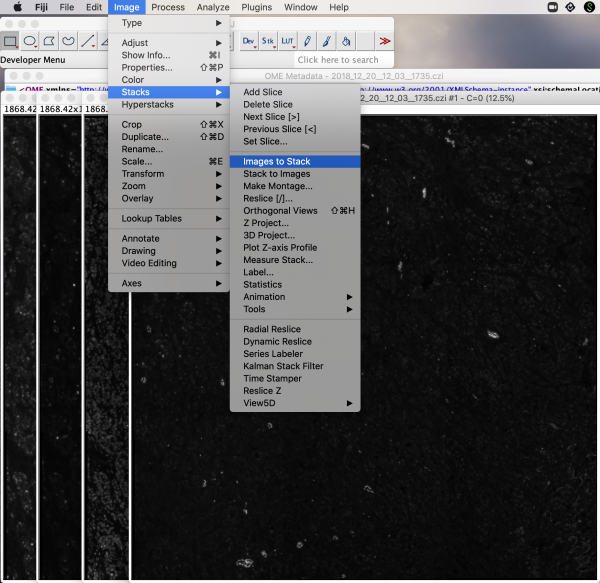
Given the decreasing dimensions in the metadata description, this CZI format file is a multi-resolution stack or pyramid stack. We continue with the preselected, highest resolution Series 1 for this illustration. This opens four planes in separate windows plus two metadata windows. Convert the planes into a stack by selecting Image>Stacks>Images to Stack.
This merges the four planes into a single stack. For the purposes of this article, for better visualization of screenshots, we convert the 16-bit image stack to 8-bit. The bits refer to the number of tones available, in this case gray-scale tones. A 16-bit image has over 65K shades of gray, whereas an 8-bit image has 256 shades of gray. To check bits in Fiji, go to Image>Type. Here we see 16-bit is checked for an original image plane.
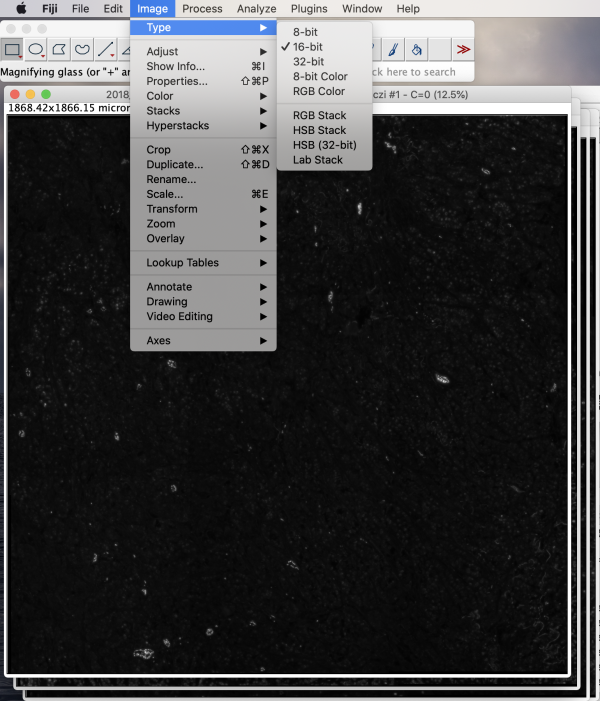
To convert to 8-bit, select Image>Type>8-bit. The conversion increases contrast on the screen and reduces the final file size roughly by half. Save as TIFF by selecting File>Save As>Tiff.

The resulting file is a multi-stack TIFF. We can confirm this when we load the file into Loupe for manual alignment in section 6.
Splitting and restacking channels and reducing bits are optional steps in converting a CZI image to TIFF. We include the steps for illustration. We can skip restacking by deselecting Split Channels in the import options then continuing with choosing a resolution.
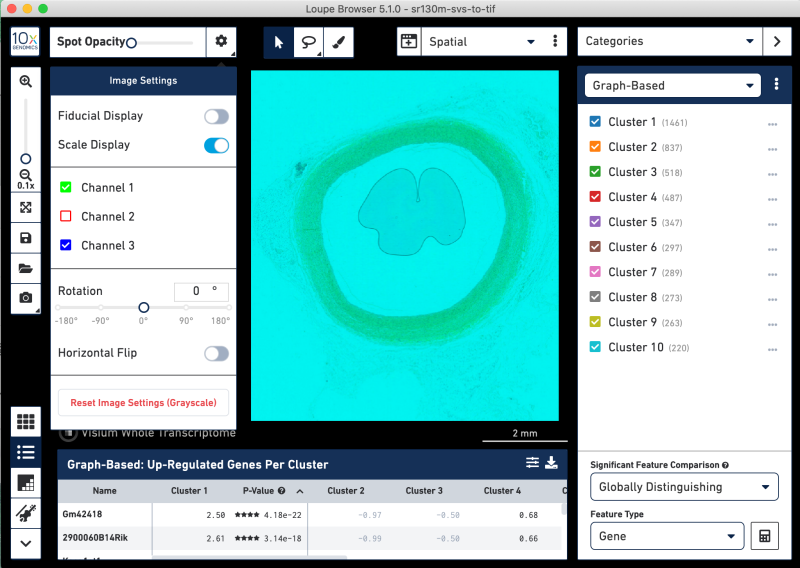
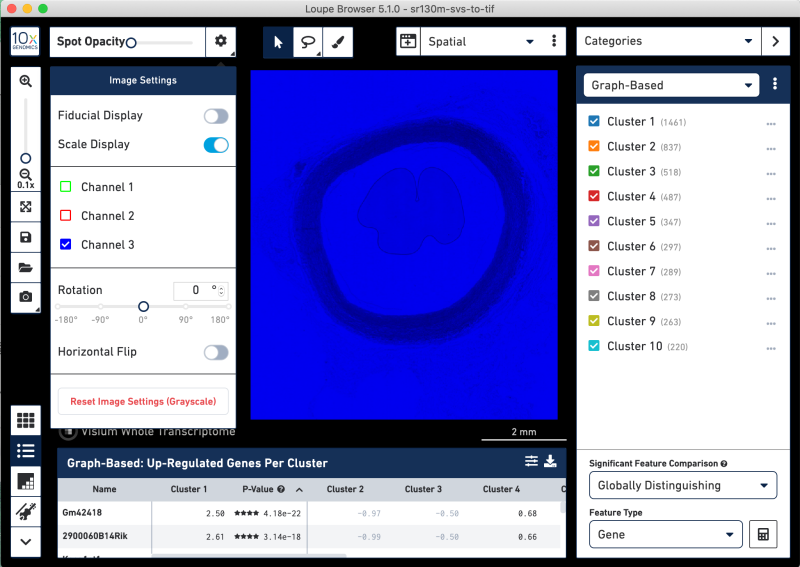
If we apply the instructions in 4 on the SVS format image and run through the testing, we see something strange in the color layers in Loupe. The overlay shows an unexpected color, in our case, seafoam green.
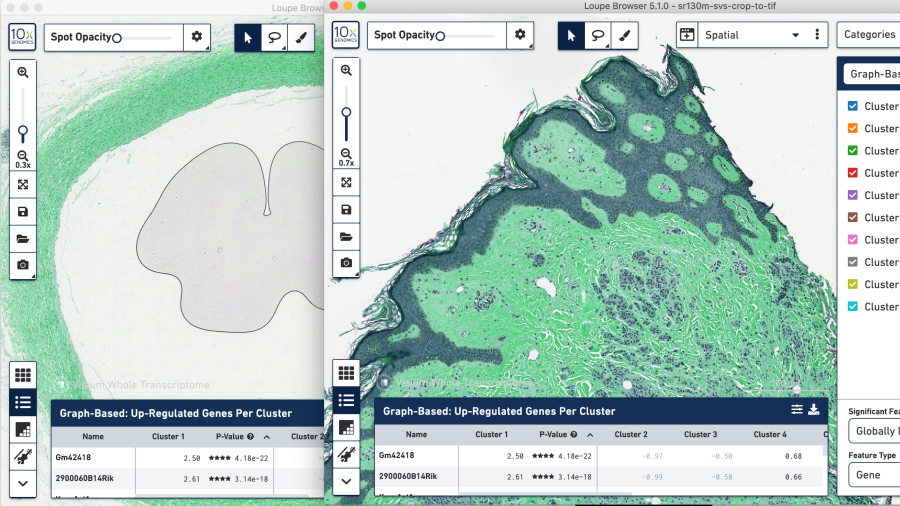
Toggling the channel layers reveals undesirable hue saturation in the layers. These images are not useful in correlating tissue features to gene expression. This suggests the SVS format image splits on hues.
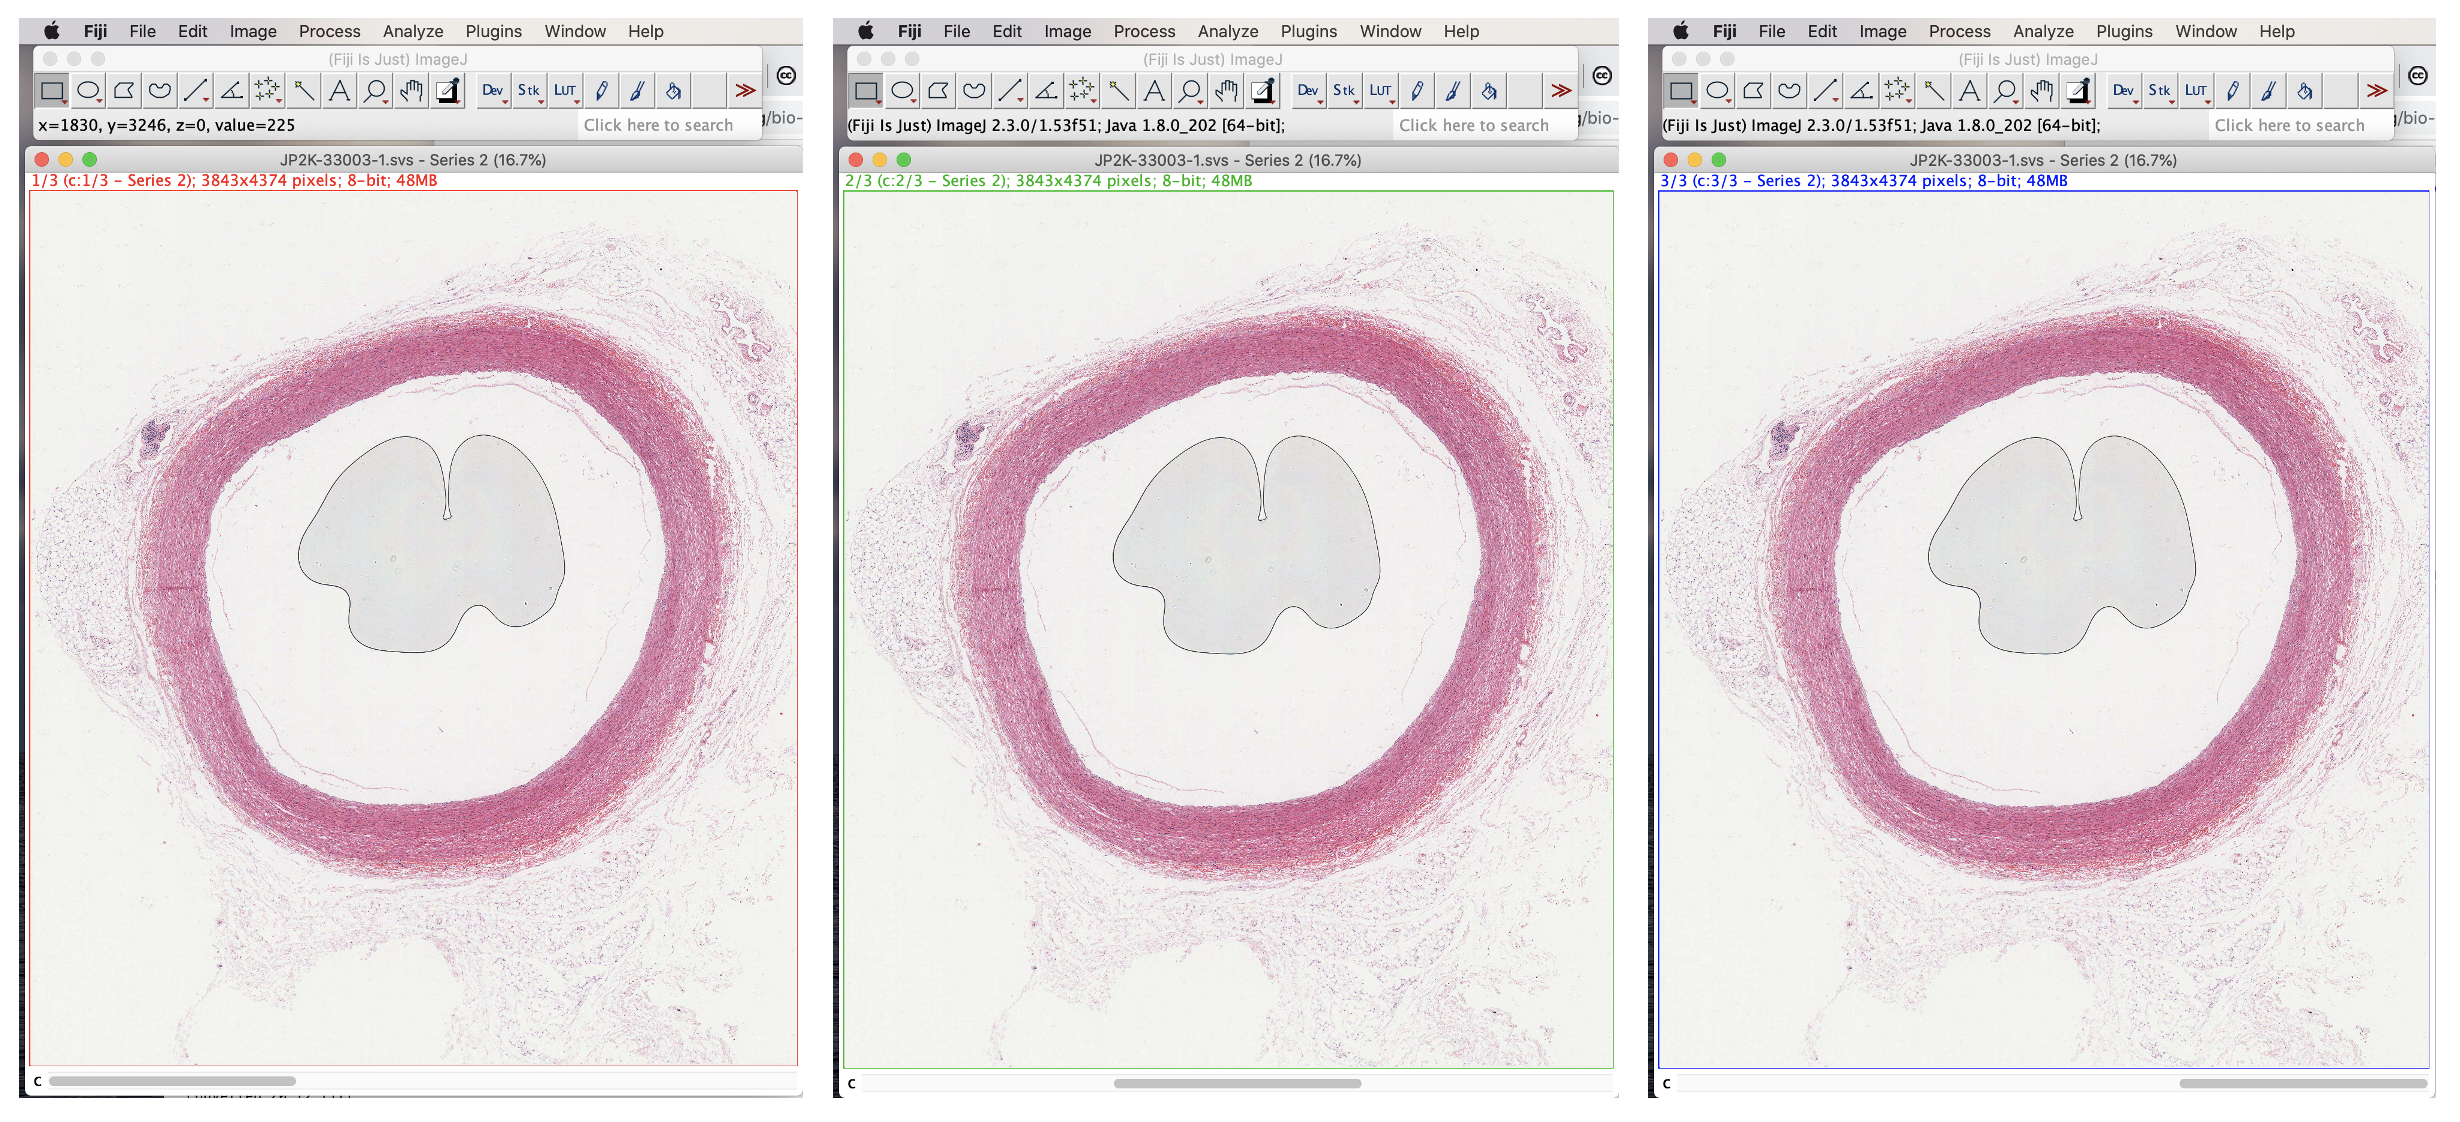
In cases where the layers are better as a composite, import the tissue image into Fiji without any splitting into separate windows. Below all of the Split options are unchecked. You might need to uncheck the Split focal planes options, which may be toggled on by default.
Fiji stalls on opening the highest resolution Series 1. This is the case even after we increase Fiji’s memory allocation in Edit>Options>Memory & Threads. Continue with the next highest resolution Series 2.
The image opens in a single window with seemingly three identical stacks viewable via the horizontal scrollbar.
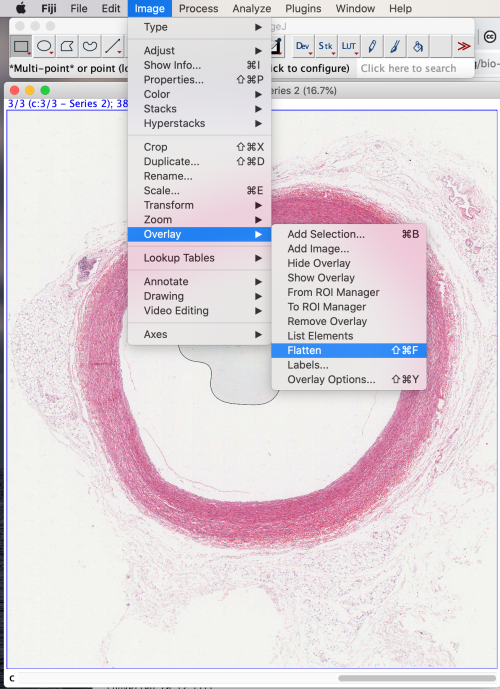
To convert to a single image, select Image>Overlay>Flatten.
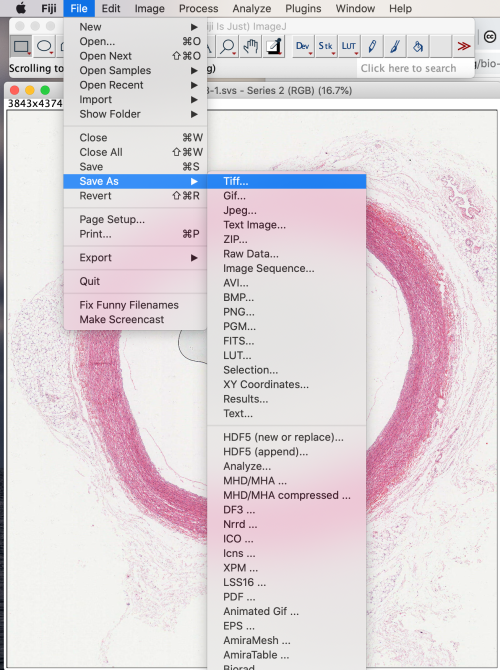
Save using File>Save As>Tiff.
Then follow directions in sections 6 and 7 to test the converted image in Space Ranger.
Loupe Browser is a desktop visual data exploration tool downloadable from /support/software/space-ranger/downloads. Launch the application. At the bottom of the initial panel is the option for Visium Image Alignment, which is detailed at /support/software/space-ranger/latest/analysis/inputs/manual-alignment. Open the wizard.
Load the converted TIFF image and select the option for no slide serial number and no slide layout file. On the next view, at top you should see a dropdown menu labeled Page. Clicking this shows four layers as expected.
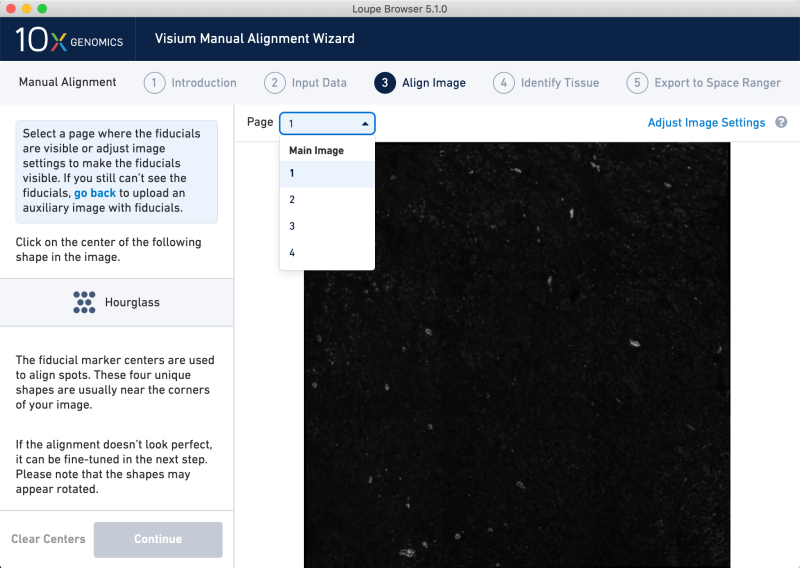
In the main image view, click on the four corners clockwise from the upper left. This imposes a mock fiducial frame on the image, which does not originate from a Visium slide.
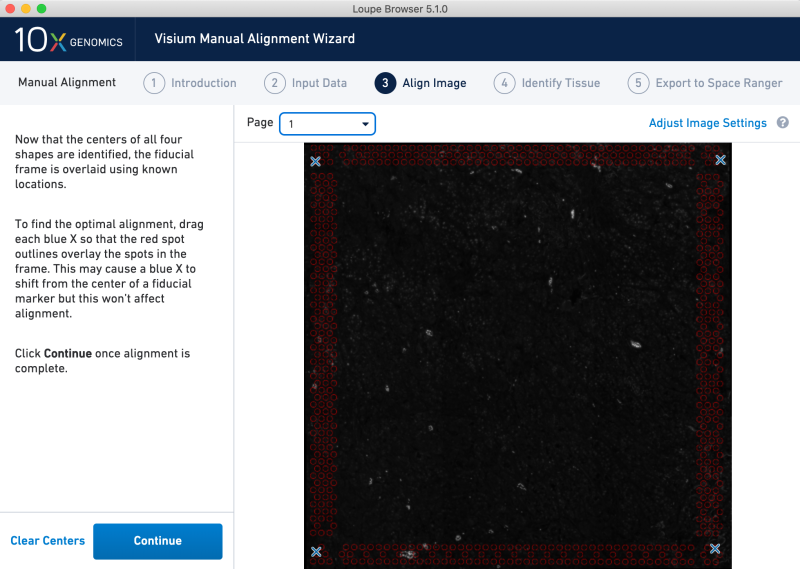
Next, lasso the entirety of the capture area spots, label as tissue and export the manual alignment. We recommend naming the alignment JSON file exactly as the image file. We will use this file with Space Ranger in the next section.
For this illustration, we use Space Ranger v1.3.0. The latest version of the software is downloadable from /support/software/space-ranger/downloads. We use reads and a reference available within the Space Ranger package that the testrun function, described on the installation page, uses with --id=tiny.
For the CSI-to-TIF image, supply the newly converted TIFF using the --darkimage option and the manual alignment file with the --loupe-alignment option.
spaceranger-1.3.1/spaceranger count \
--id=sr131-czi-to-tif \
--transcriptome=spaceranger-1.3.1/external/spaceranger_tiny_ref/1.0.0 \
--fastqs=spaceranger-1.3.1/external/spaceranger_tiny_inputs/fastqs \
--unknown-slide \
--localcores=8 \
--localmem=64 \
--darkimage=example-1735.czi.1.8bit.tif \
--loupe-alignment=example-1735.czi.1.8bit.tif.json
For the SVS-to-TIFF image, use the Brightfield `--image` option to supply the image to Space Ranger.
spaceranger-1.3.1/spaceranger count \
--id=sr131-svs-to-tif \
--transcriptome=spaceranger-1.3.1/external/spaceranger_tiny_ref/1.0.0 \
--fastqs=spaceranger-1.3.1/external/spaceranger_tiny_inputs/fastqs \
--unknown-slide \
--localcores=8 \
--localmem=64 \
--image=example-33003-1.svs.series2.tif \
--loupe-alignment=example-33003-1.svs.series2.tif.json
Each run should complete within approximately two minutes.
Note --image, --darkimage and colorizedimage options specify different image types. For a description of parameters see /support/software/space-ranger/latest/analysis/running-pipelines/space-ranger-count#args. Briefly:
--imageis for brightfield TIFF or JPG images--darkimageis for multi-channel, dark-background images either in single or multi-stack TIFF or JPG format. It is possible to specify --darkimage multiple times.--colorizedimageis for flattened colorized fluorescent images.
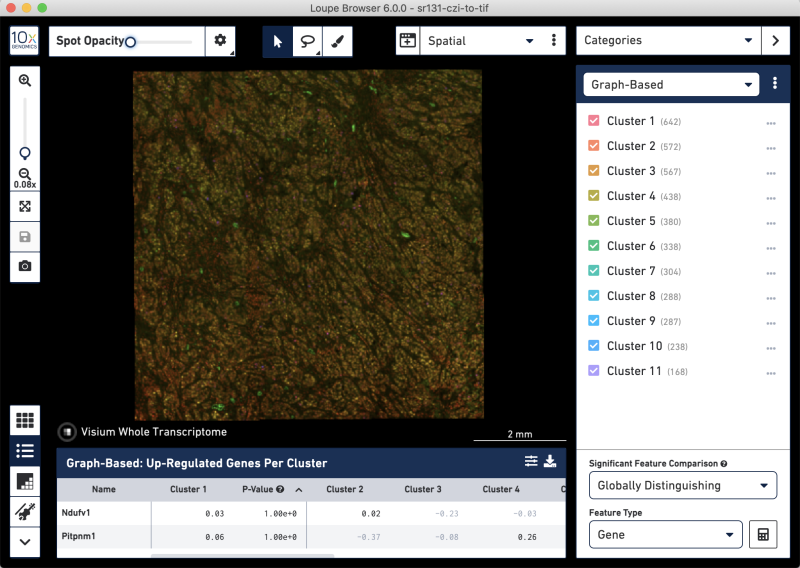
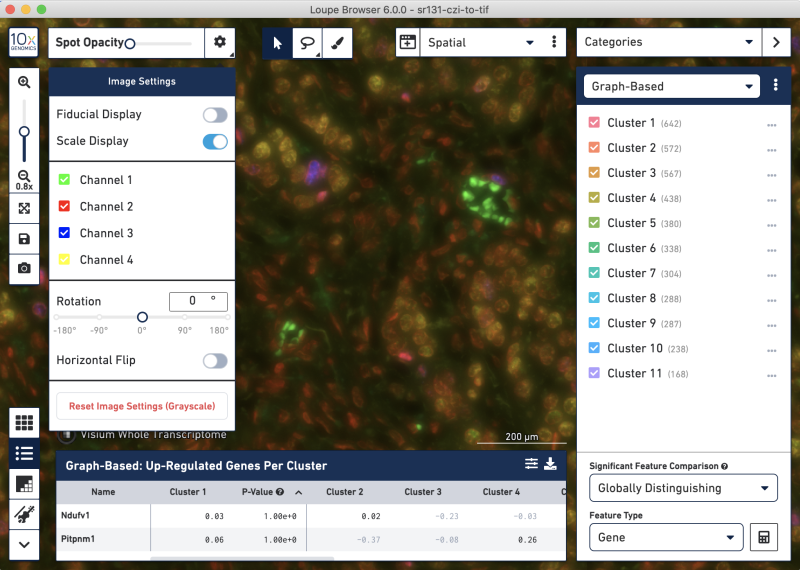
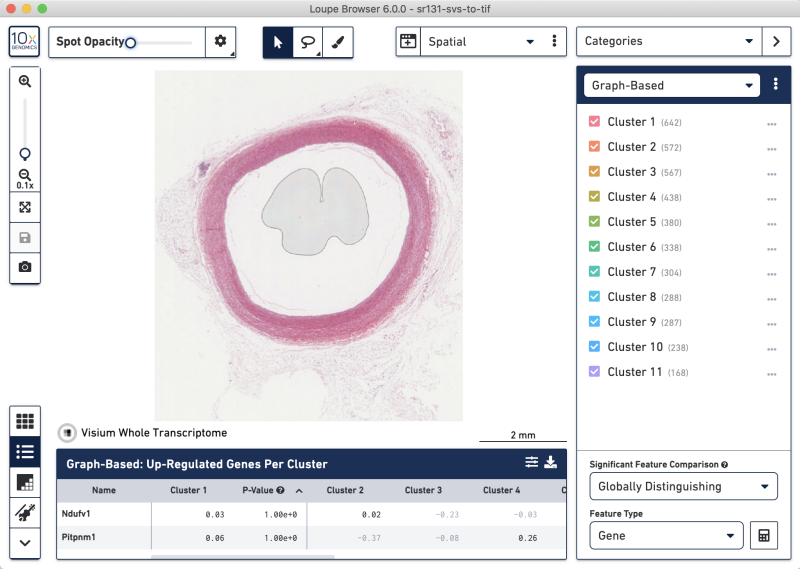
The resulting web summary report and loupe file display features of interest. Below we show screenshots of the Loupe Browser display.
CZI-to-TIF whole-tissue view
CZI-to-TIF Loupe image settings panel and zoomed-in tissue view
SVS-to-TIFF whole-tissue view
SVS-to-TIFF zoomed-in tissue view
