The Xenium In Situ workflow is non-destructive, which enables post-Xenium Analyzer staining and imaging on the same tissue section. Hematoxylin & Eosin (H&E) images can be imported and aligned to the original DAPI-stained image in Xenium Explorer v1.2 and later. In v1.3 and later, immunofluorescence (IF) images can be imported and aligned to the original DAPI-stained image (XE v2.0 and later supports importing images with >six channels and displays up to six channels at once).
Xenium Explorer provides three methods for viewing post-Xenium H&E and IF images:
- Learn how to align a post-Xenium Analyzer image in Xenium Explorer using manual landmark selection.
- Learn how to upload an image alignment file to view the aligned image (i.e., if the image has already been aligned in Xenium Explorer).
- Learn how to add an image that has been aligned with a community-developed tool.
The image format must be a pyramidal, tiled OME-TIFF to be compatible with Xenium Explorer. If you need to convert the image file, start with the image file conversion tutorial.
Once the H&E or IF image is in an ome.tif format, you can open the dataset in Xenium Explorer (see Getting Started tutorial for guidance) and proceed to import and alignment options described below.
Option 1: To follow along with example steps for aligning the image in Xenium Explorer, download the Xenium Onboard Analysis (XOA) output bundle and an OME-TIFF-formatted H&E image from this human pancreatic cancer dataset. This file is already converted to OME-TIFF format (see file conversion tutorial if your post-Xenium file needs to be converted).
# Example curl command to download files
# Post-Xenium H&E image in OME-TIFF format
curl -O https://cf.10xgenomics.com/samples/xenium/1.6.0/Xenium_V1_hPancreas_Cancer_Add_on_FFPE/Xenium_V1_hPancreas_Cancer_Add_on_FFPE_he_image.ome.tif
# Output Files (this is the Xenium Explorer subset)
curl -O https://cf.10xgenomics.com/samples/xenium/1.6.0/Xenium_V1_hPancreas_Cancer_Add_on_FFPE/Xenium_V1_hPancreas_Cancer_Add_on_FFPE_xe_outs.zip
Option 2: To follow the steps for using an existing image alignment file, download these files for the H&E and IF post-Xenium images from the same human pancreas dataset as above:
# Example curl command to download files
# Post-Xenium H&E image in OME-TIFF format and alignment matrix
curl -O https://cf.10xgenomics.com/samples/xenium/1.6.0/Xenium_V1_hPancreas_Cancer_Add_on_FFPE/Xenium_V1_hPancreas_Cancer_Add_on_FFPE_he_image.ome.tif
curl -O https://cf.10xgenomics.com/samples/xenium/1.6.0/Xenium_V1_hPancreas_Cancer_Add_on_FFPE/Xenium_V1_hPancreas_Cancer_Add_on_FFPE_he_imagealignment.csv
# Post-Xenium IF image in OME-TIFF format and alignment matrix
curl -O https://cf.10xgenomics.com/samples/xenium/1.6.0/Xenium_V1_hPancreas_Cancer_Add_on_FFPE/Xenium_V1_hPancreas_Cancer_Add_on_FFPE_if_image.ome.tif
curl -O https://cf.10xgenomics.com/samples/xenium/1.6.0/Xenium_V1_hPancreas_Cancer_Add_on_FFPE/Xenium_V1_hPancreas_Cancer_Add_on_FFPE_if_imagealignment.csv
# Output Files (this is the Xenium Explorer subset)
curl -O https://cf.10xgenomics.com/samples/xenium/1.6.0/Xenium_V1_hPancreas_Cancer_Add_on_FFPE/Xenium_V1_hPancreas_Cancer_Add_on_FFPE_xe_outs.zip
Option 3: To follow the steps for adding an image that has been aligned with a community-developed tool, download the supplemental aligned H&E image and XOA files from this public dataset: FFPE Human Breast with Pre-designed Panel.
# Example curl commands to download file
# Post-Xenium aligned H&E image in OME-TIFF format
curl -O https://cf.10xgenomics.com/samples/xenium/1.0.2/Xenium_V1_FFPE_Human_Breast_IDC/Xenium_V1_FFPE_Human_Breast_IDC_he_image.ome.tif
# Output Files
curl -O https://s3-us-west-2.amazonaws.com/10x.files/samples/xenium/1.0.2/Xenium_V1_FFPE_Human_Breast_IDC/Xenium_V1_FFPE_Human_Breast_IDC_outs.zip
Click through this demo of the image alignment workflow with data from the FFPE Human Ovarian Cancer with 5K Human Pan Tissue and Pathways Panel plus 100 Custom Genes dataset:
The image alignment workflow supports importing up to two additional images to the Image layer in a single Xenium Explorer window. For example, you can align post-Xenium H&E and IF images for the same section.
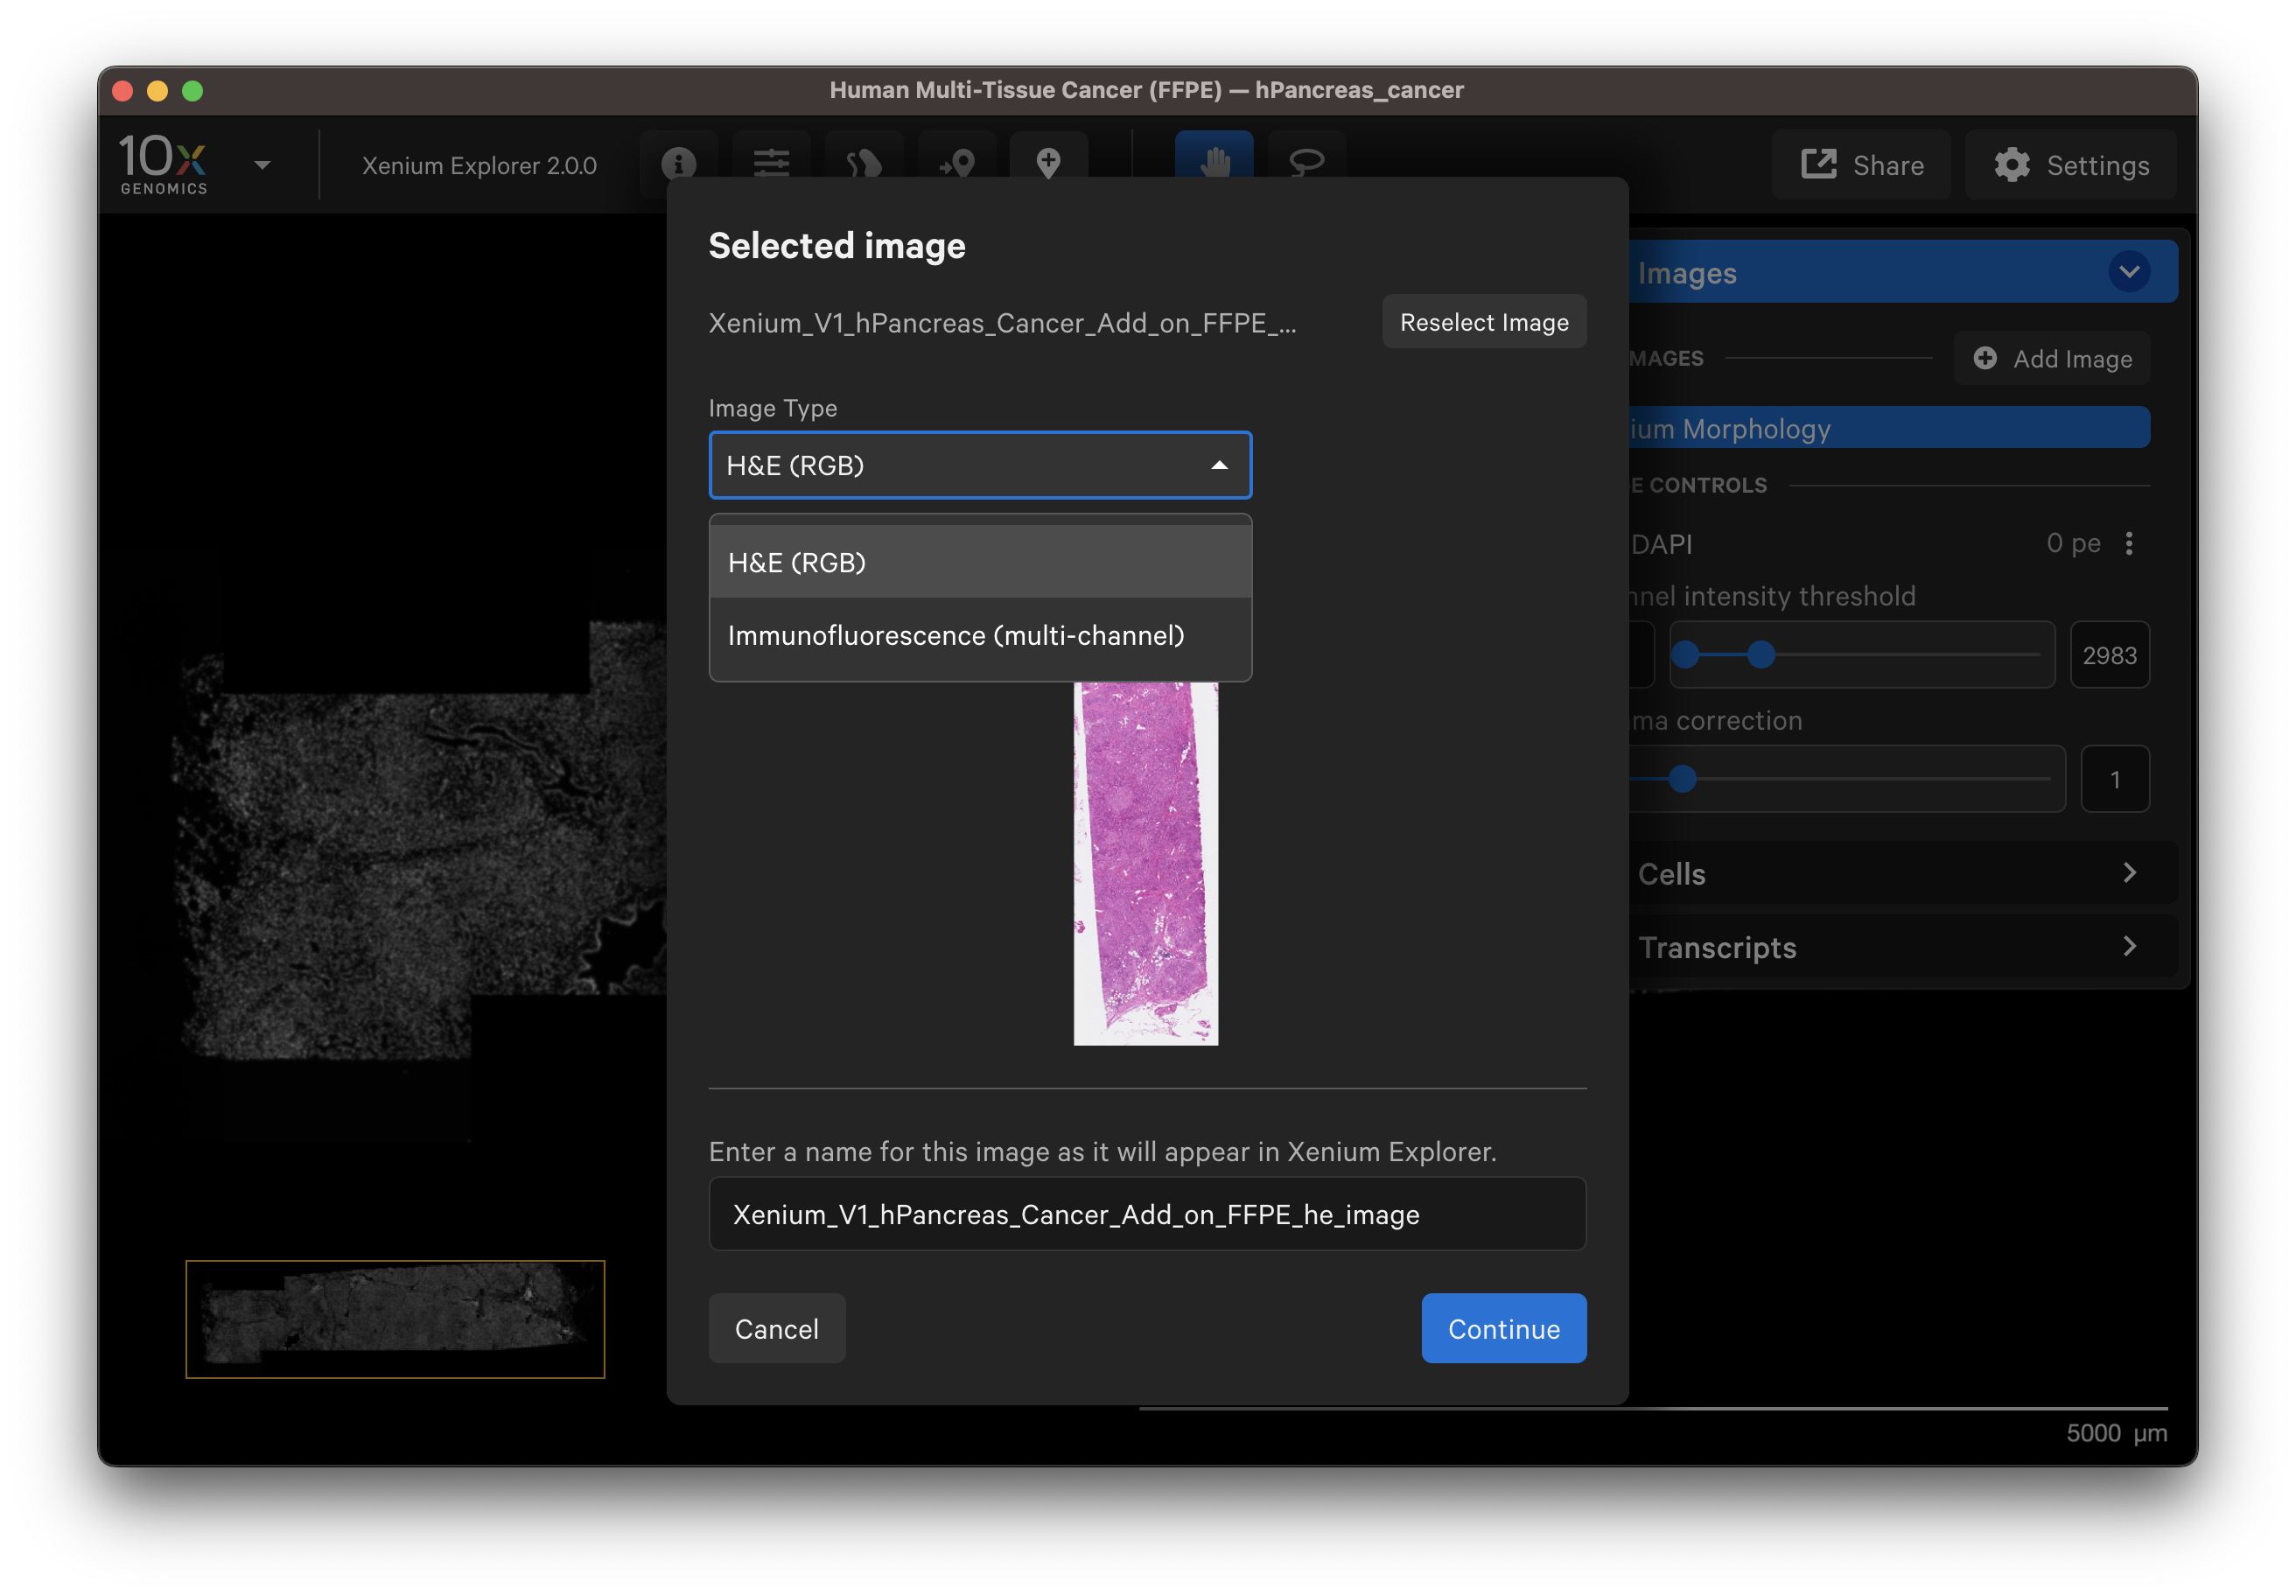
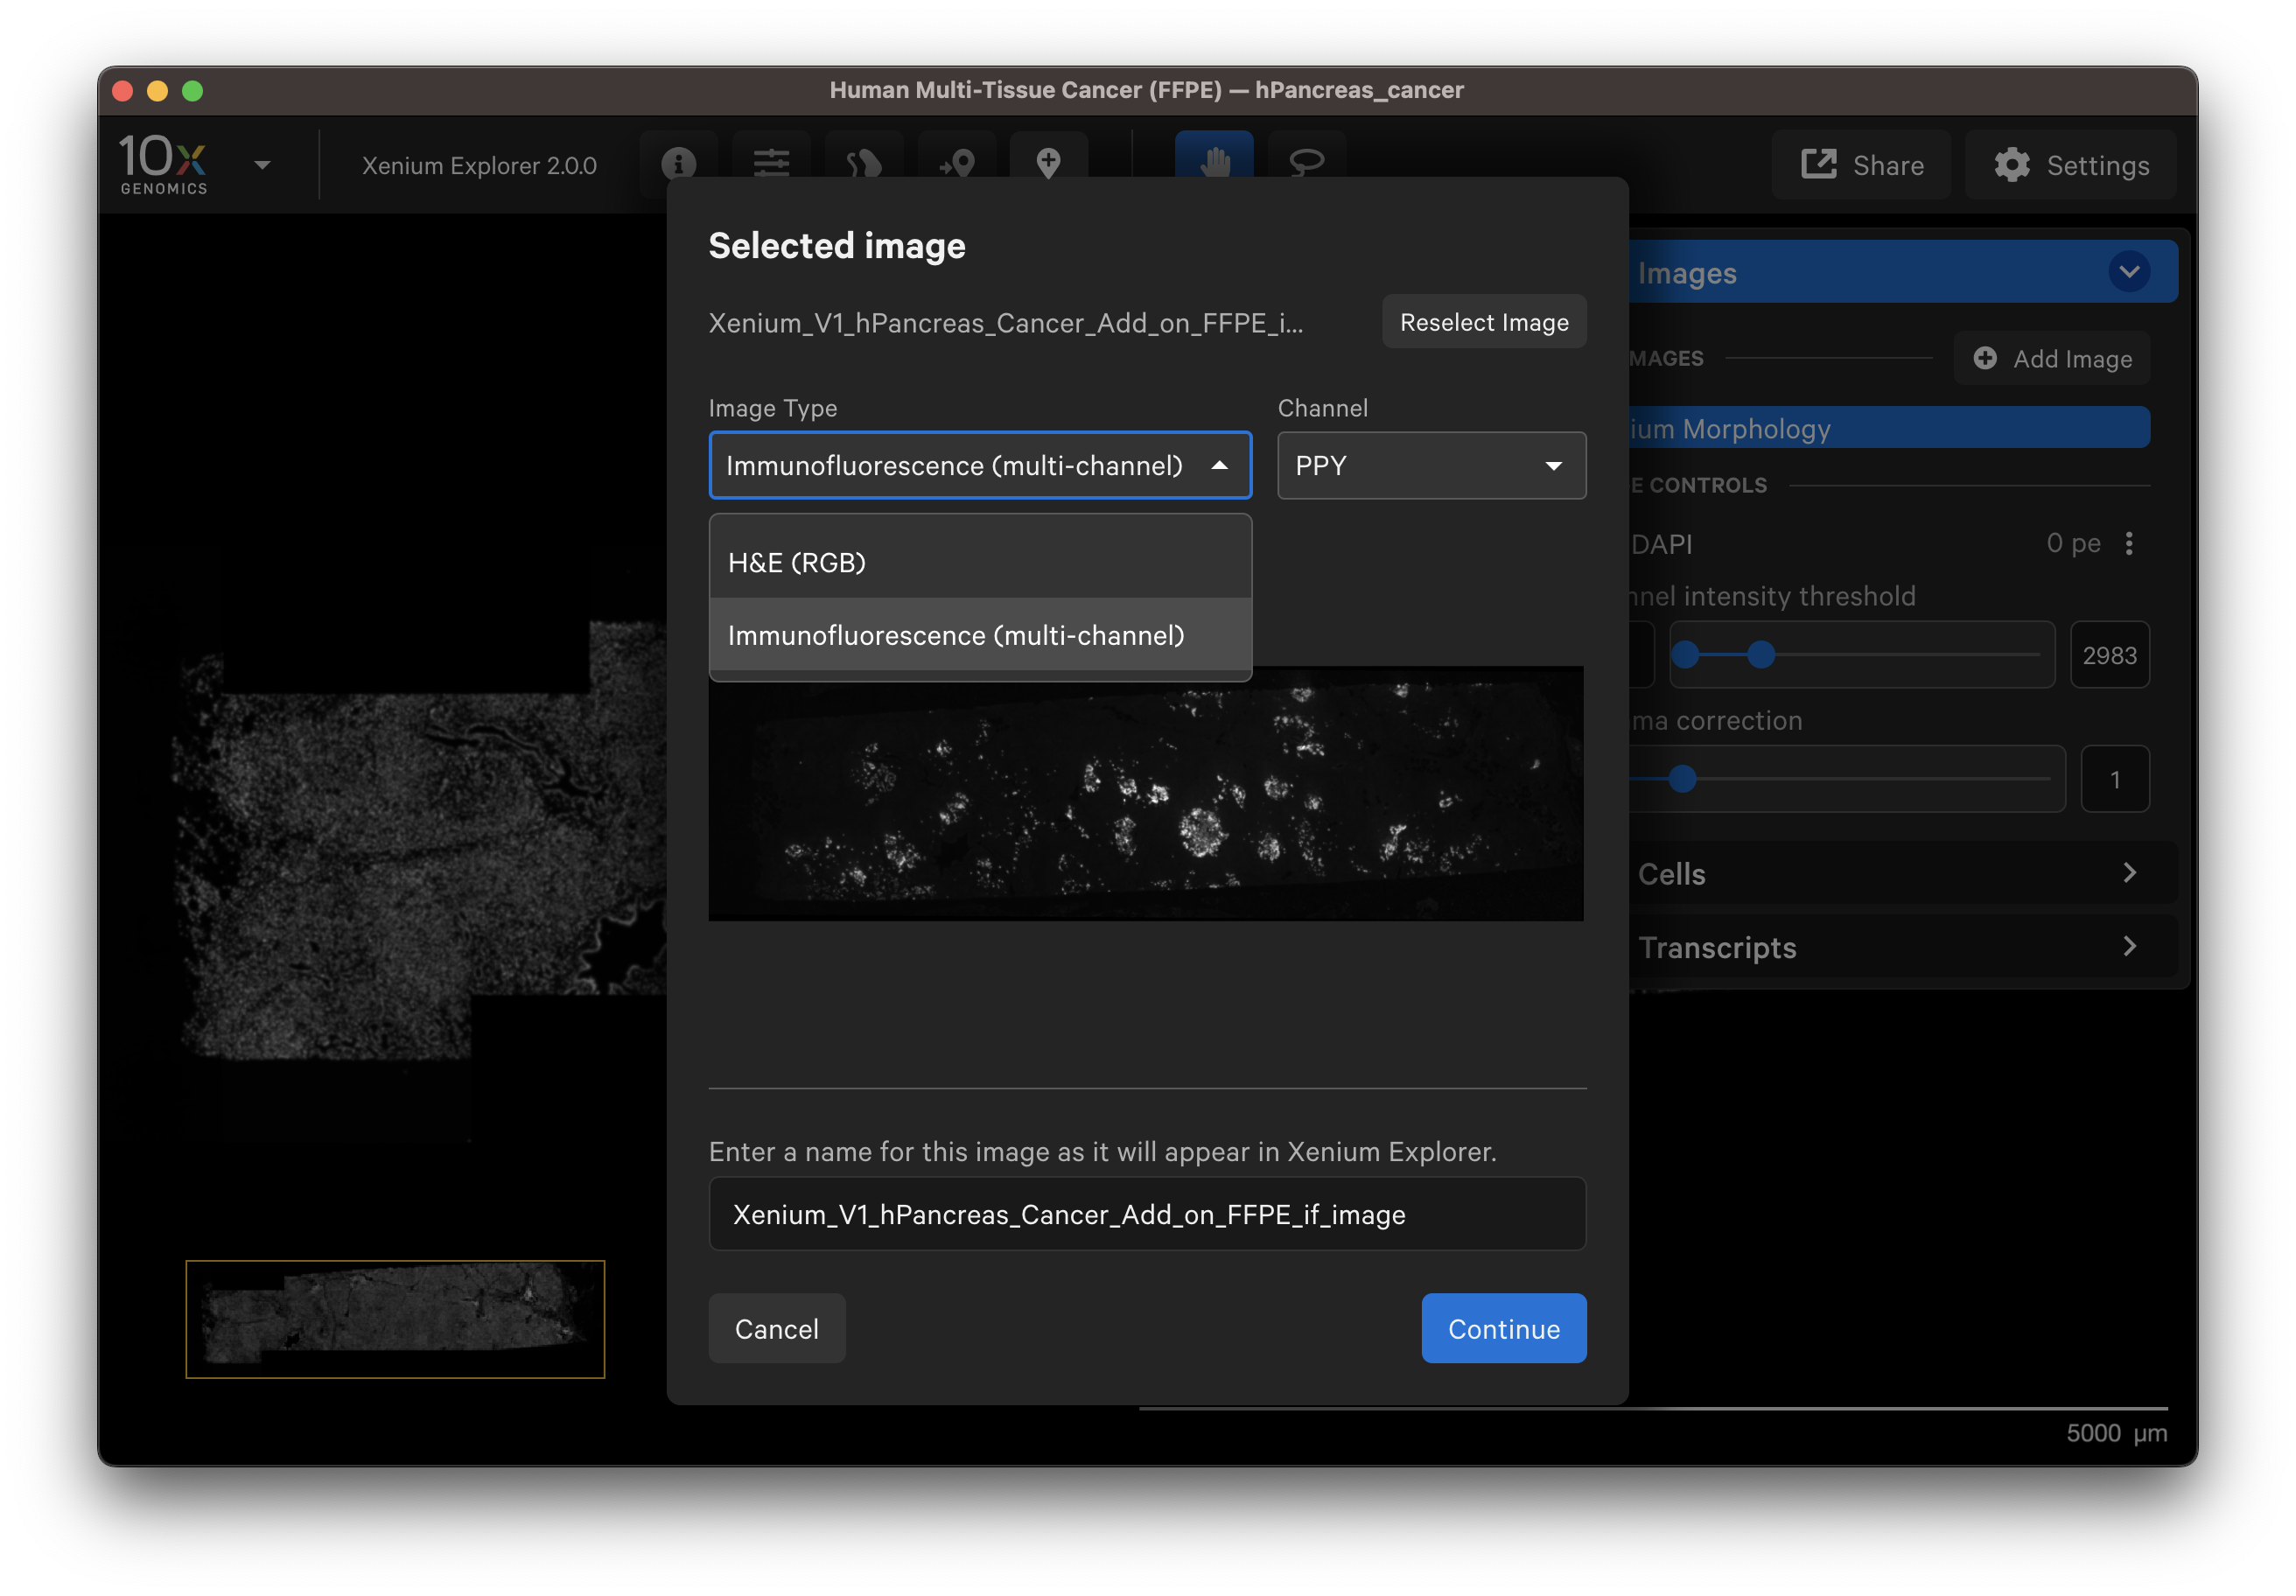
In the Image layer, click on Add image and select the OME-TIFF image file by clicking Import Image. Select the H&E image on your computer or shared network drive.
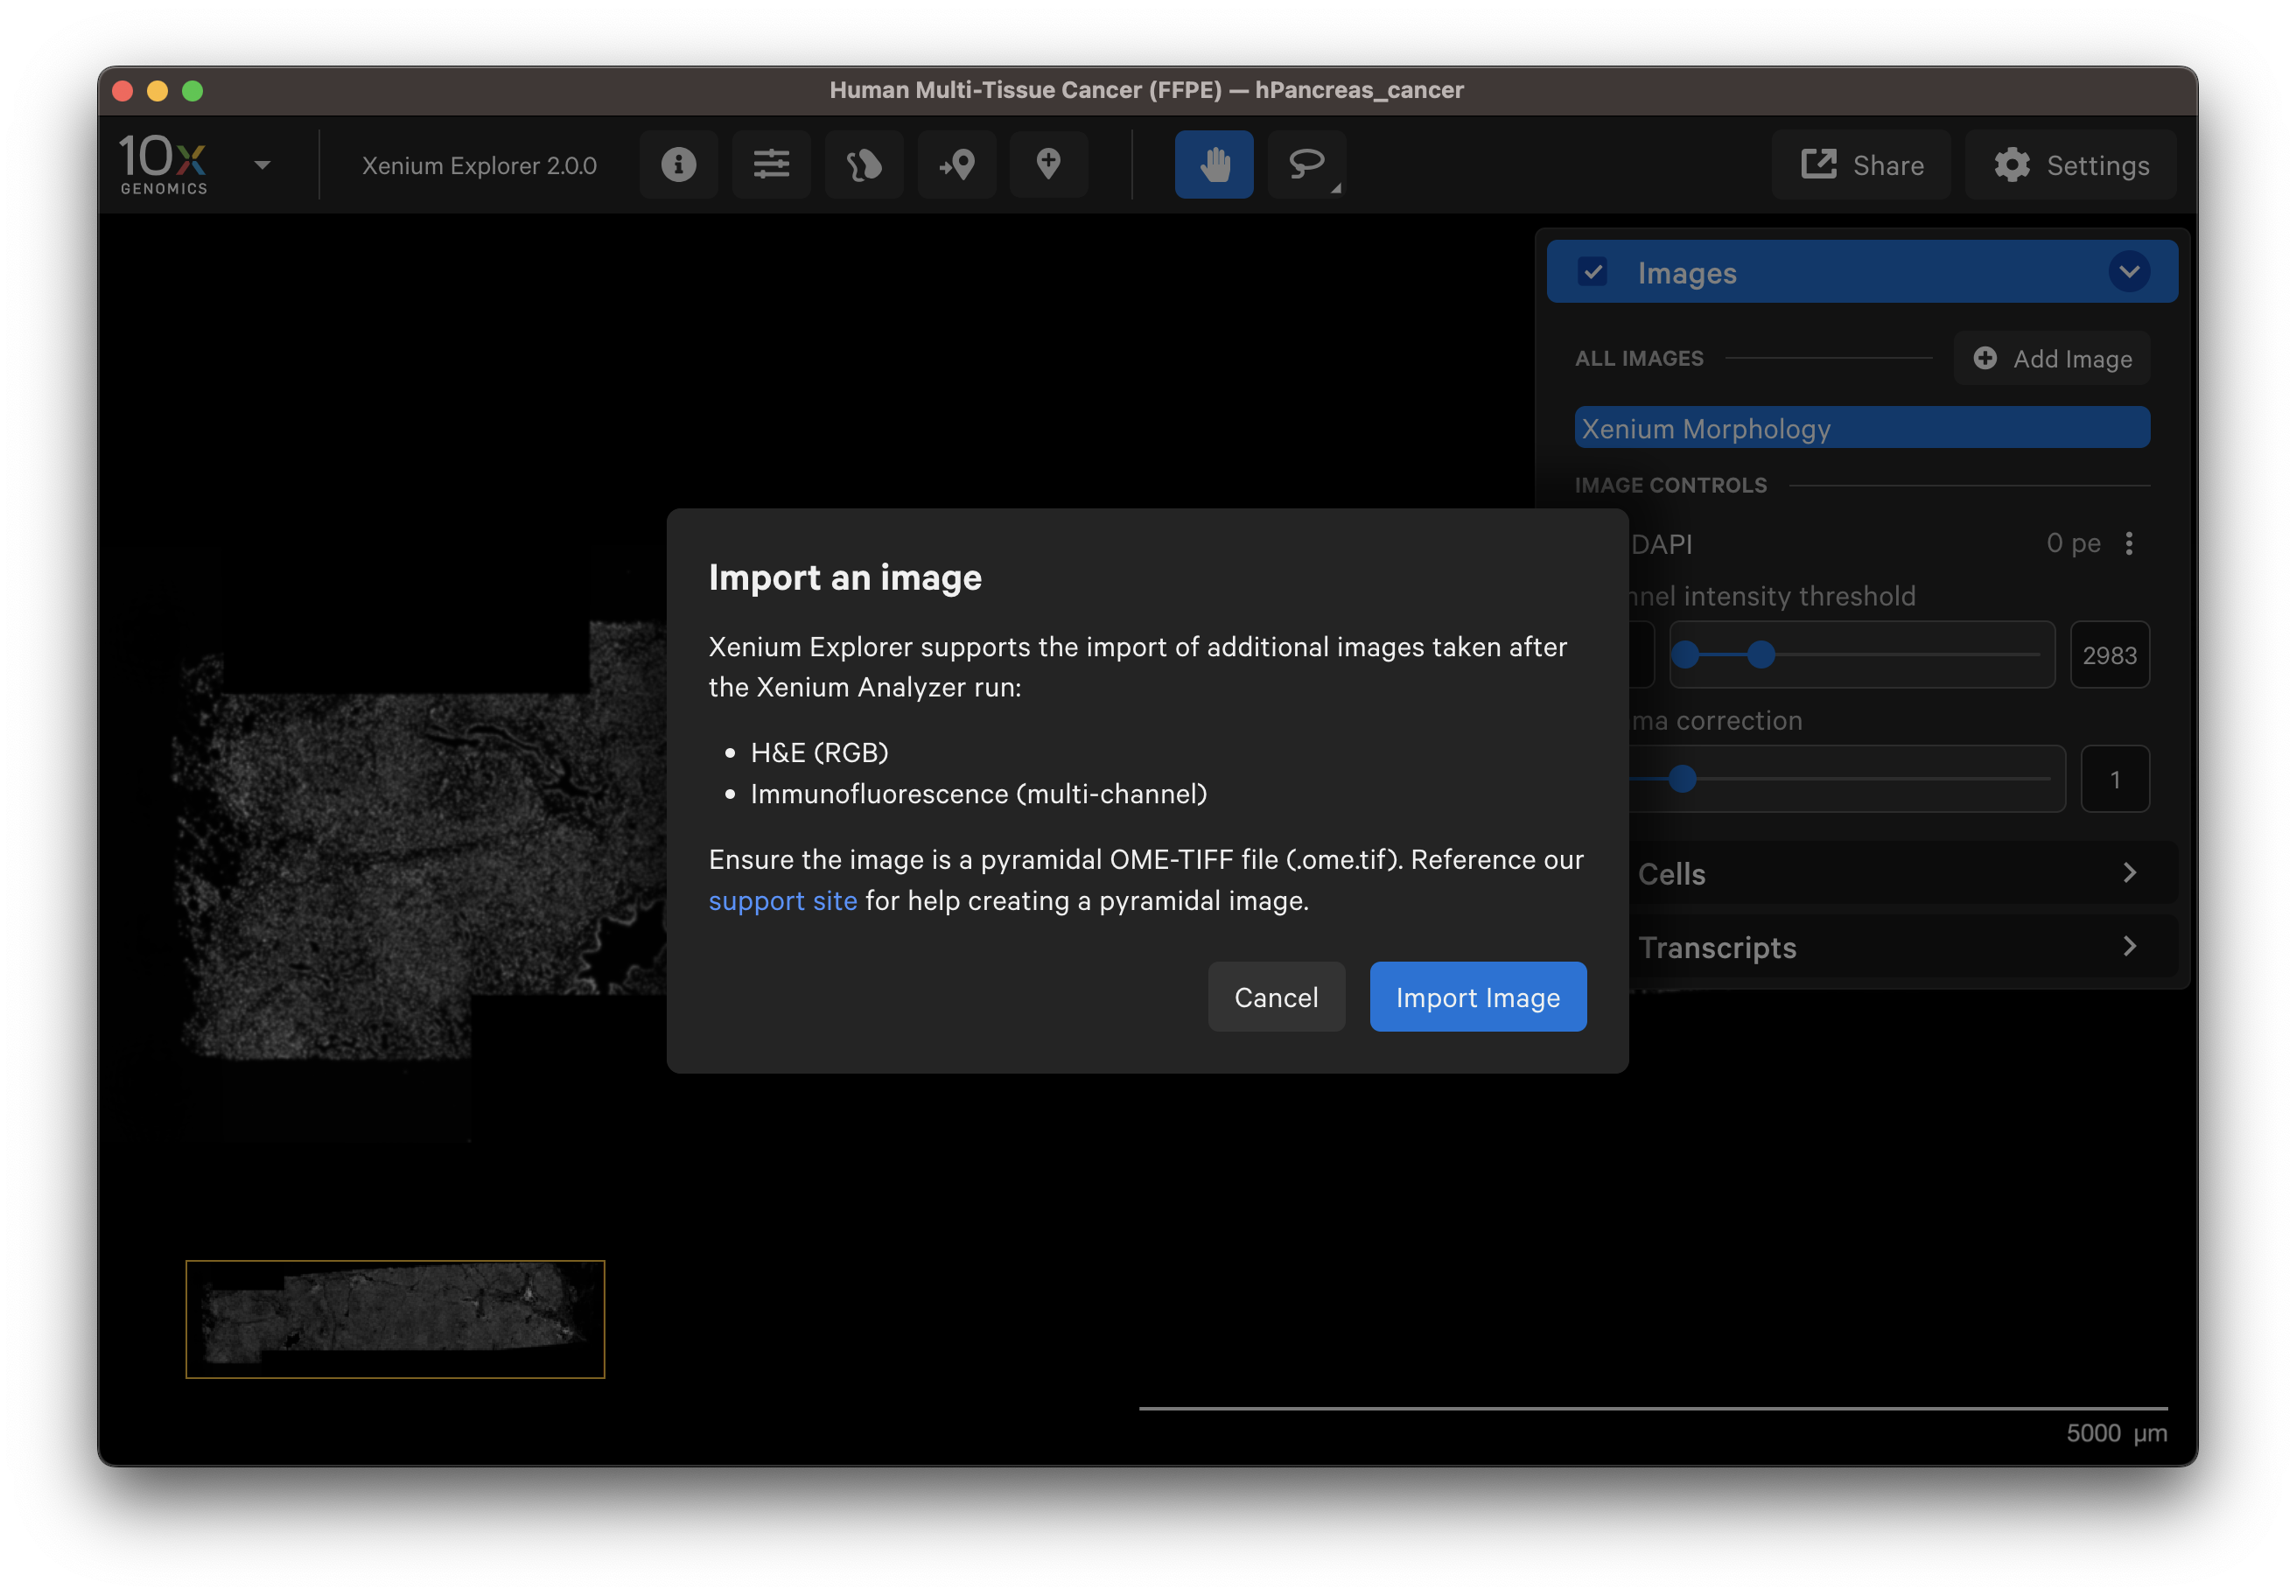
You should see a preview of the image. Please wait for images to load, it may take a few seconds depending on image size. Verify the selected image is correct. You can reselect another image or edit the image name in the dialog box to change how it is displayed in the UI.
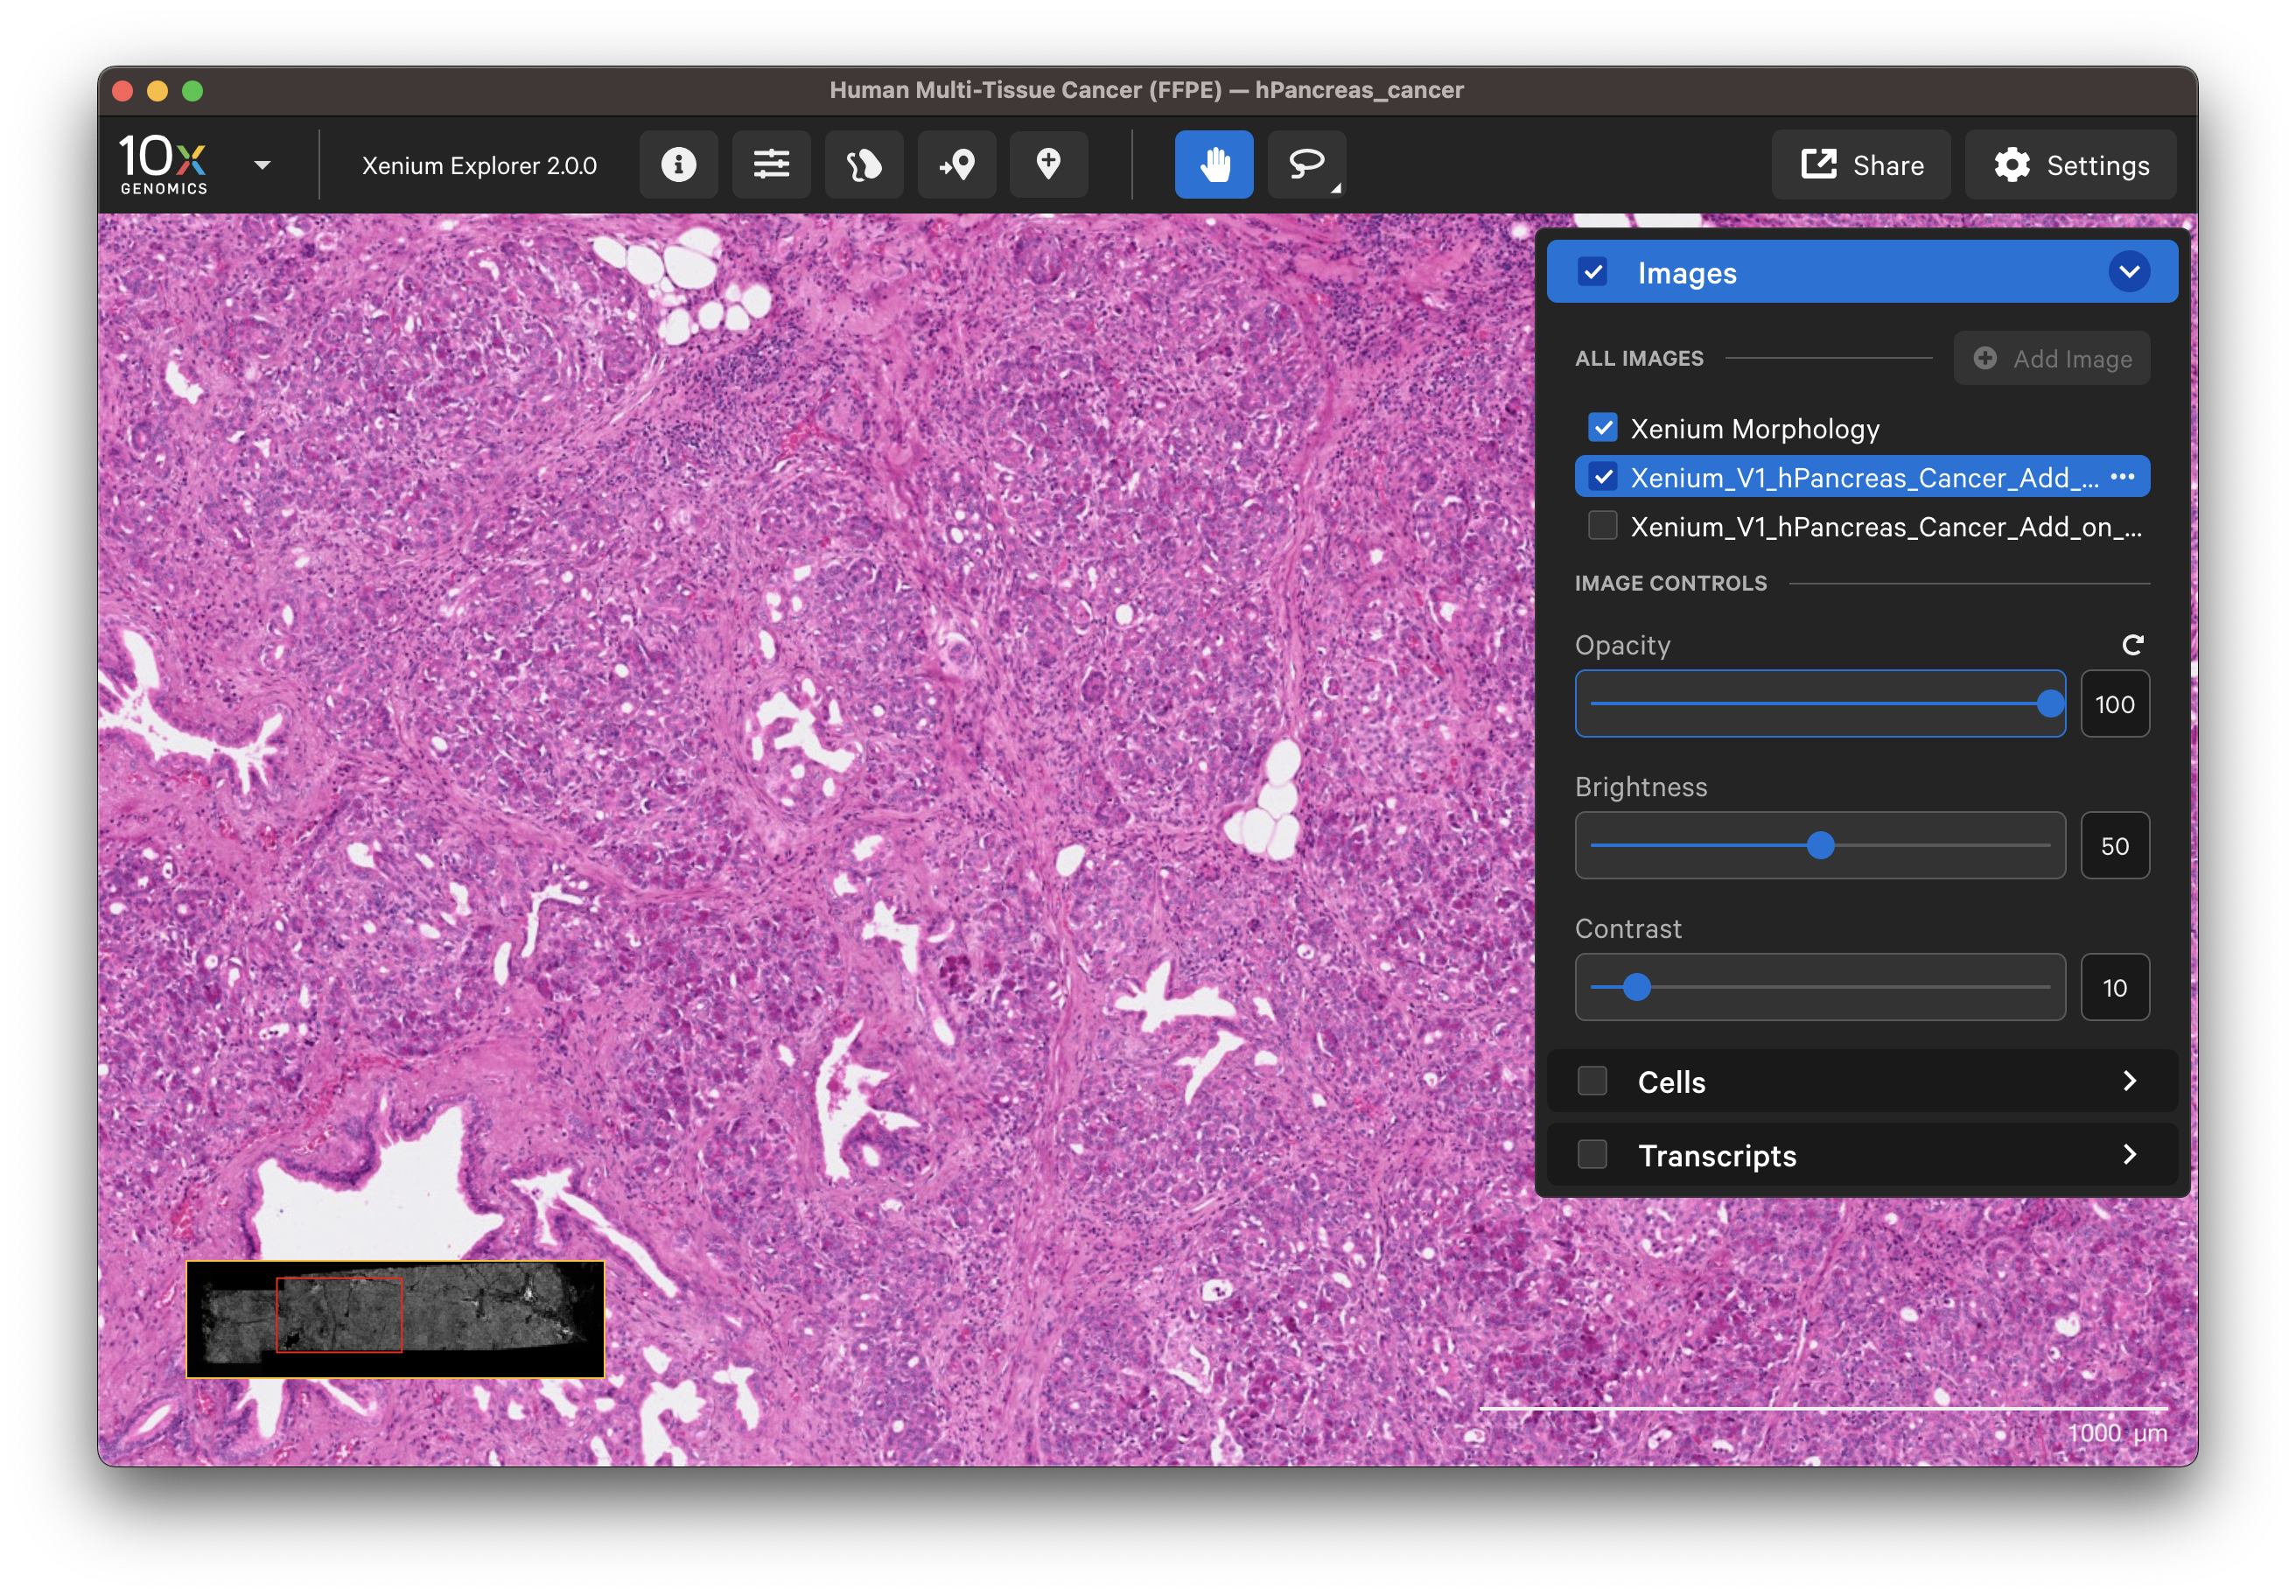
- Example H&E image selected.
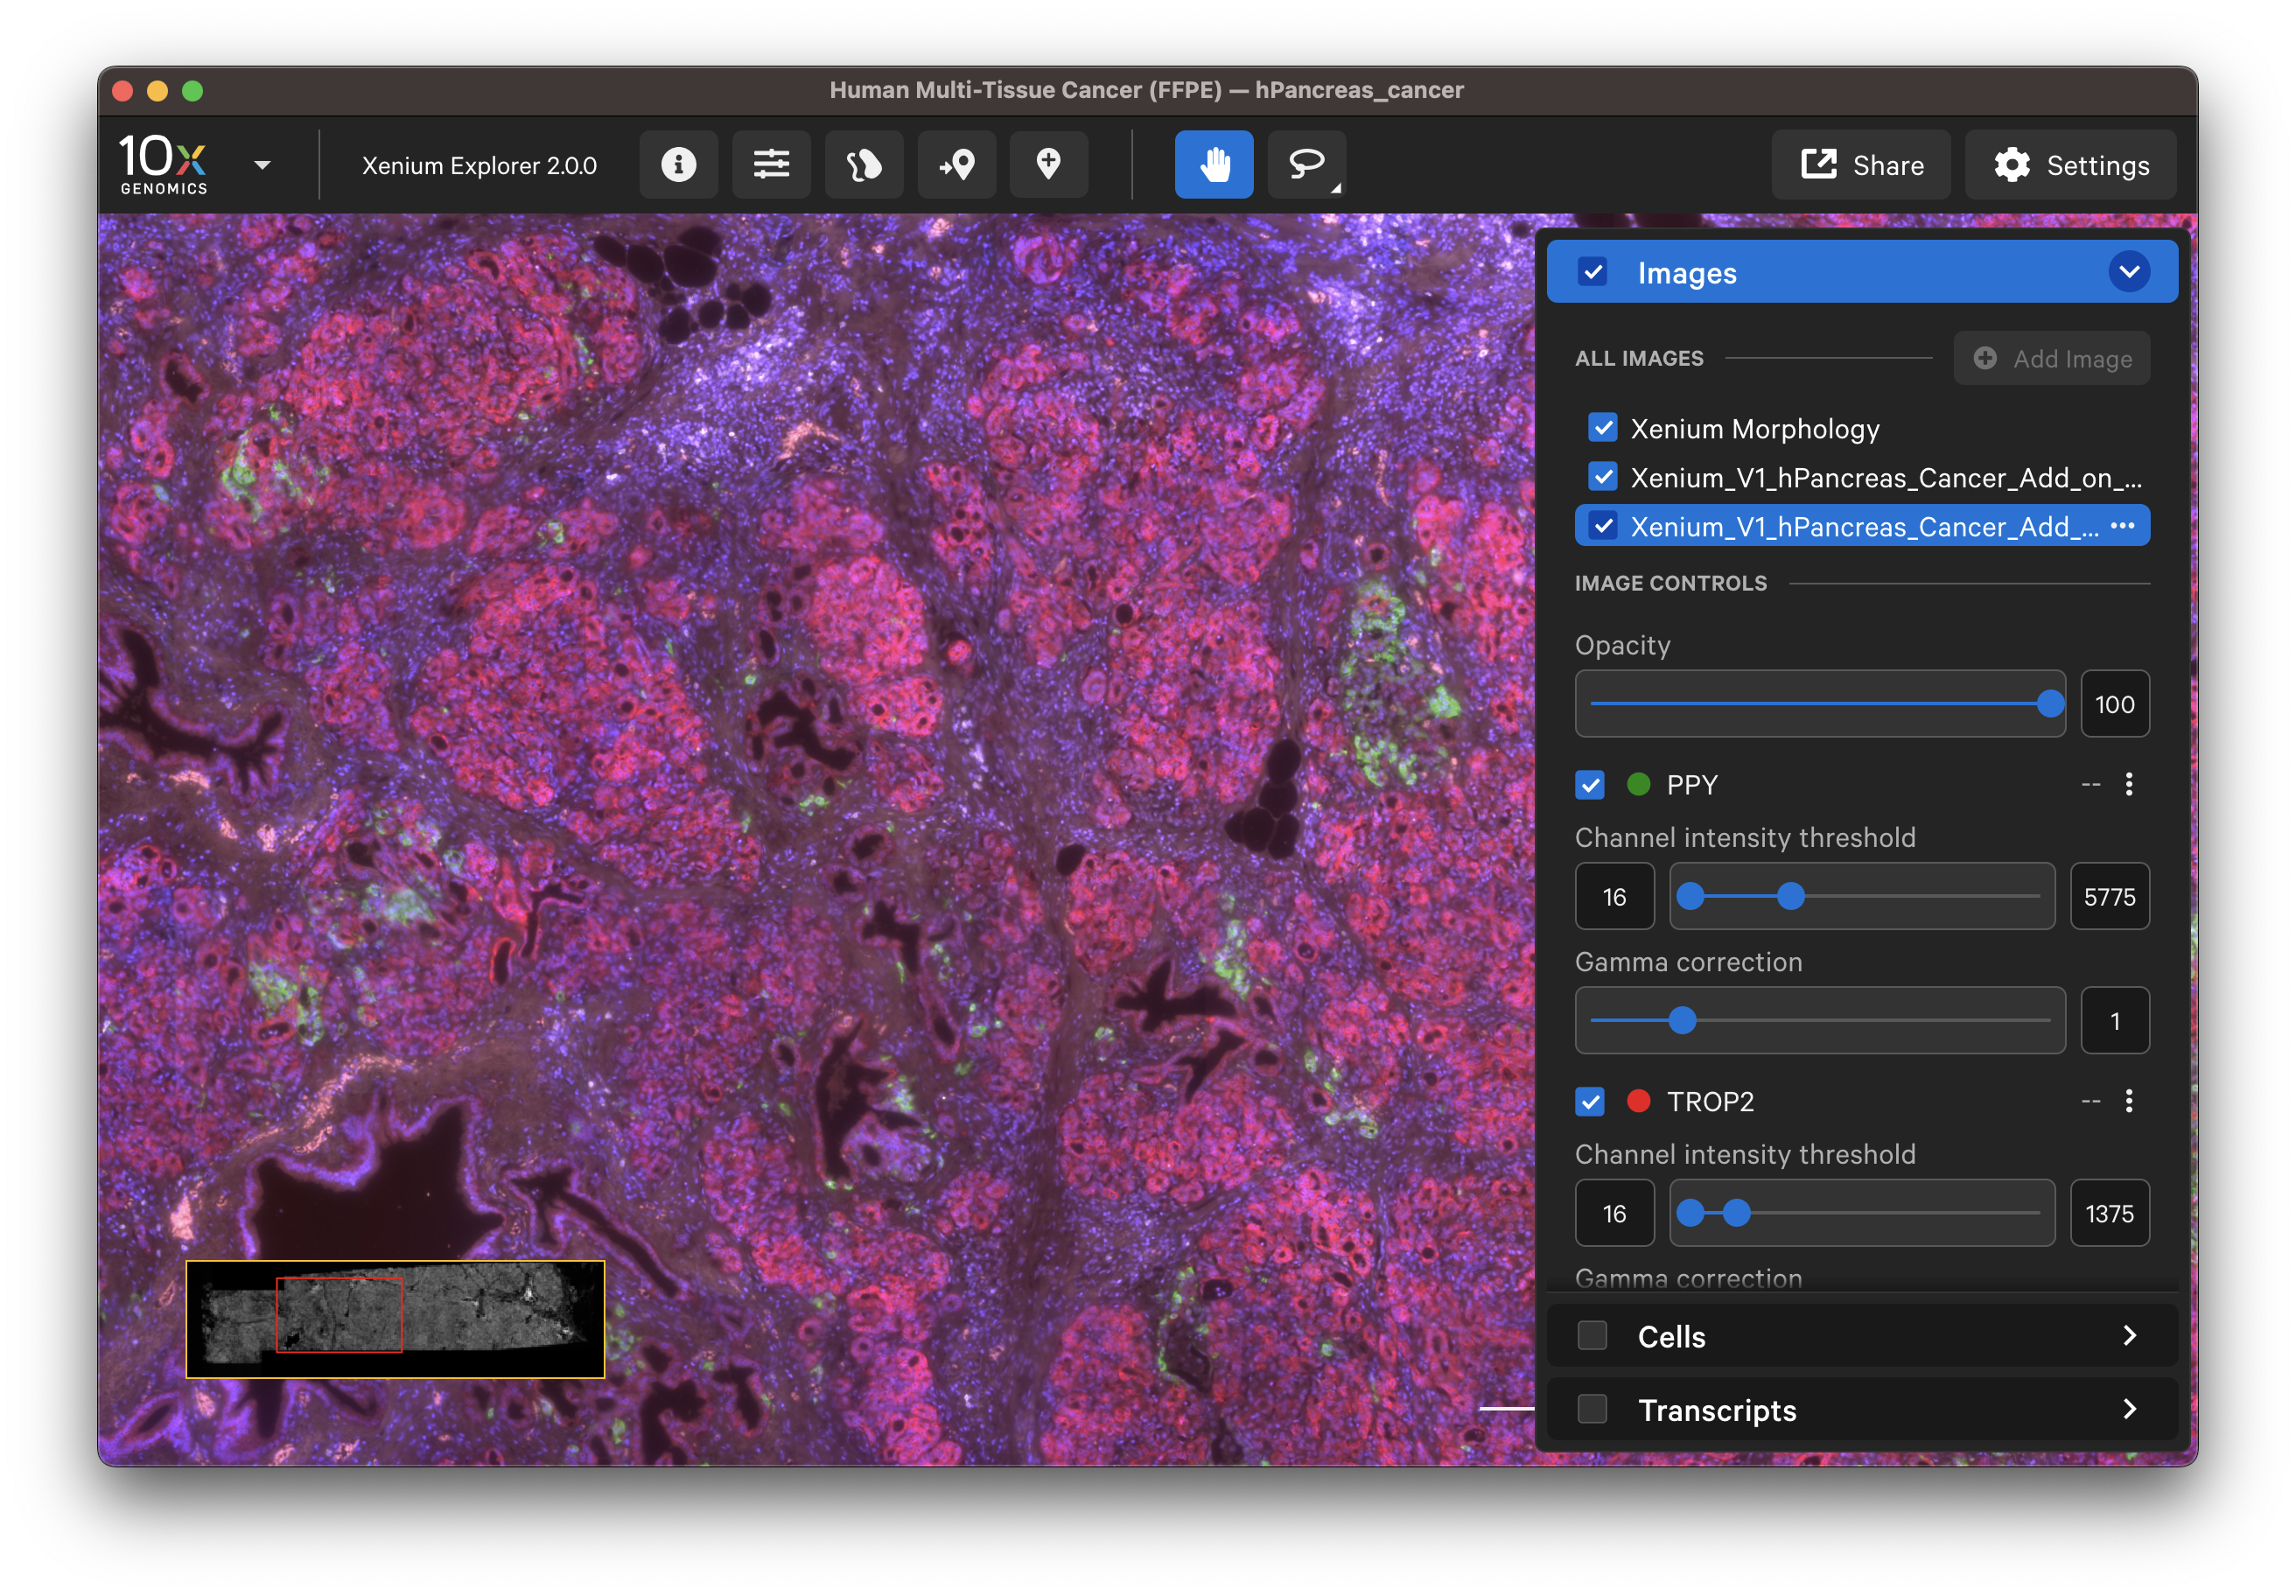
- Example IF image selected. You can check the different channel images with the dropdown layer.
Click Continue to view the image alignment options.
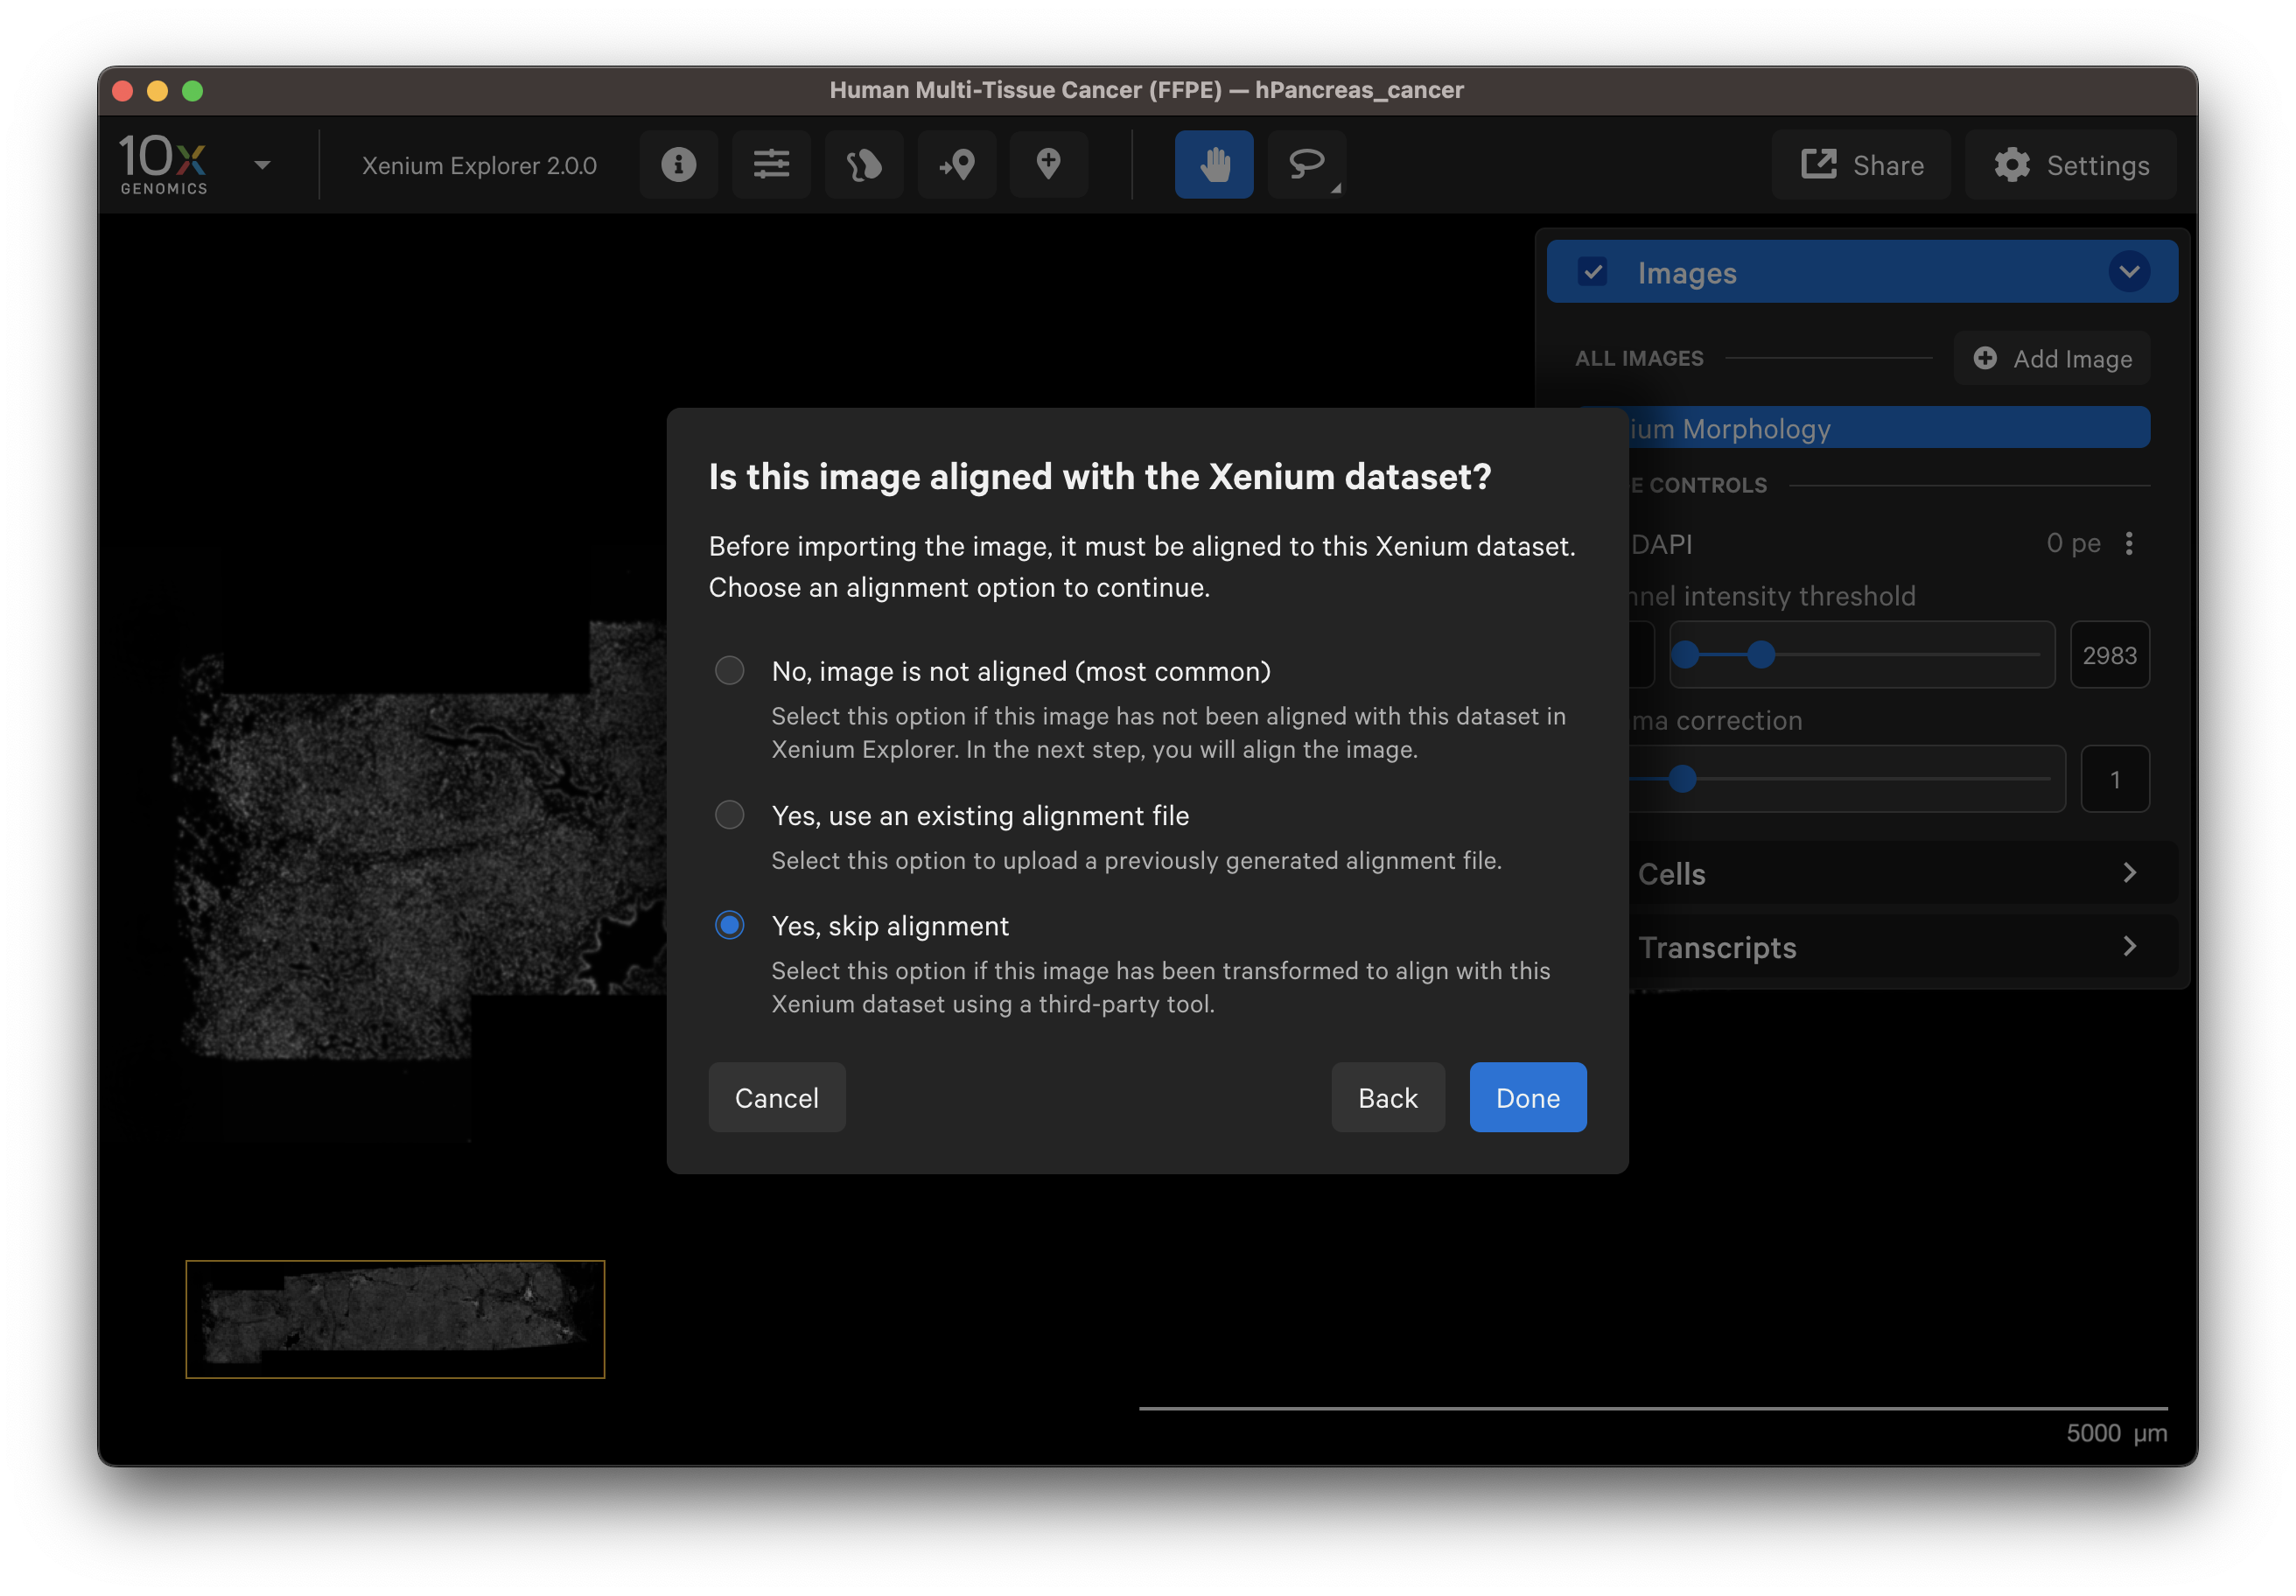
There are three image alignment options. The sections below describe and demonstrate when to use each option.
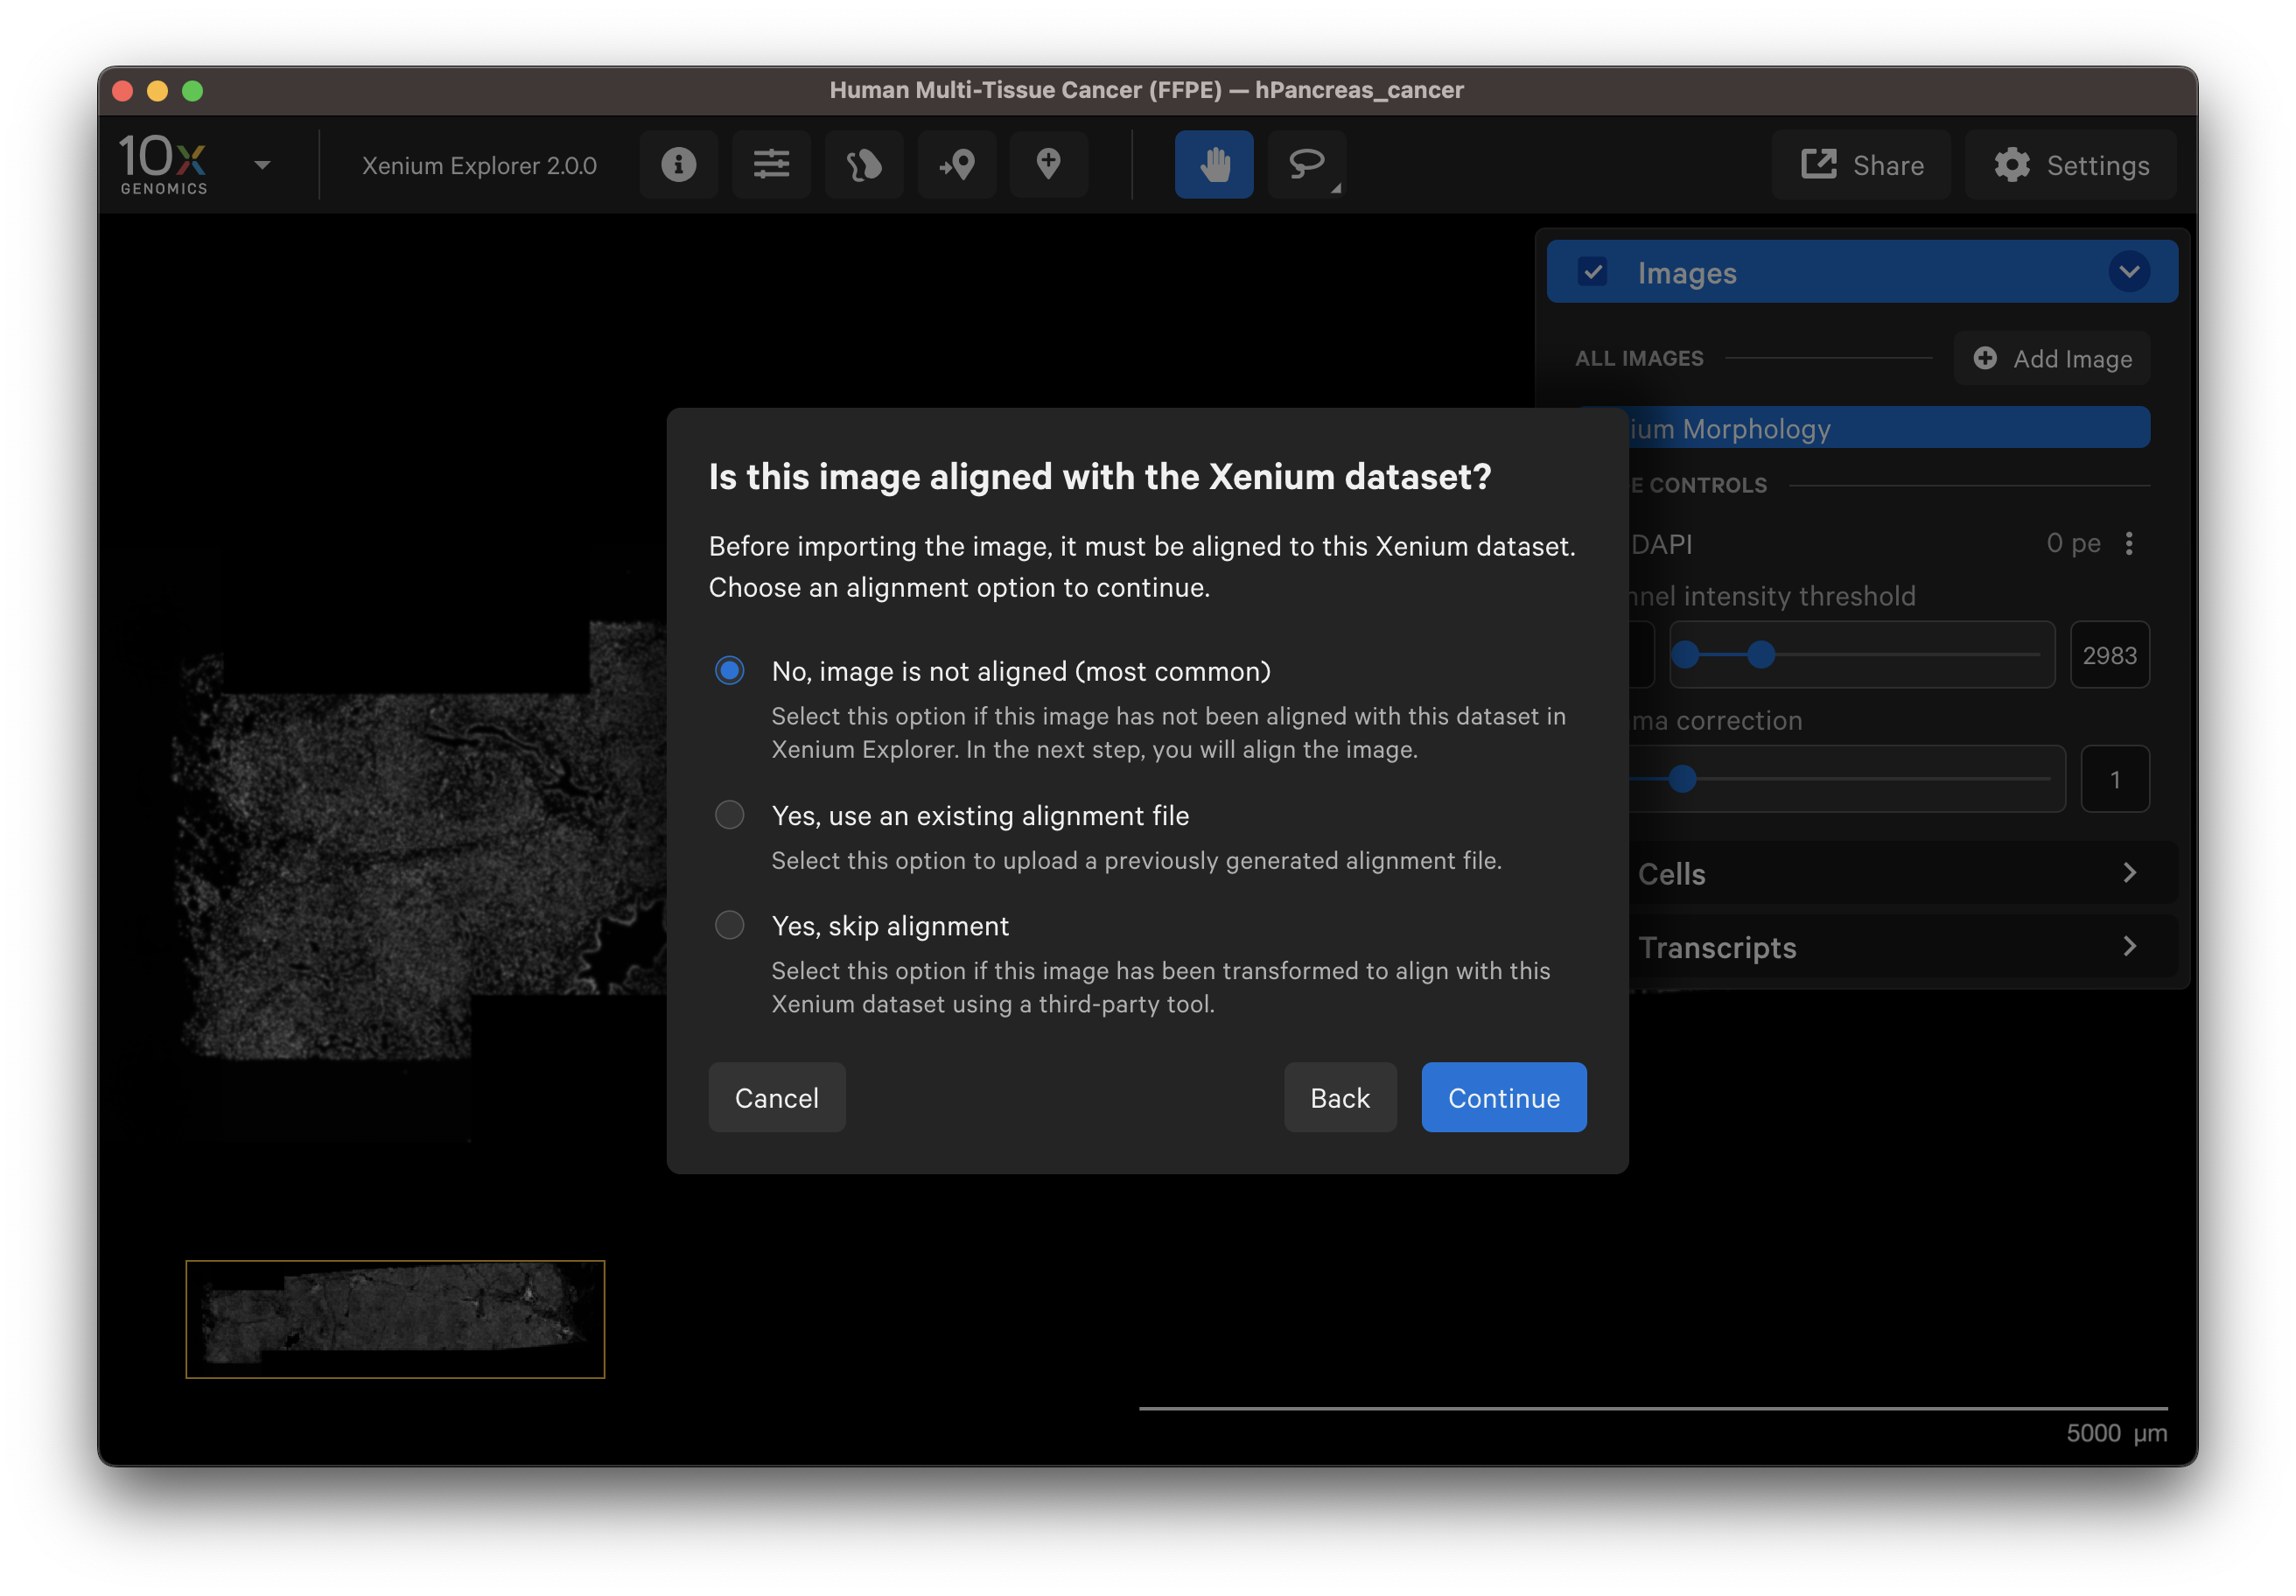
After adding the image, select No, image is not aligned to align the image in Xenium Explorer (see algorithm section).
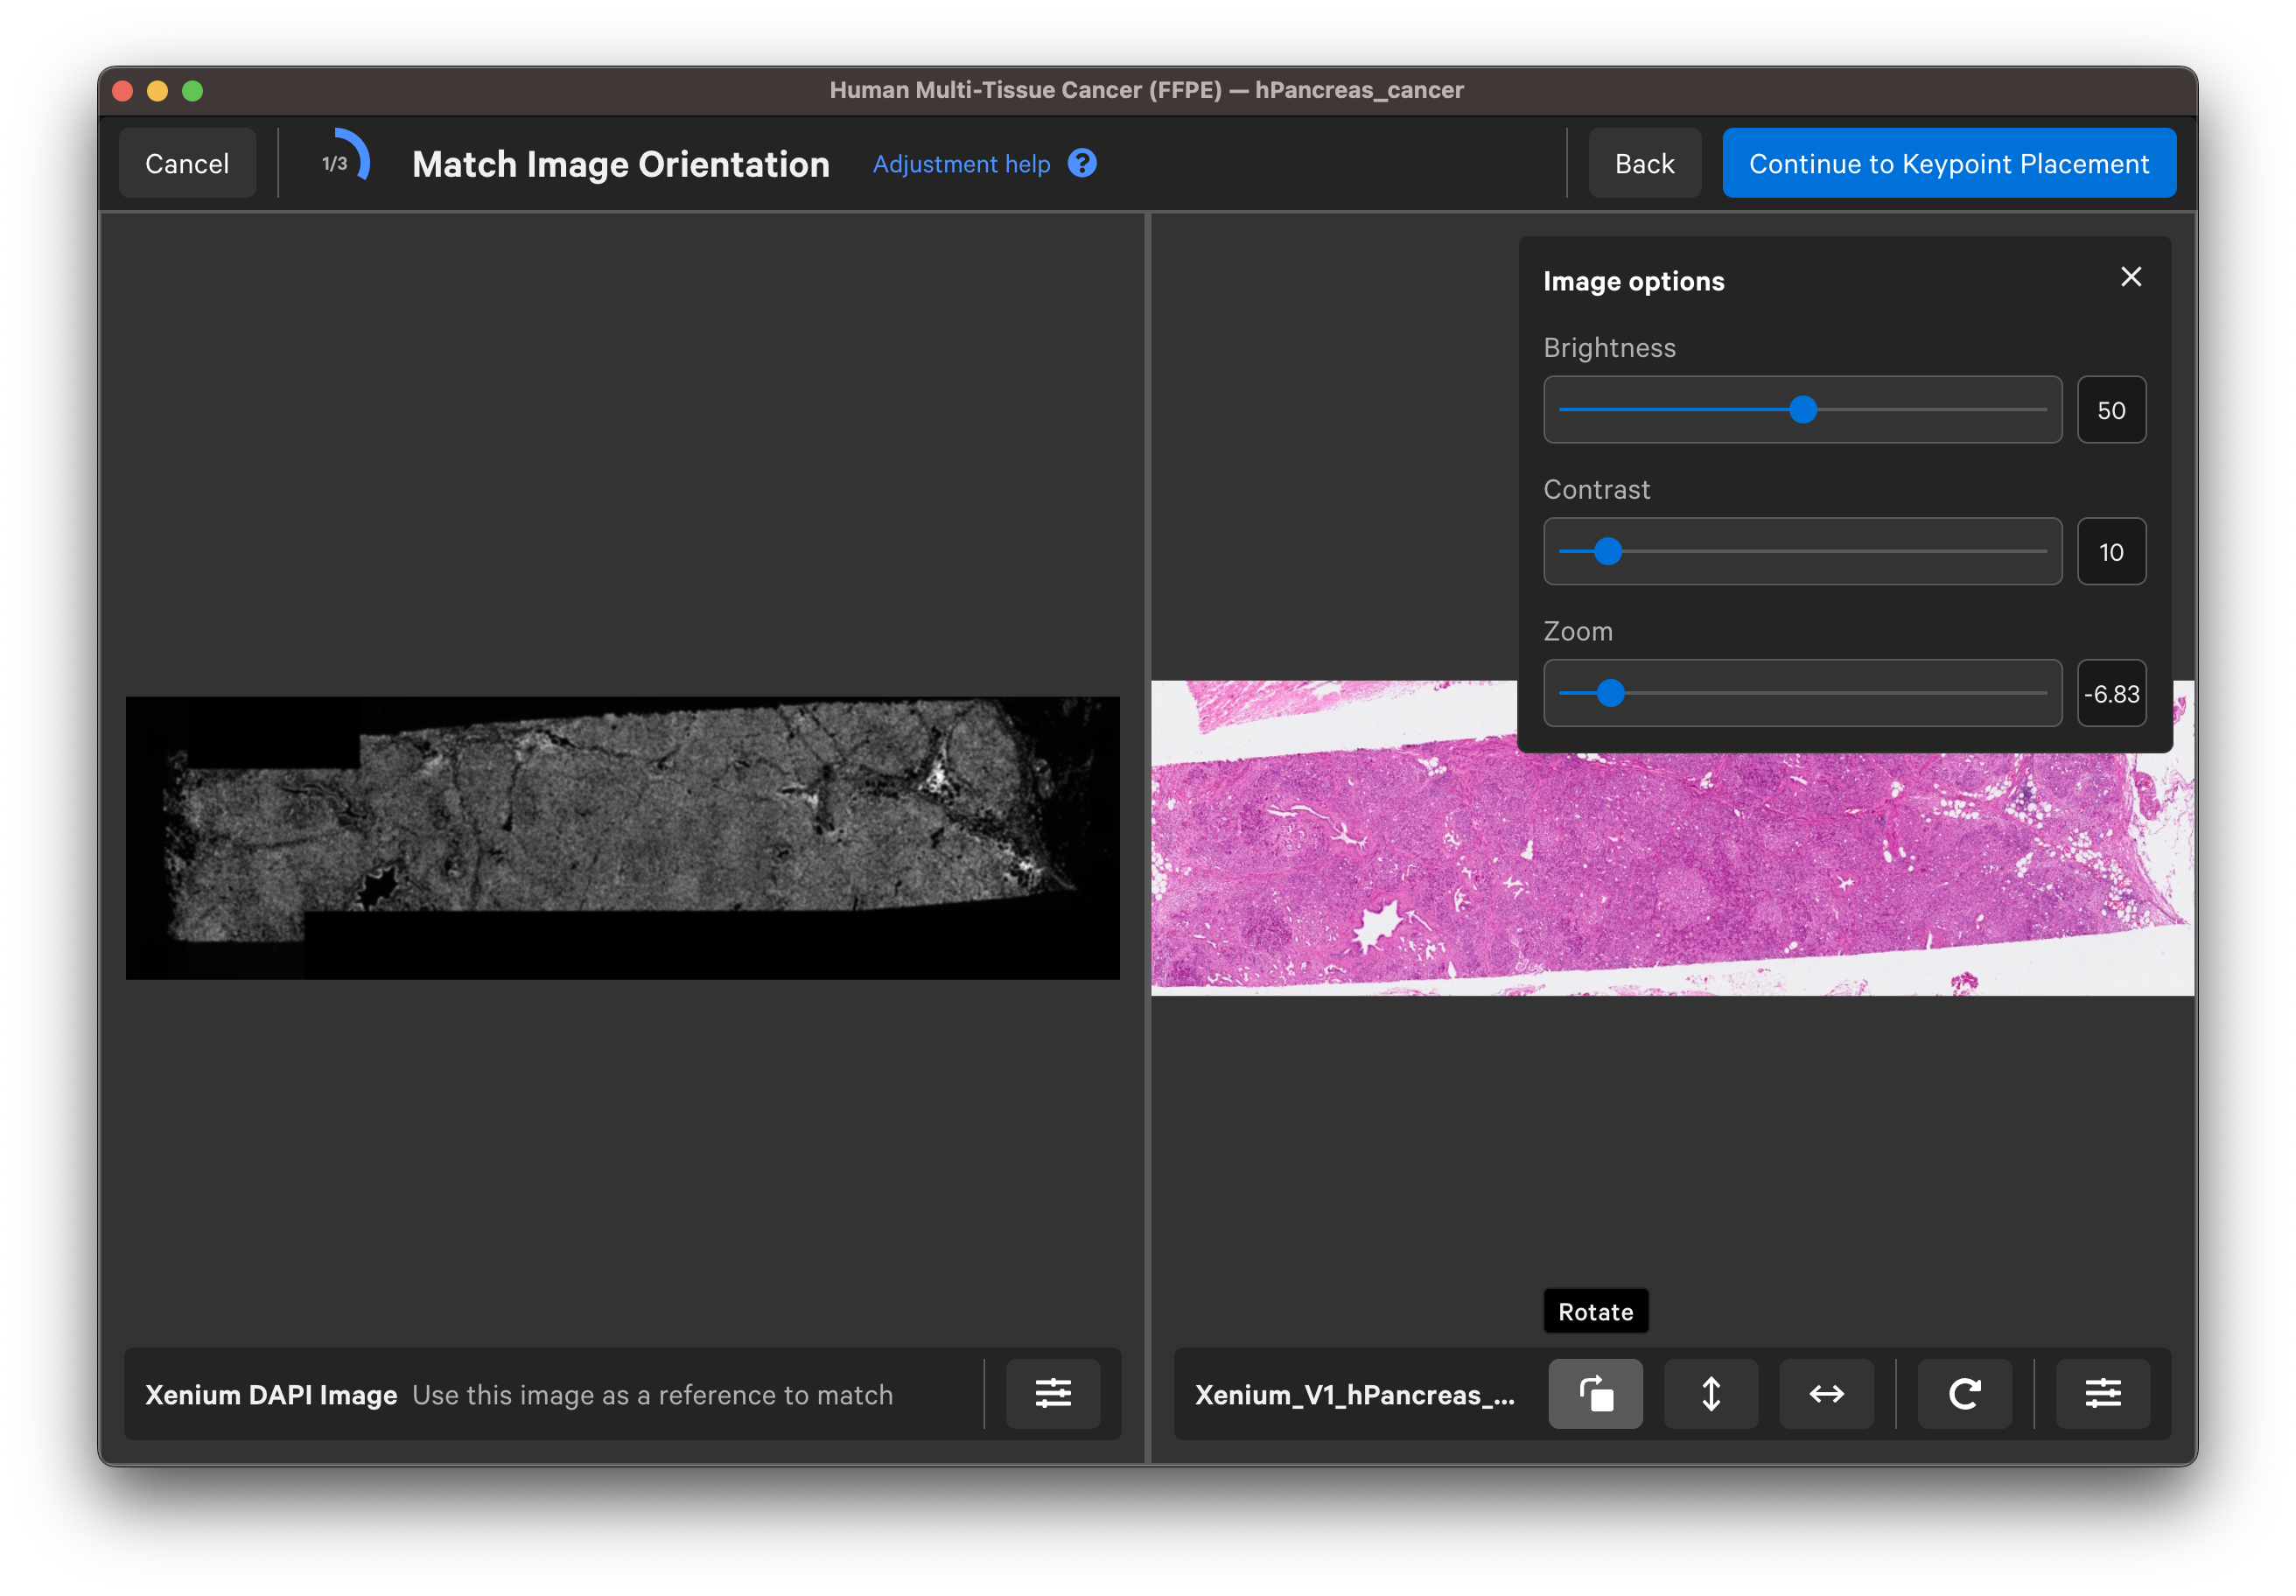
The UI instructions will guide you through the image alignment process. For each step, you can reopen the specific instructions and guidance in the UI by clicking the blue ? at the top of the window.
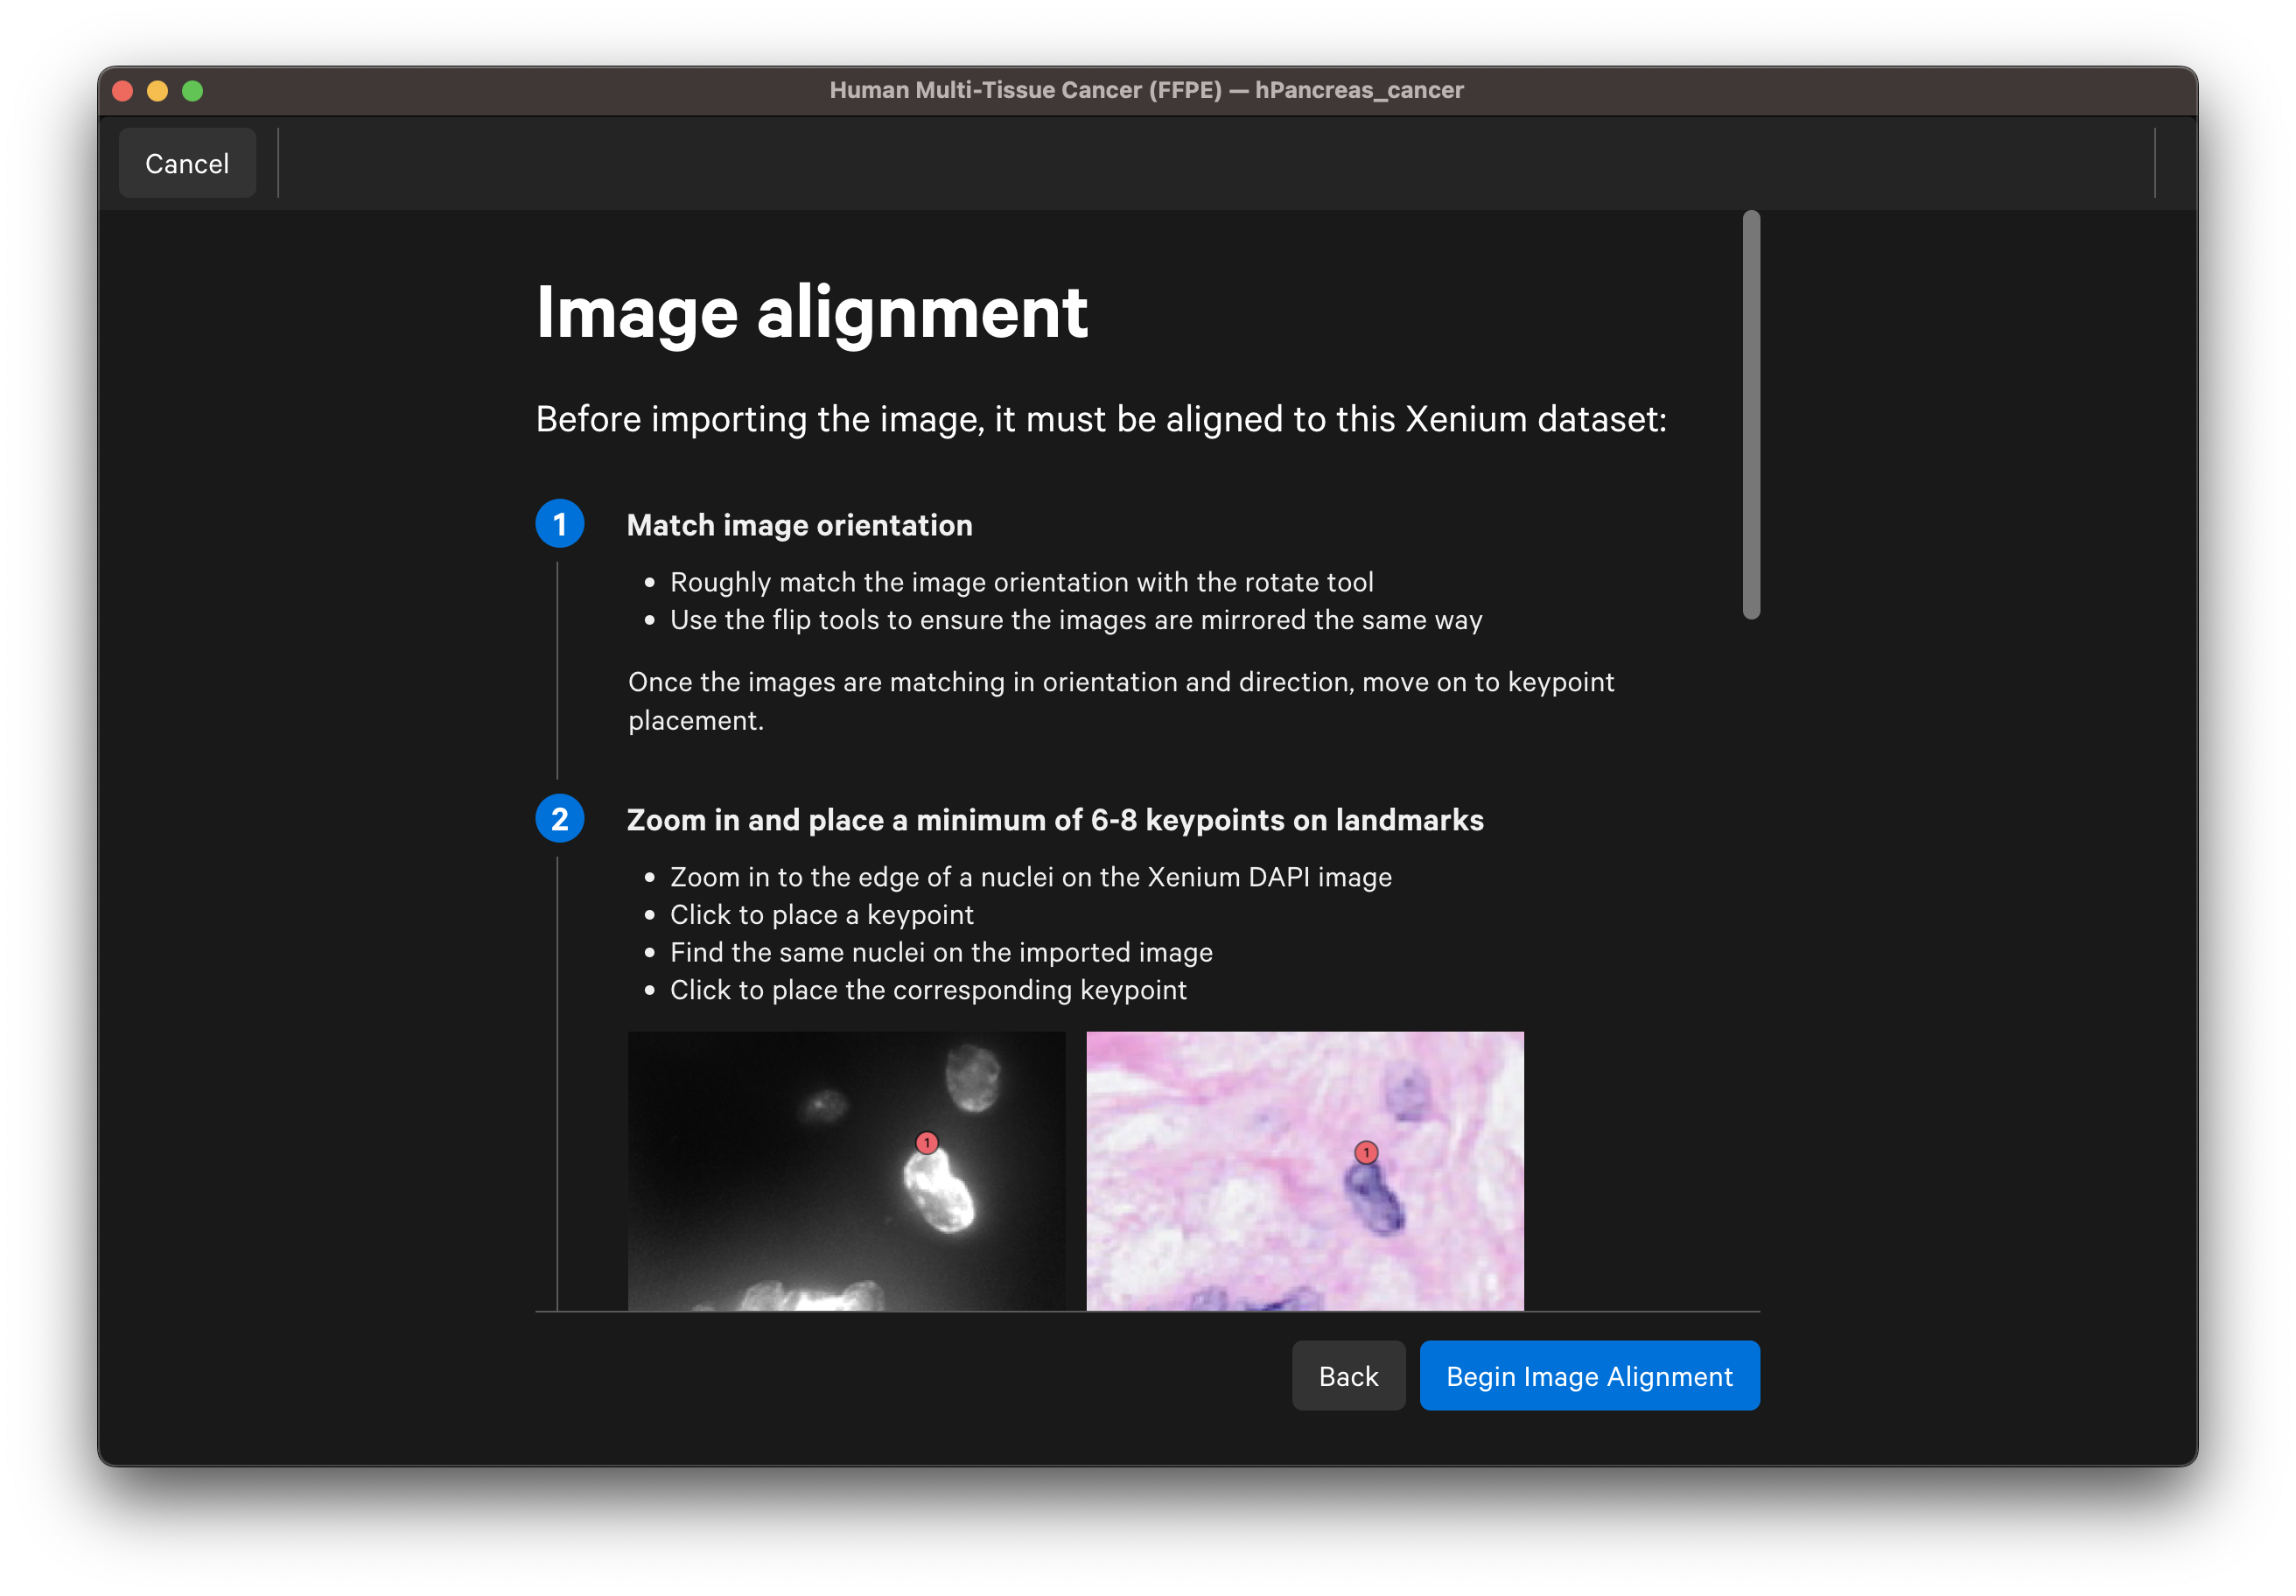
Use the buttons to rotate or flip (vertically or horizontally) the H&E or IF image to match the DAPI image orientation. You can adjust the channel intensity threshold or use the gamma correction to adjust contrast with the Image options button. For multi-channel images, use the dropdown layer to check different channels. Click Continue to Keypoint Placement to go to the next step.
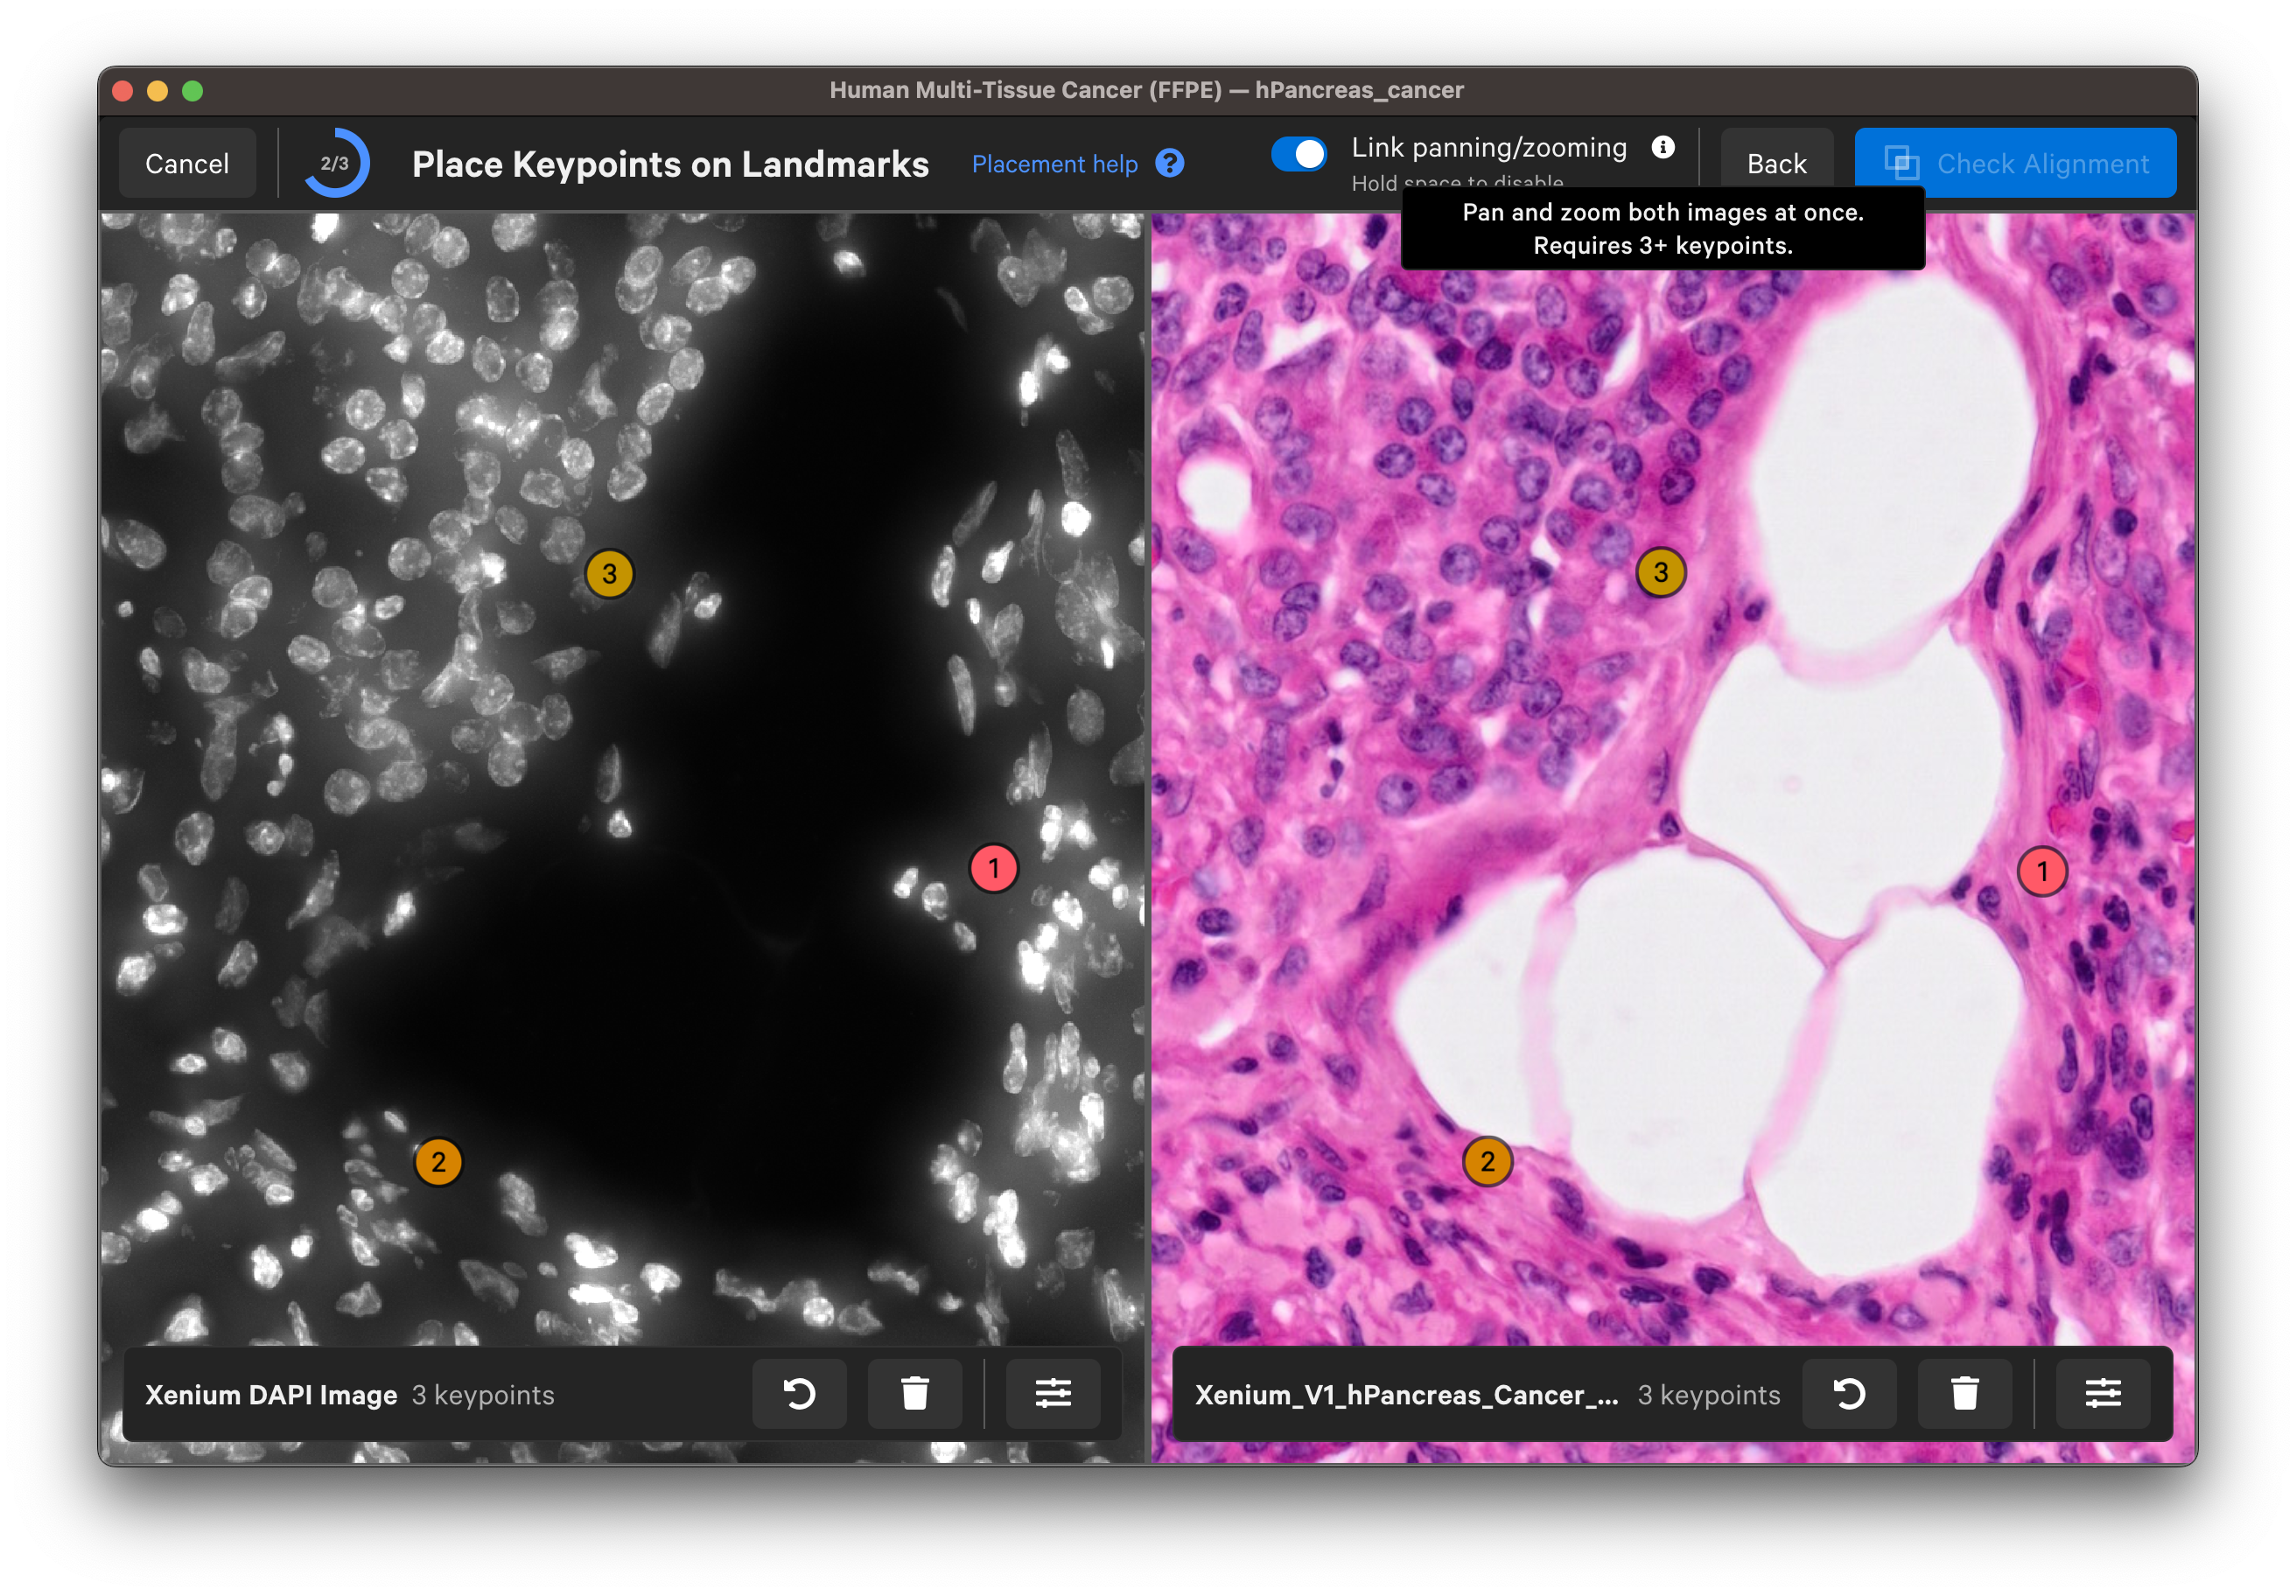
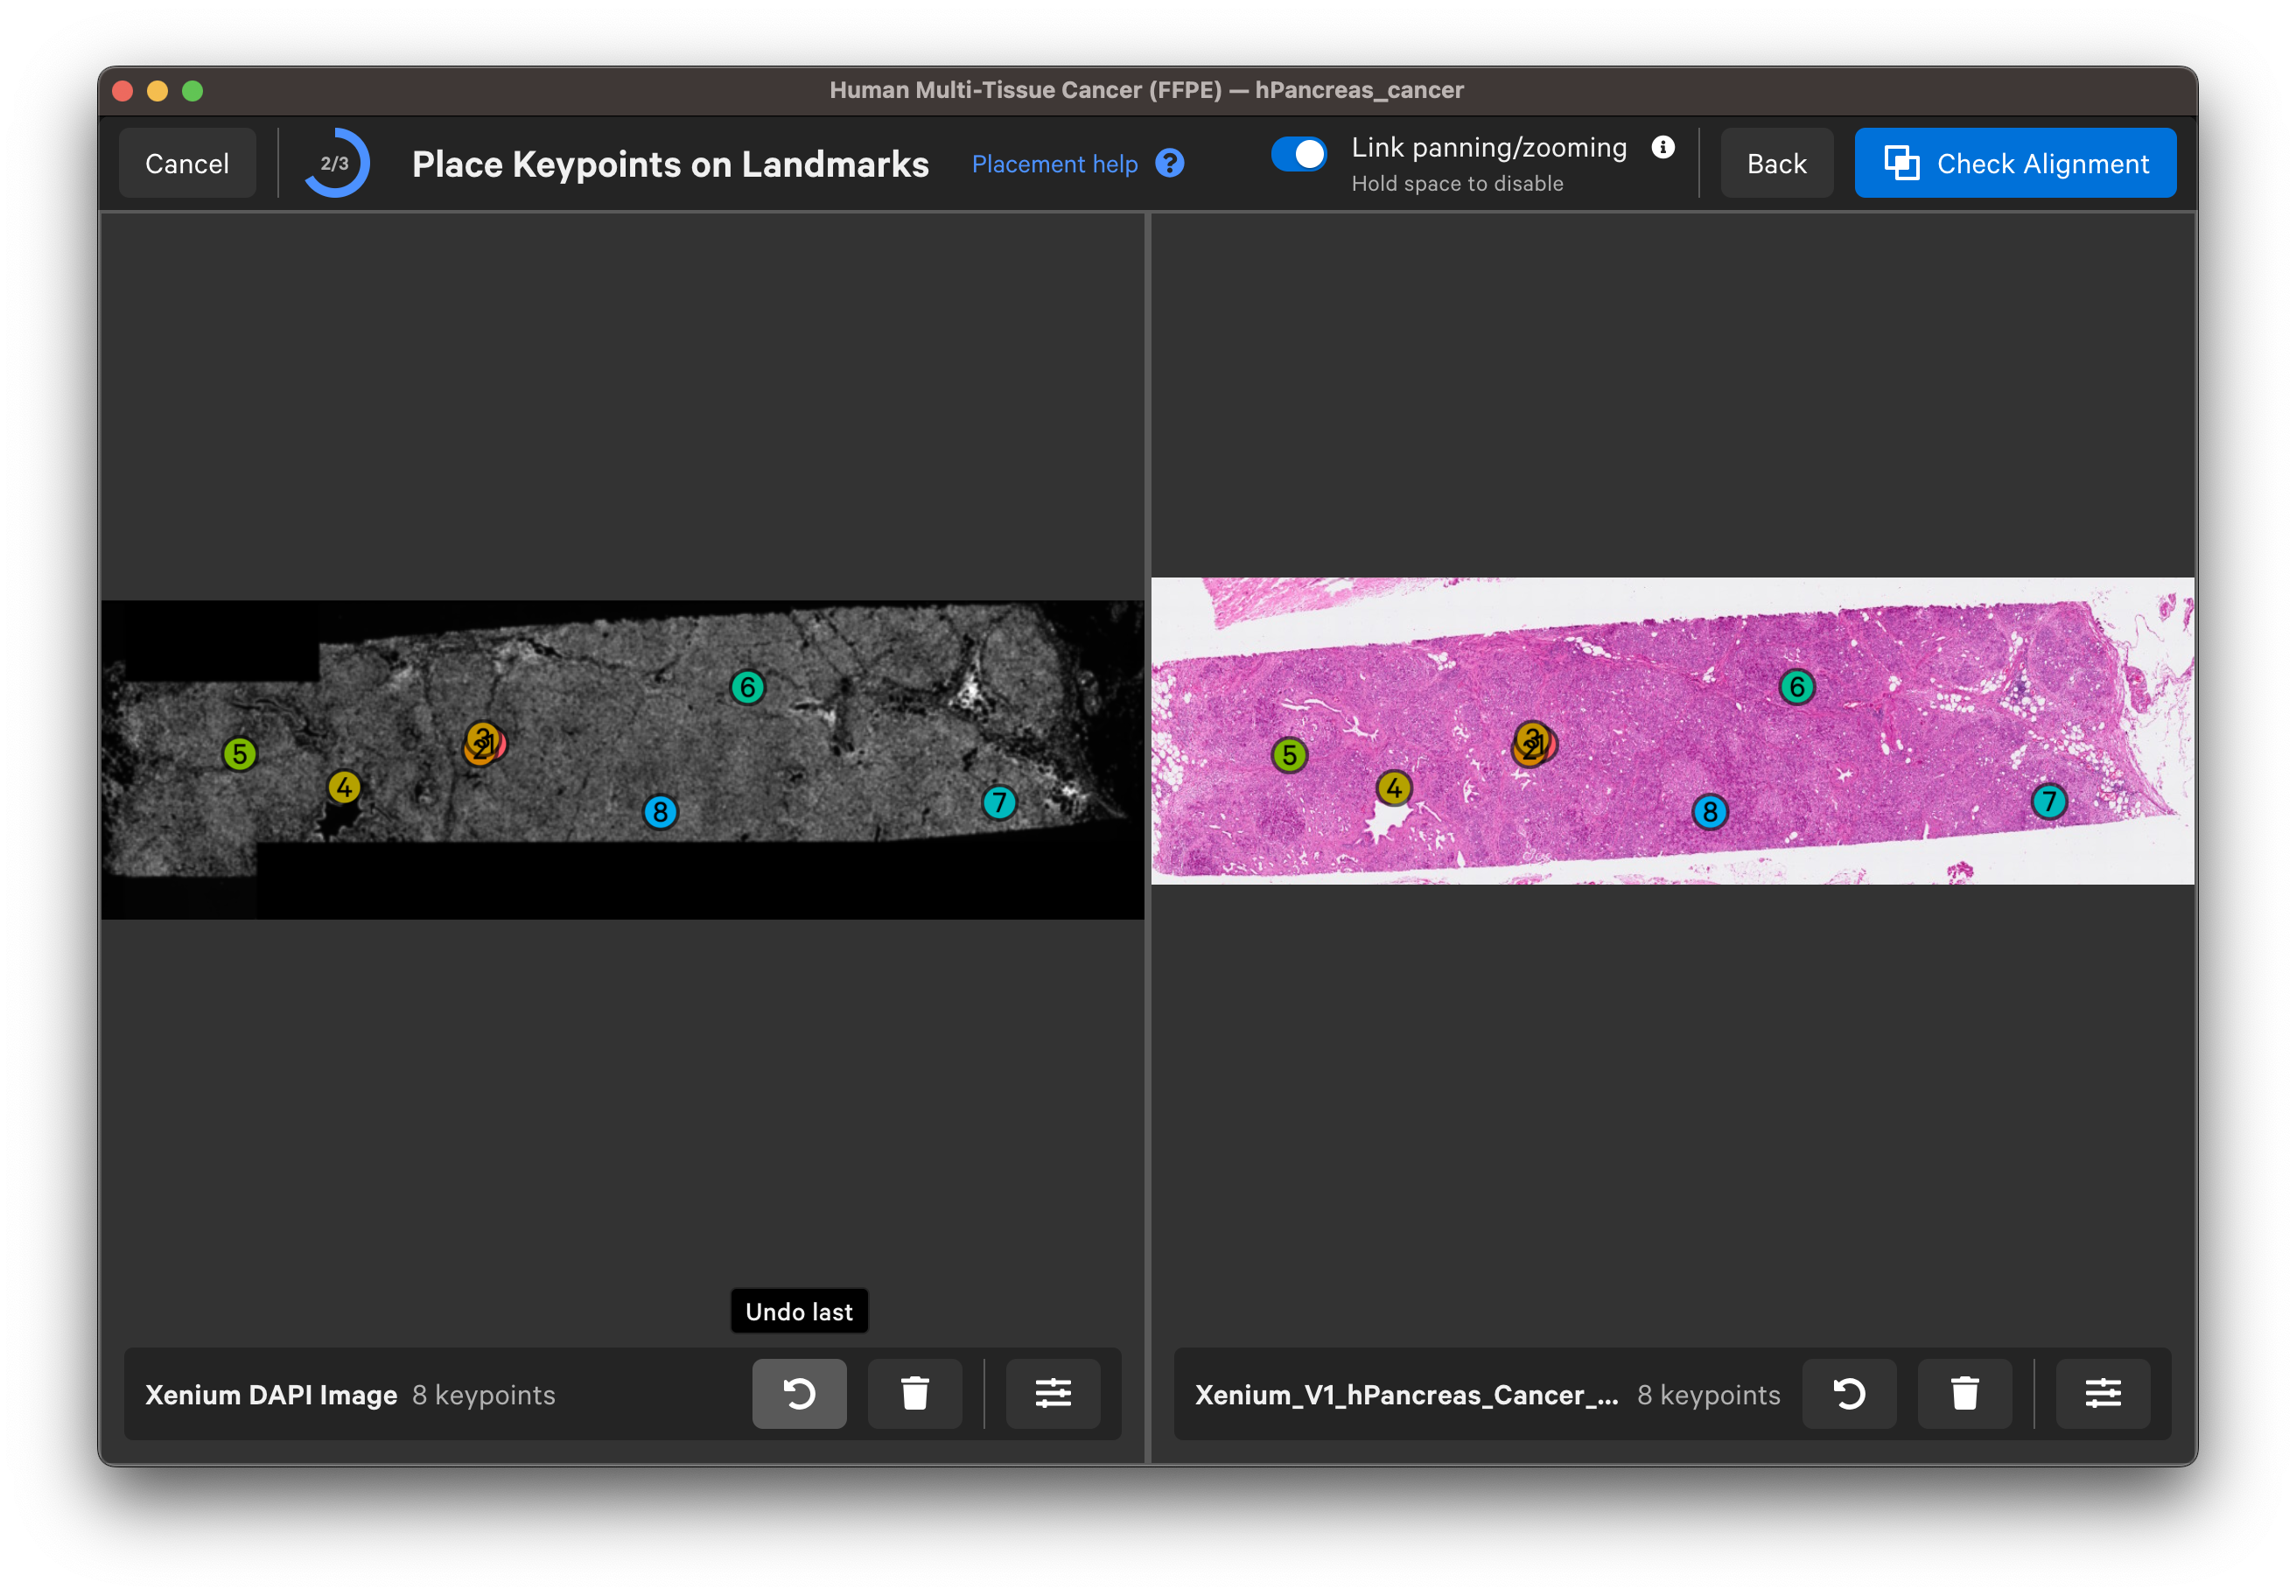
Follow the guidance in the wizard for placing keypoints on landmarks on the DAPI and post-Xenium images:
- Zoom in to the edge of a nucleus on the Xenium DAPI image. For IF images, you can use the dropdown layer to switch between channel images.
- Place at least 6-8 keypoints on each image.
- Space keypoints around the entire capture area.
- Focus on edges and other visually distinctive areas.
- Add more keypoints in specific regions of interest for a more precise alignment in those regions. Keypoints can be adjusted post-alignment if needed.
- 25-30 keypoints may be required to achieve a satisfactory alignment depending on image quality and keypoint accuracy.
For each landmark, zoom in until you can see the nuclei edges in both images to place the keypoints. You can Undo last keypoint or Clear all keypoints using the arrow and trash can buttons for each image.
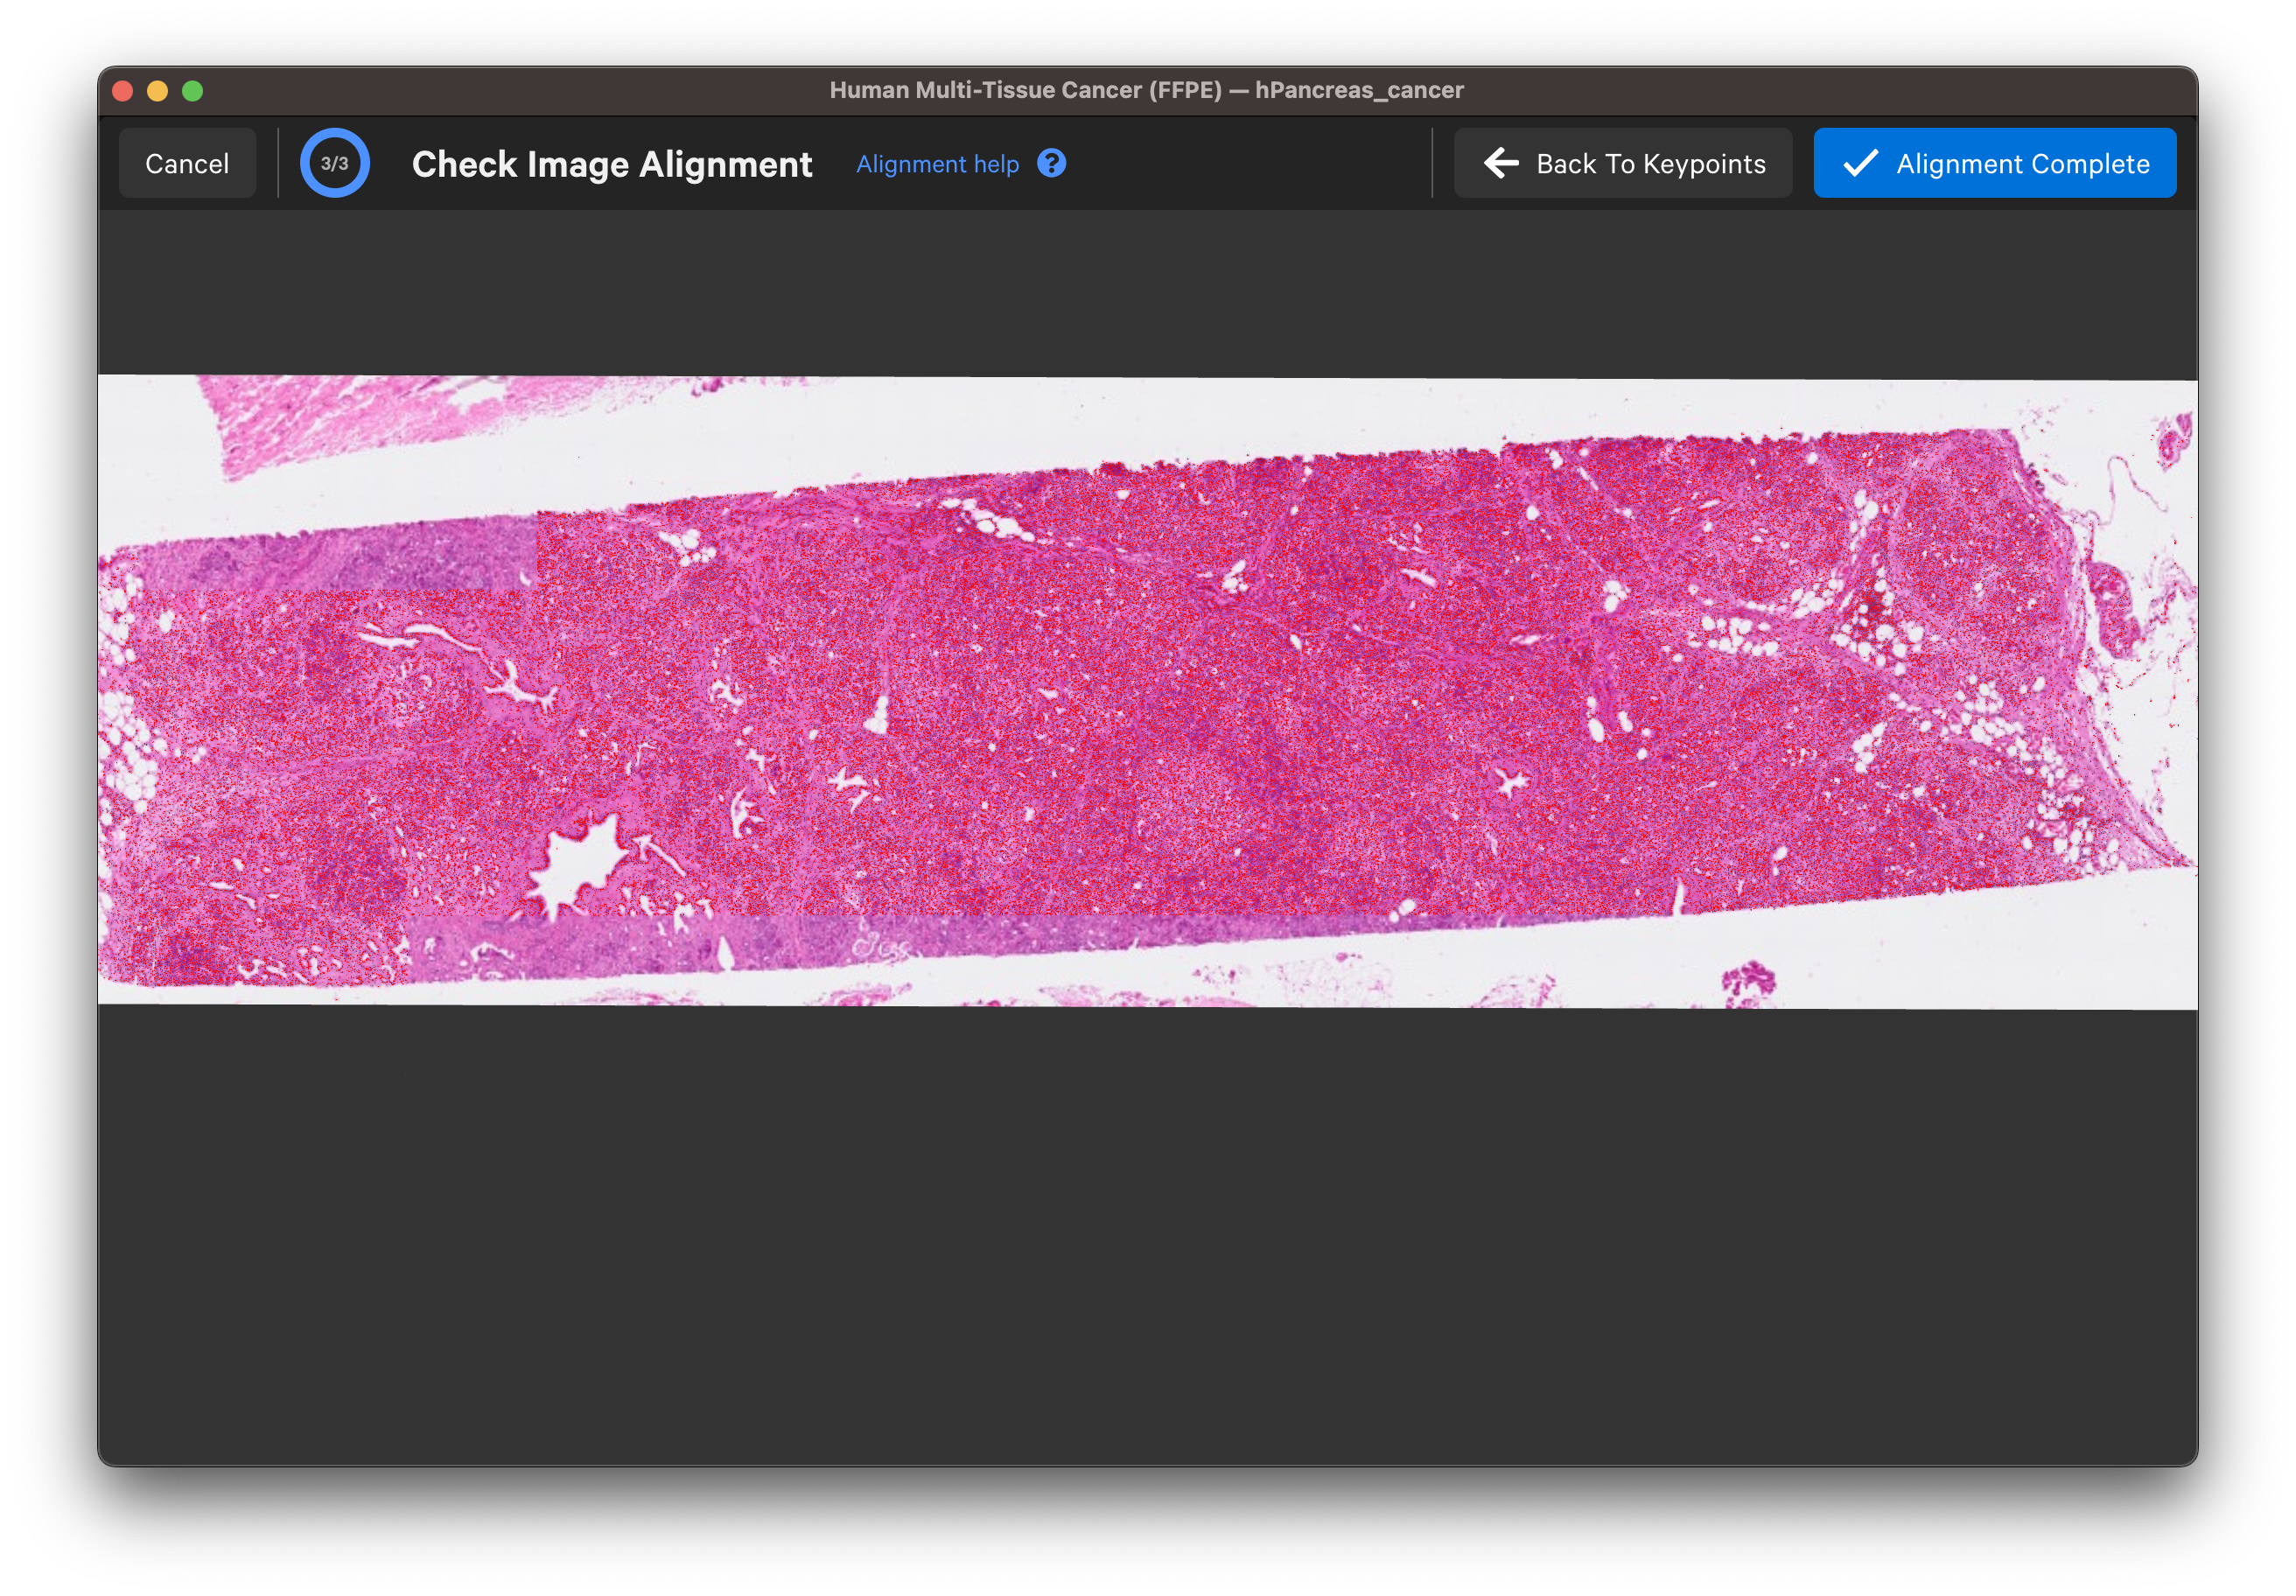
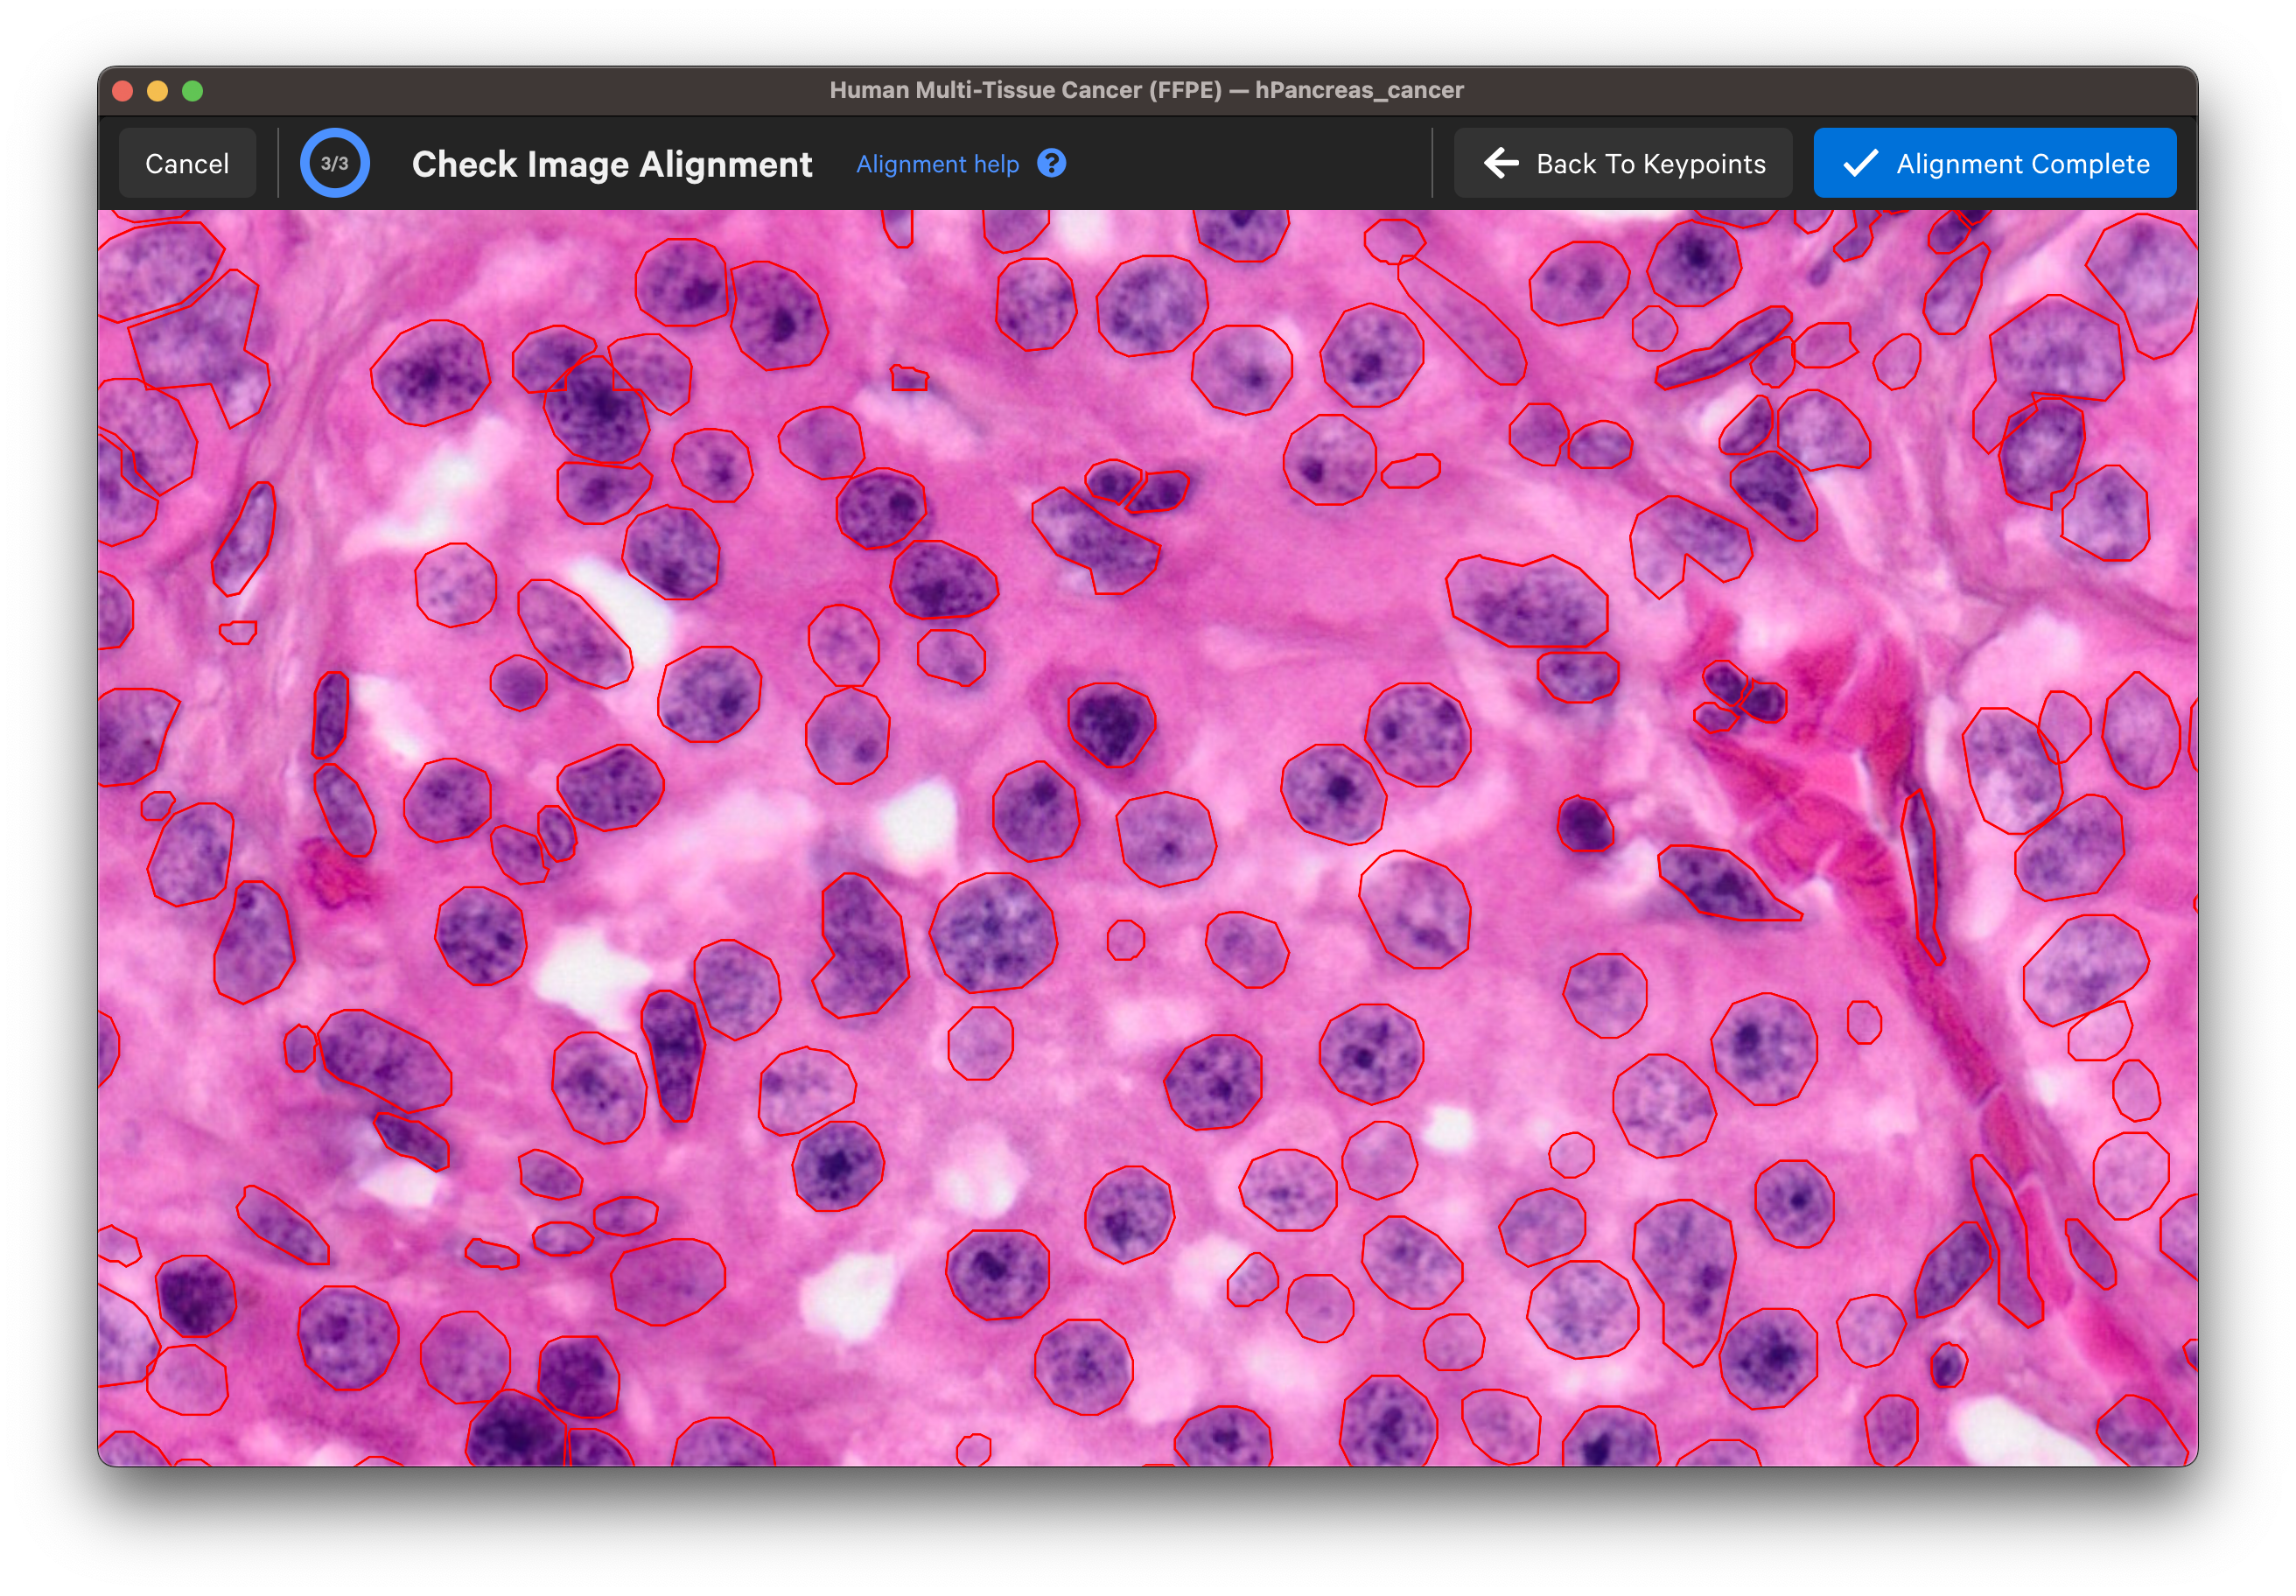
Once you are satisfied with the keypoint placements, click Check Alignment.
Wait for the post-Xenium image and red nuclei outlines to load. Check that the image is properly aligned by verifying that the red nuclei boundaries, based on the DAPI segmentation results, fit around the nuclei in the imported image (use mouse to zoom in).
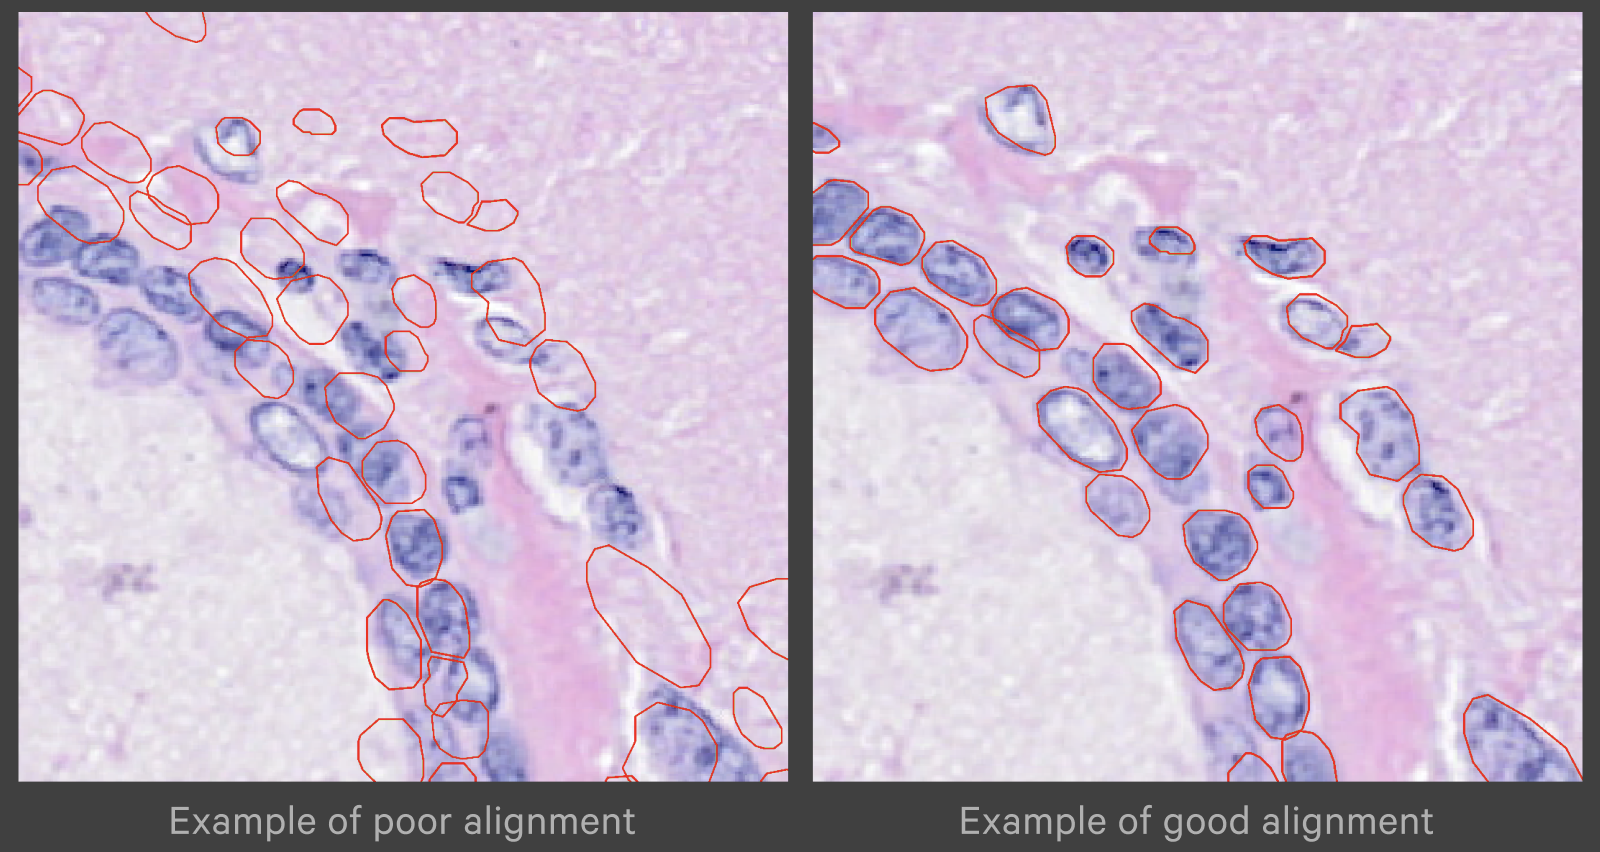
Zoom in to check the nuclei alignment across the image area. Here are examples of poor vs. good alignment of the nuclei outlines on an H&E image:
Click Back To Keypoints to adjust as needed. If satisfied, click Alignment Complete. You can adjust keypoints after completing the alignment workflow as well.
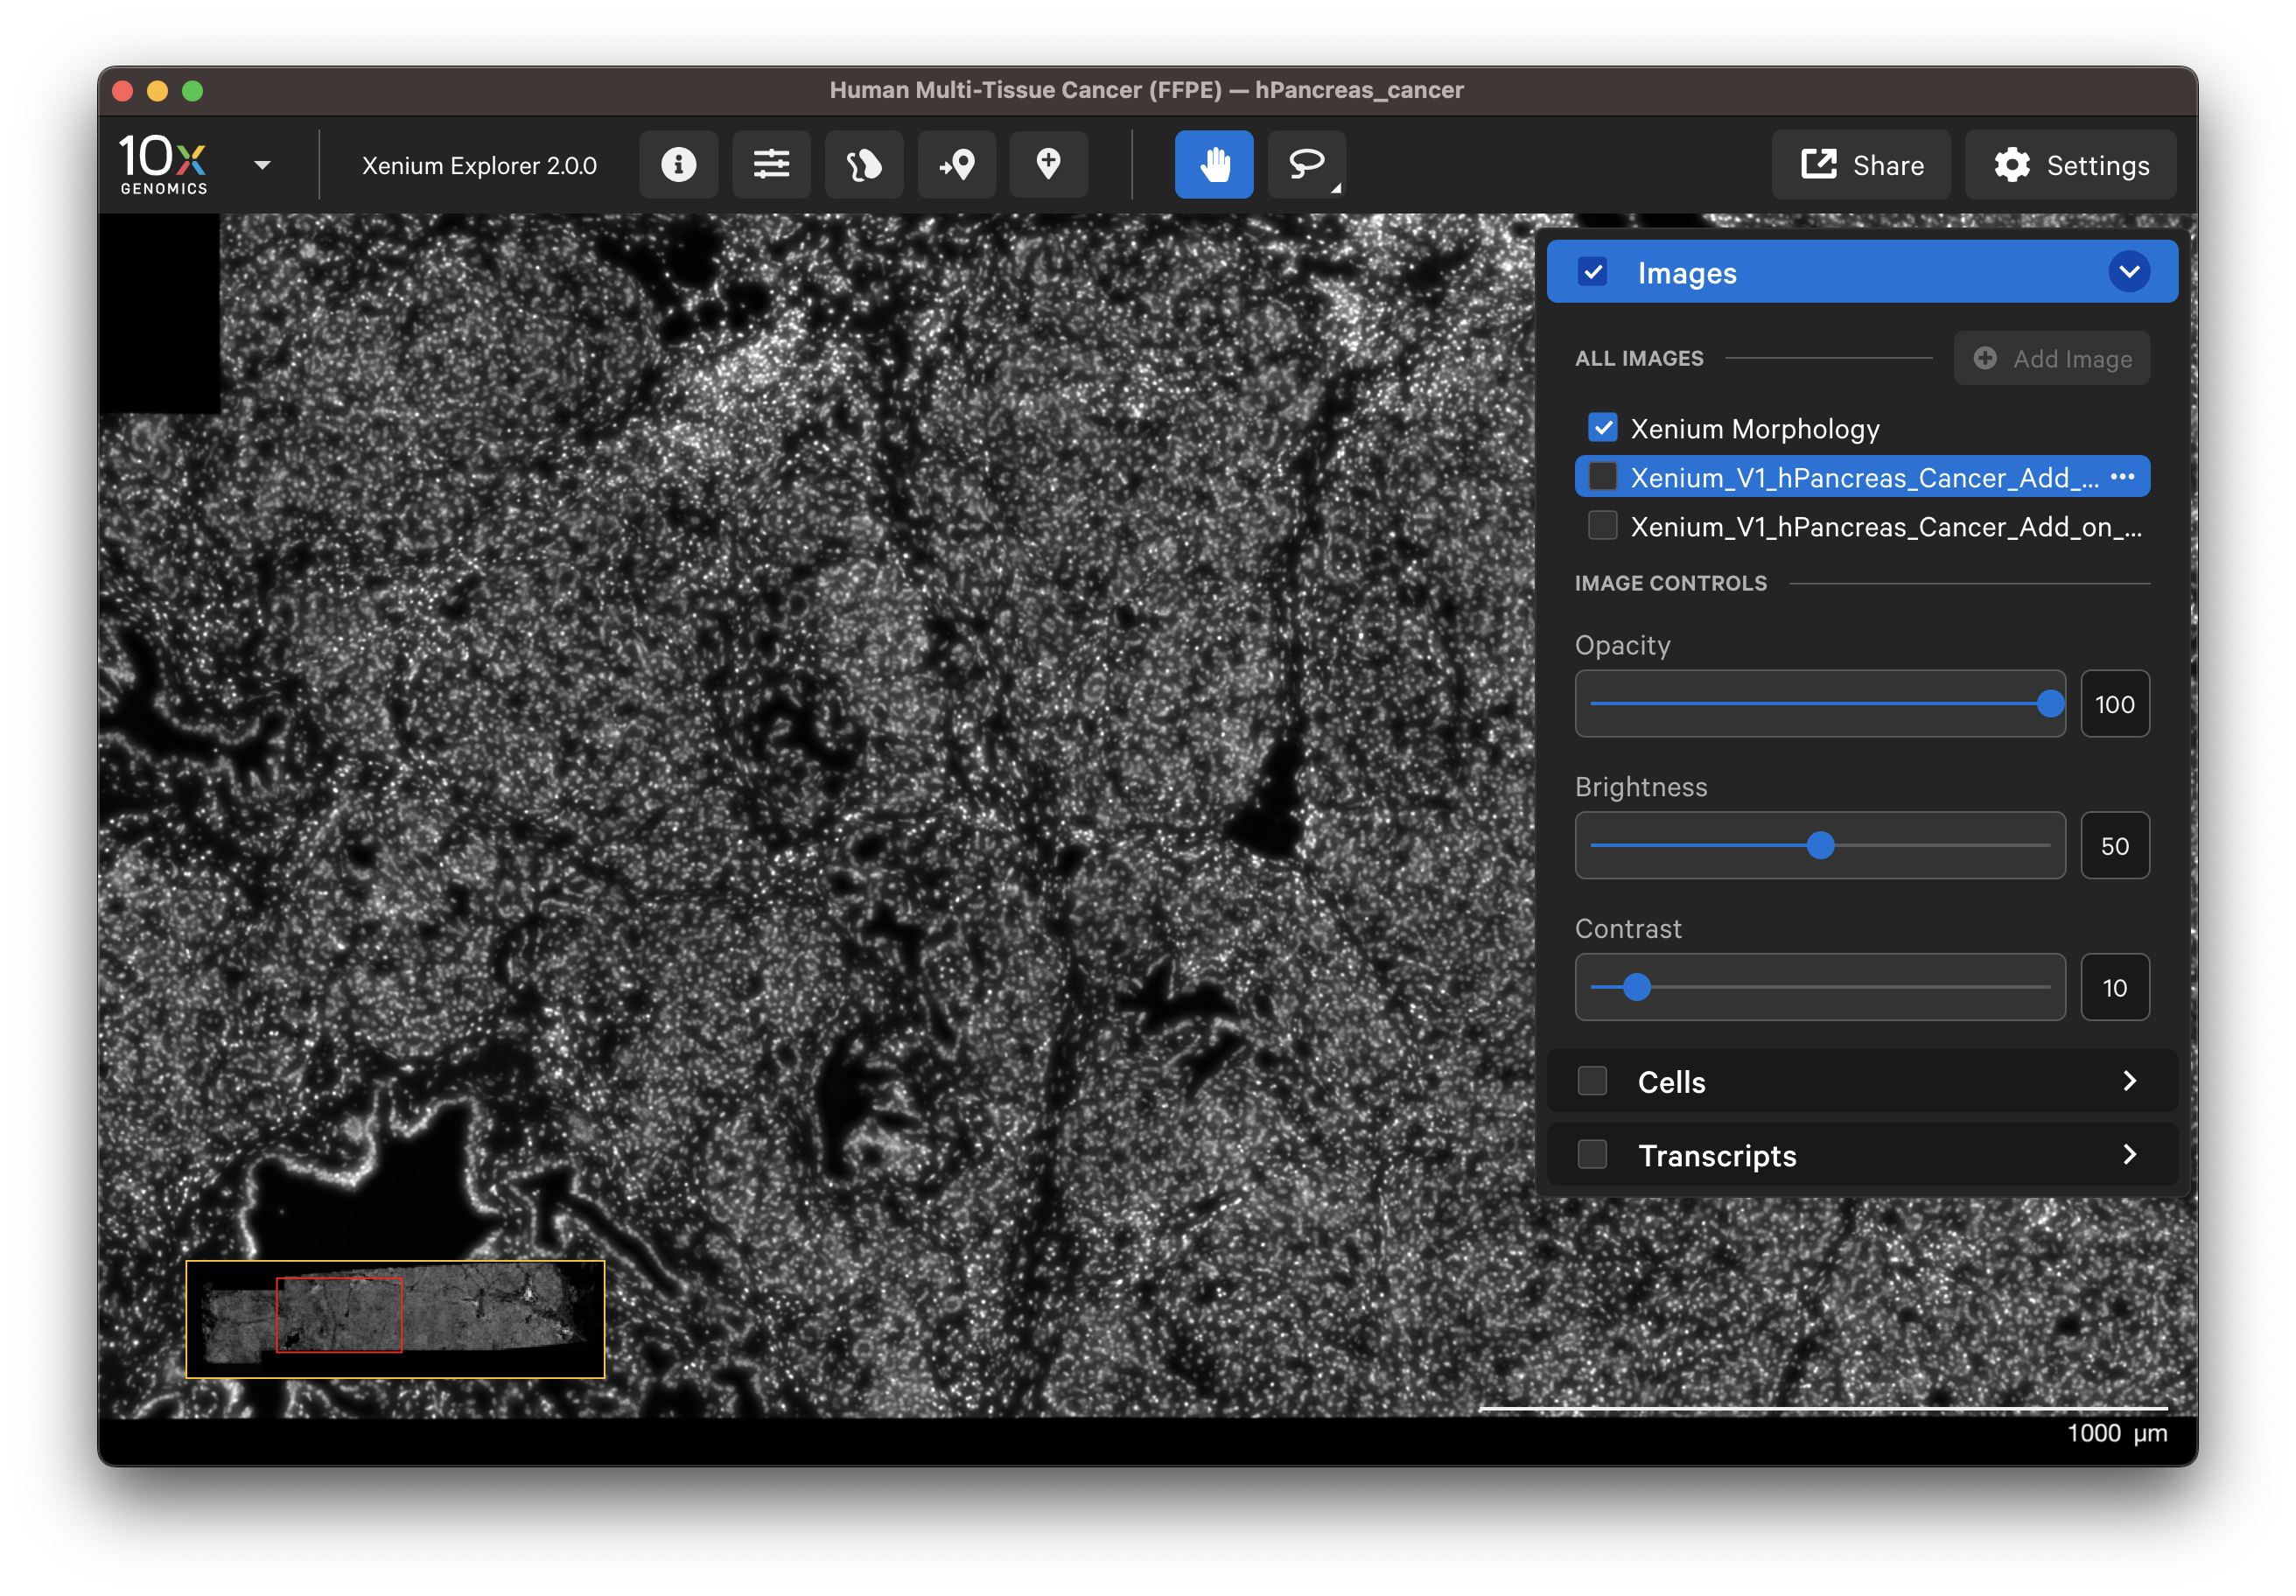
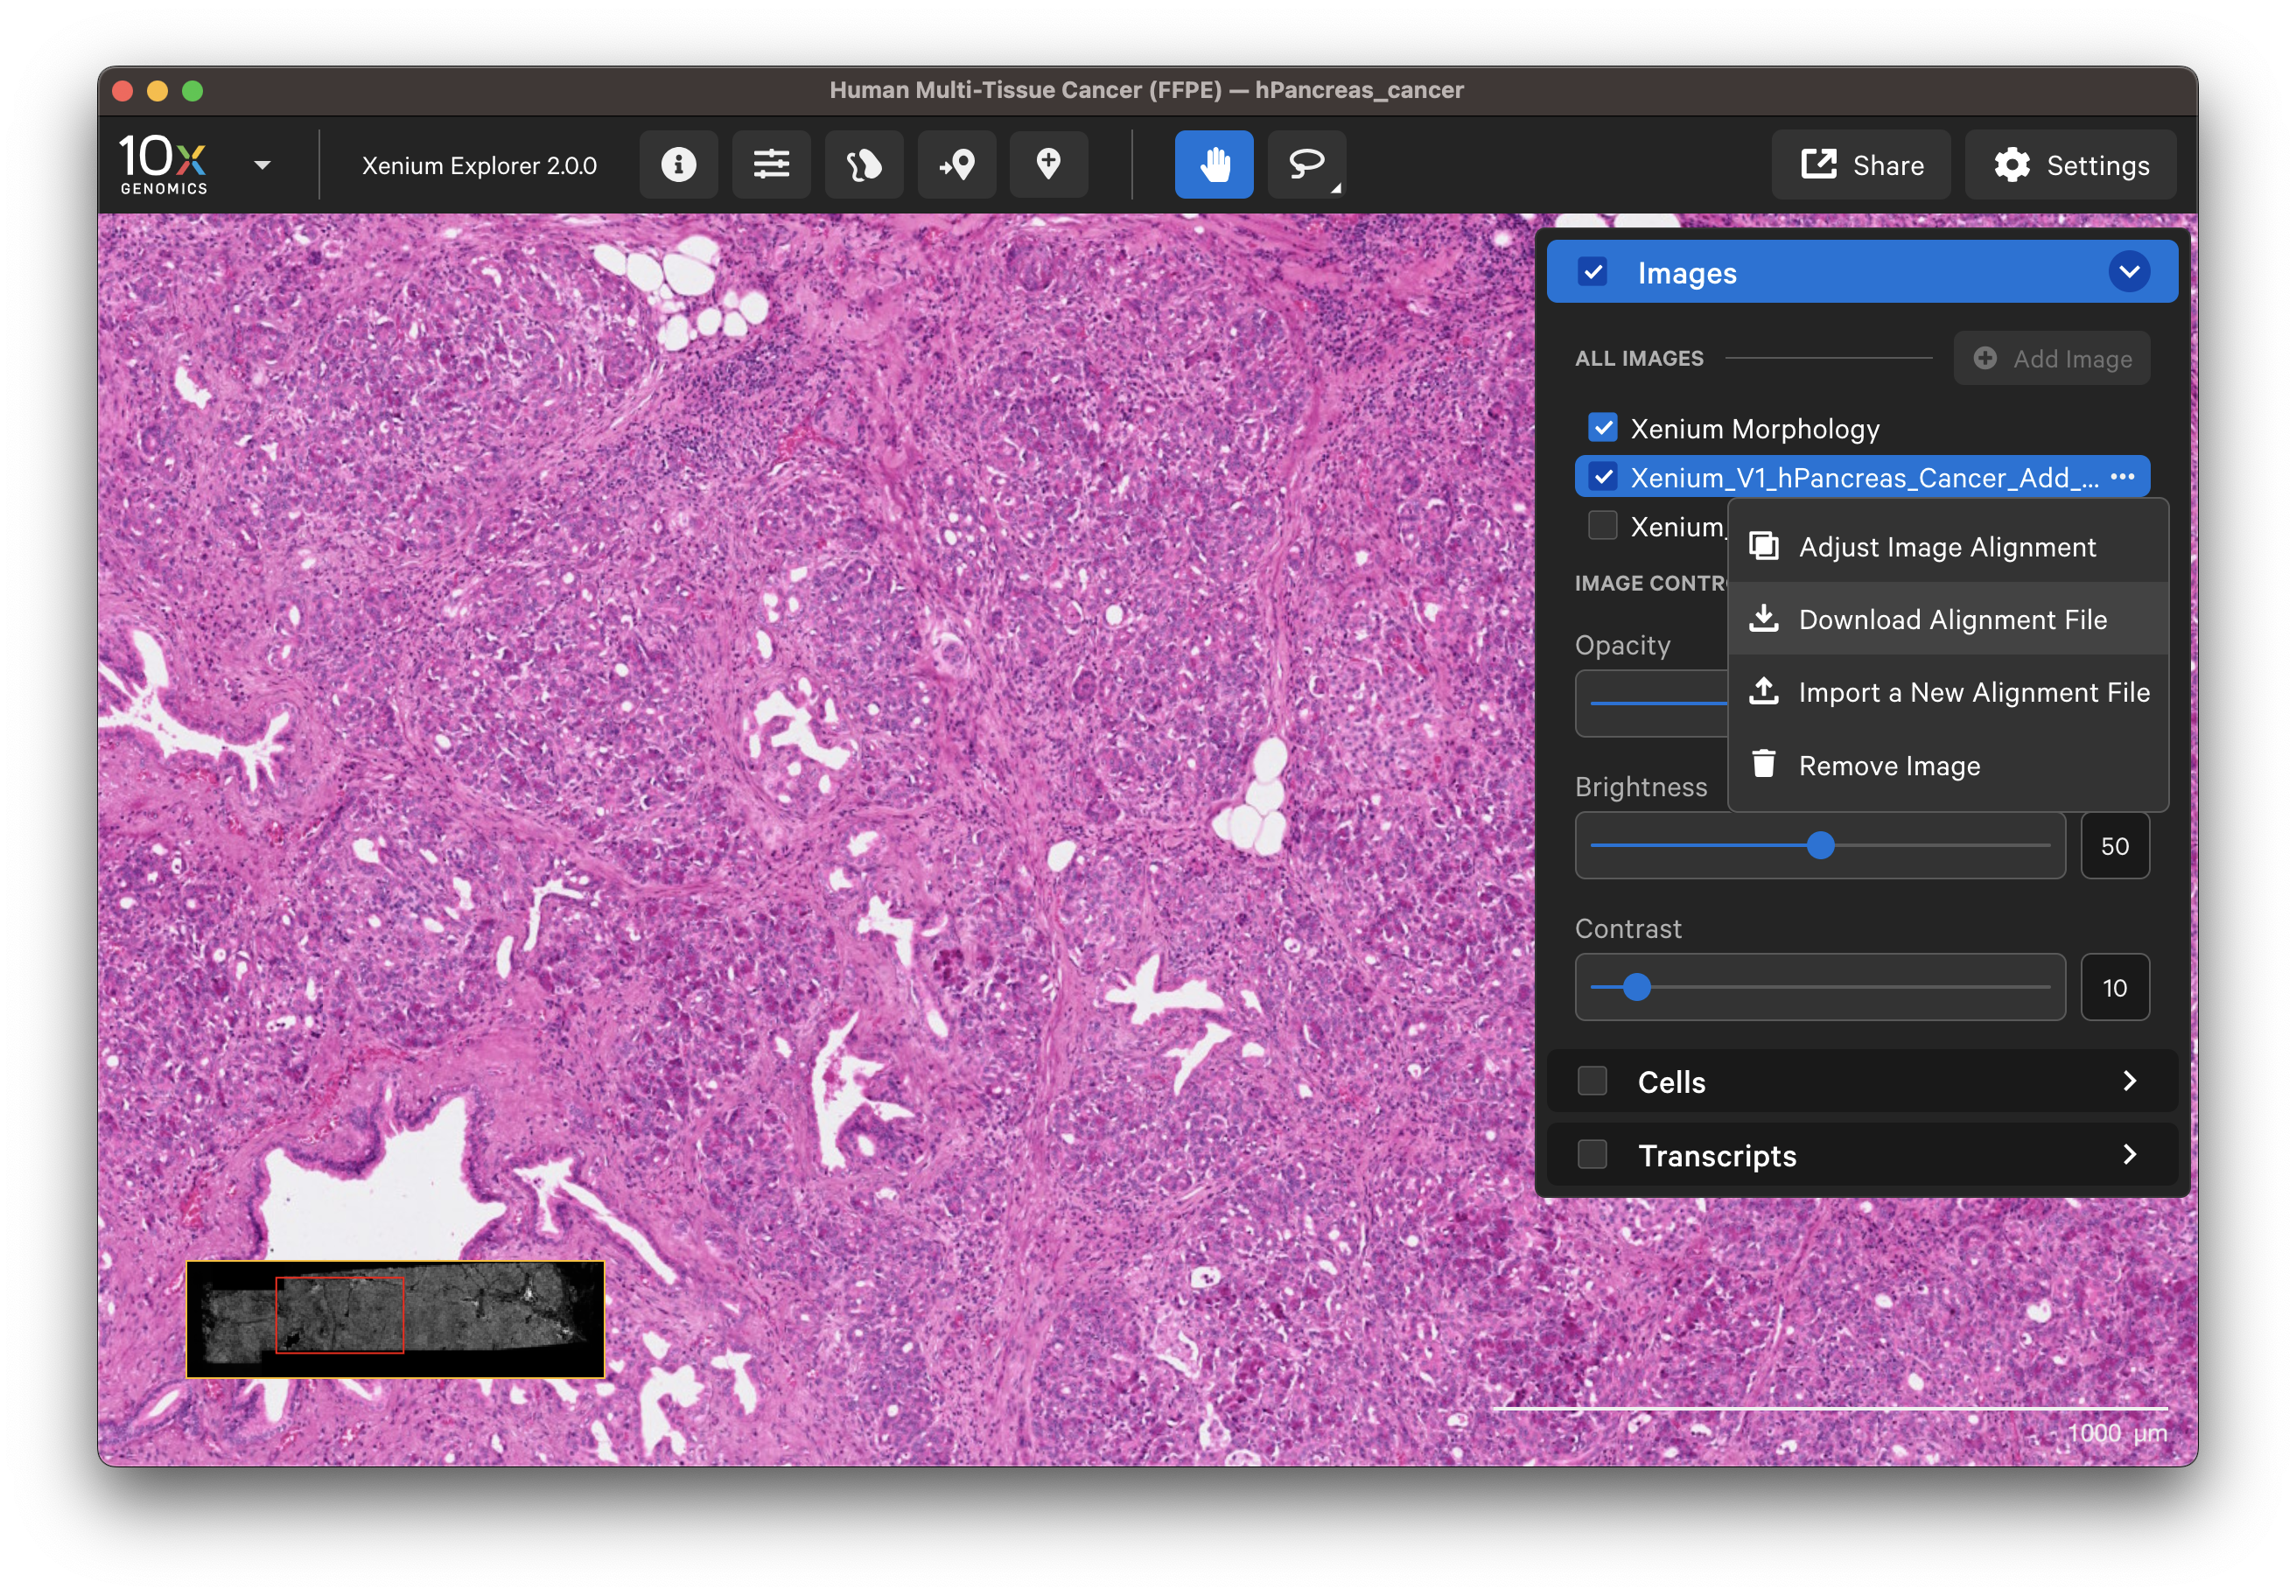
The aligned H&E or IF image will be listed in the Image layer under the DAPI image. Click the image name and depending on the image type use the sliders to adjust channel intensity, gamma correction, opacity, brightness, or contrast.
- DAPI image:
- H&E image:
- IF image:
The options in the Cells and Transcripts layers, as well as selections, can now be used for the post-Xenium image. The cell and nuclei outlines shown in the Cells layer are based on the DAPI image segmentation results.
To remove an aligned image, click the three dots next to the image name in the Image layer and select Remove image.
For images aligned in Xenium Explorer, keypoint placement can be adjusted to add more keypoints or redo existing placements. You can also adjust keypoints if a colleague has shared their keypoints CSV file with you.
Click on the dropdown layer from an image aligned in Xenium Explorer and select Adjust Image Alignment. You can cancel any time to revert to the existing alignment.
- Add more keypoints: This option is useful to improve alignment in particular areas of interest after the initial alignment.
- Redo a subset of keypoints: You can undo keypoints starting from the last placed point and redo that subset (i.e., out of six points, undo points 6, 5, and 4; then redo placement for points 4, 5, and 6).
- Clear all points and start over: Before continuing with this option, you may want to download the existing keypoints.


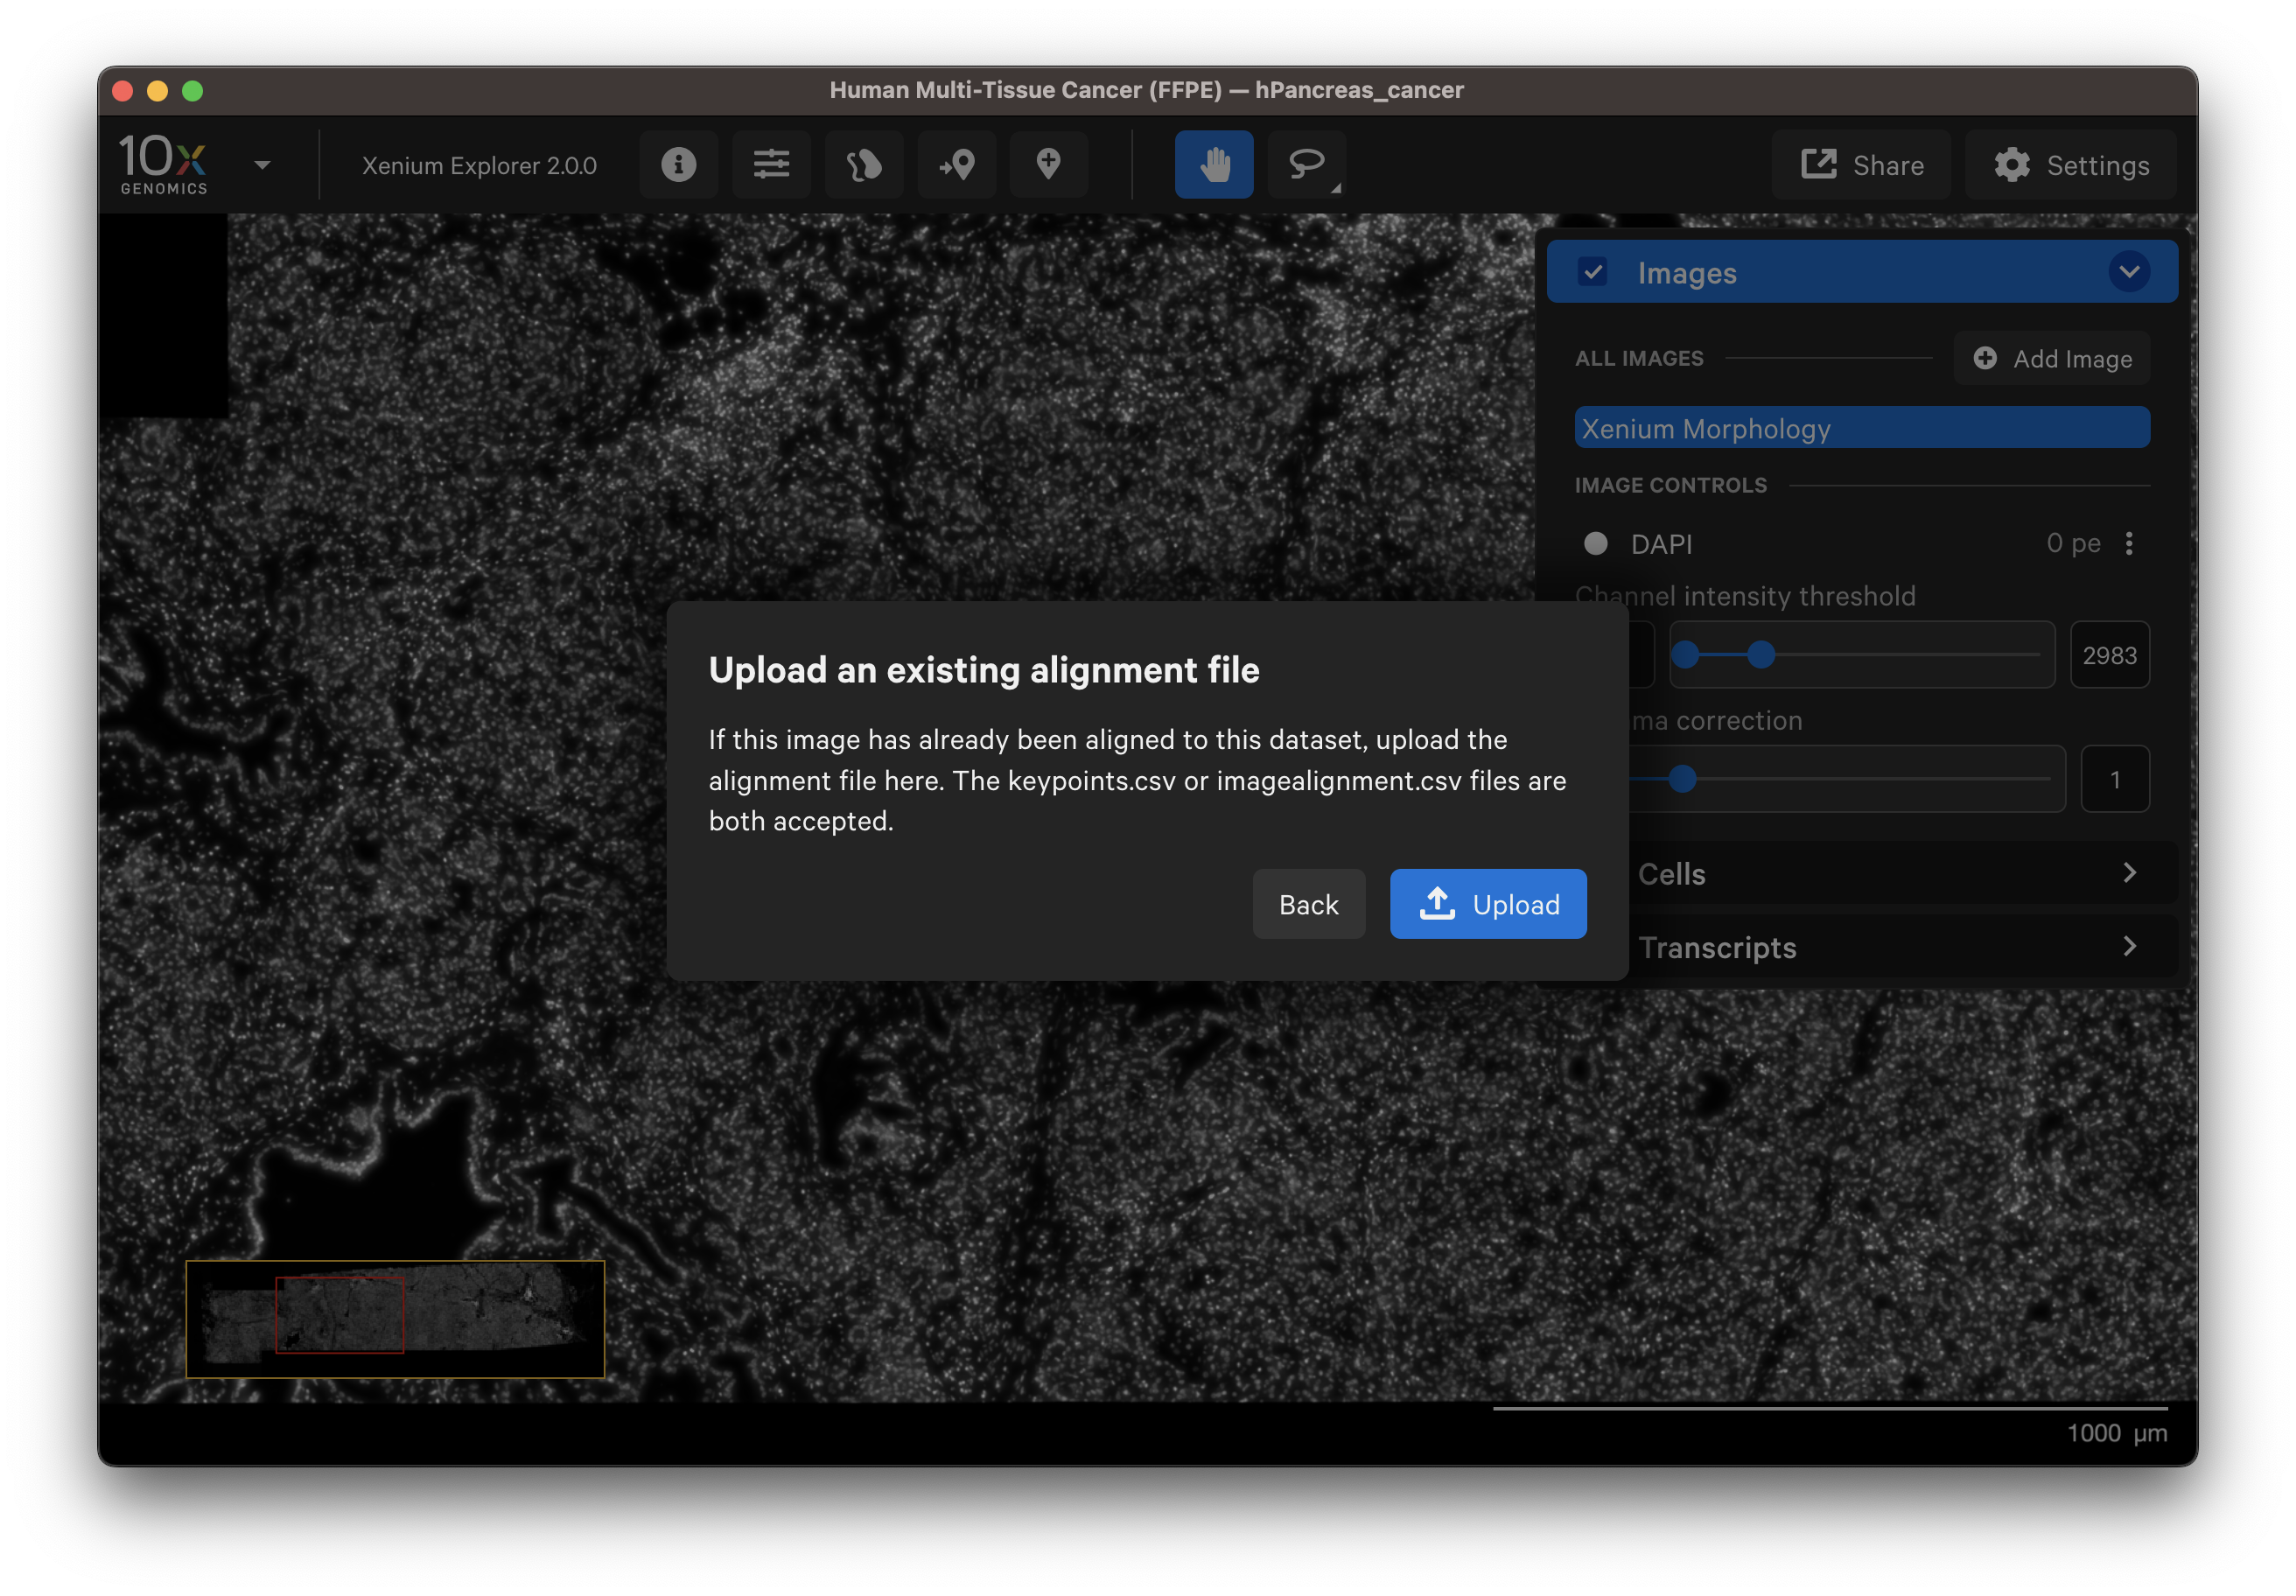
Select a post-Xenium image that has already been aligned for example in Xenium Explorer in a previous session or by a colleague. After verifying the preview image is correct, select Yes, use an existing alignment file.
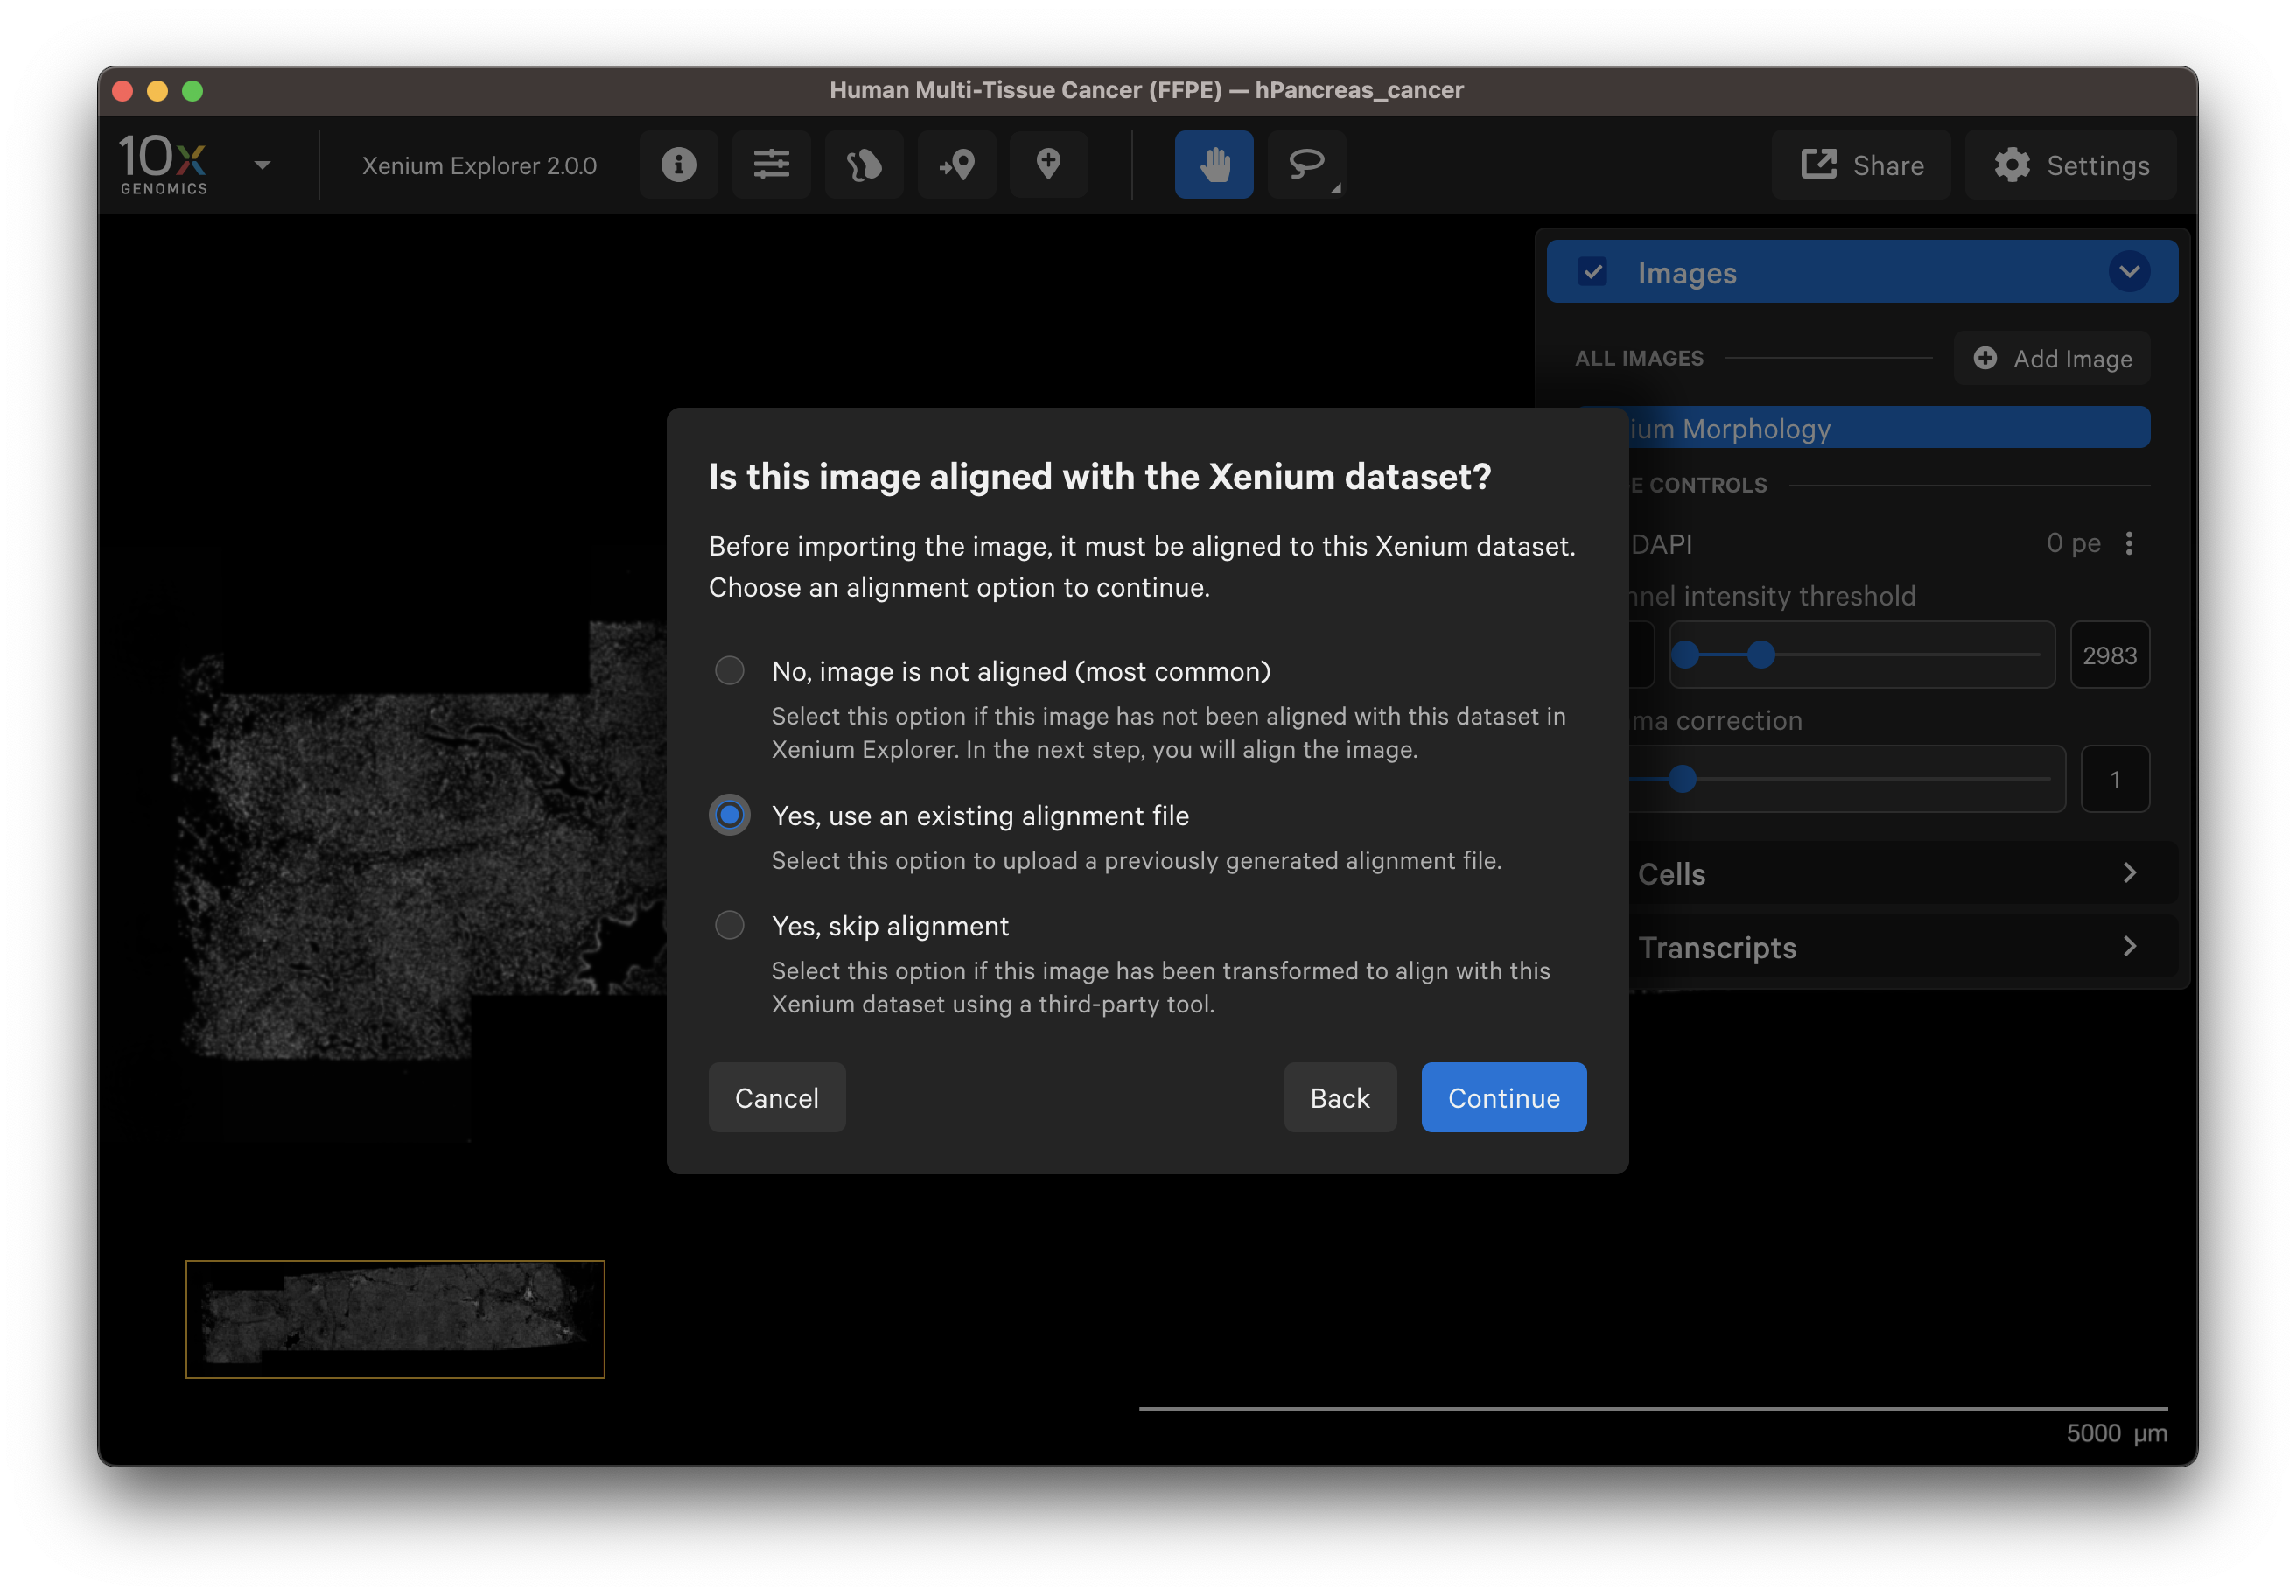
Click Upload and upload either the transformation matrix or keypoints alignment CSV file (see above for step to download these files).
Alternatively, if the image is already selected and listed in the Image layer. You can click the dropdown layer to Import a New Alignment File and select either a keypoints or transformation matrix CSV file.
Choose this option if you have an image that was aligned and transformed into the Xenium coordinate system with community-developed software (e.g., H&E to Xenium DAPI Image Registration with Fiji Analysis Guide). Make sure the image format is OME-TIFF.
- For example, download the "Supplemental: Aligned post-Xenium H&E image (OME-TIFF)" file for either Tissue sample 1 or 2. They are already in OME-TIFF format and were aligned with community-developed software.
- Add the image to Xenium Explorer.
- Select Yes, skip alignment.
 4. Wait for the image to load and be added to the Image layer.
To share the image alignment with a colleague or view the alignment later, select Download Image Alignment File to save the alignment information. The imported post-Xenium image will be saved to your Recent Files and Saved Views by default.
Two file formats are available for download - the affine transformation matrix and an alignment keypoints file (starting in Xenium Explorer v1.3). Save one or both of the alignment files (saves to a zipped folder for the latter, <image name>_alignment_files.zip).
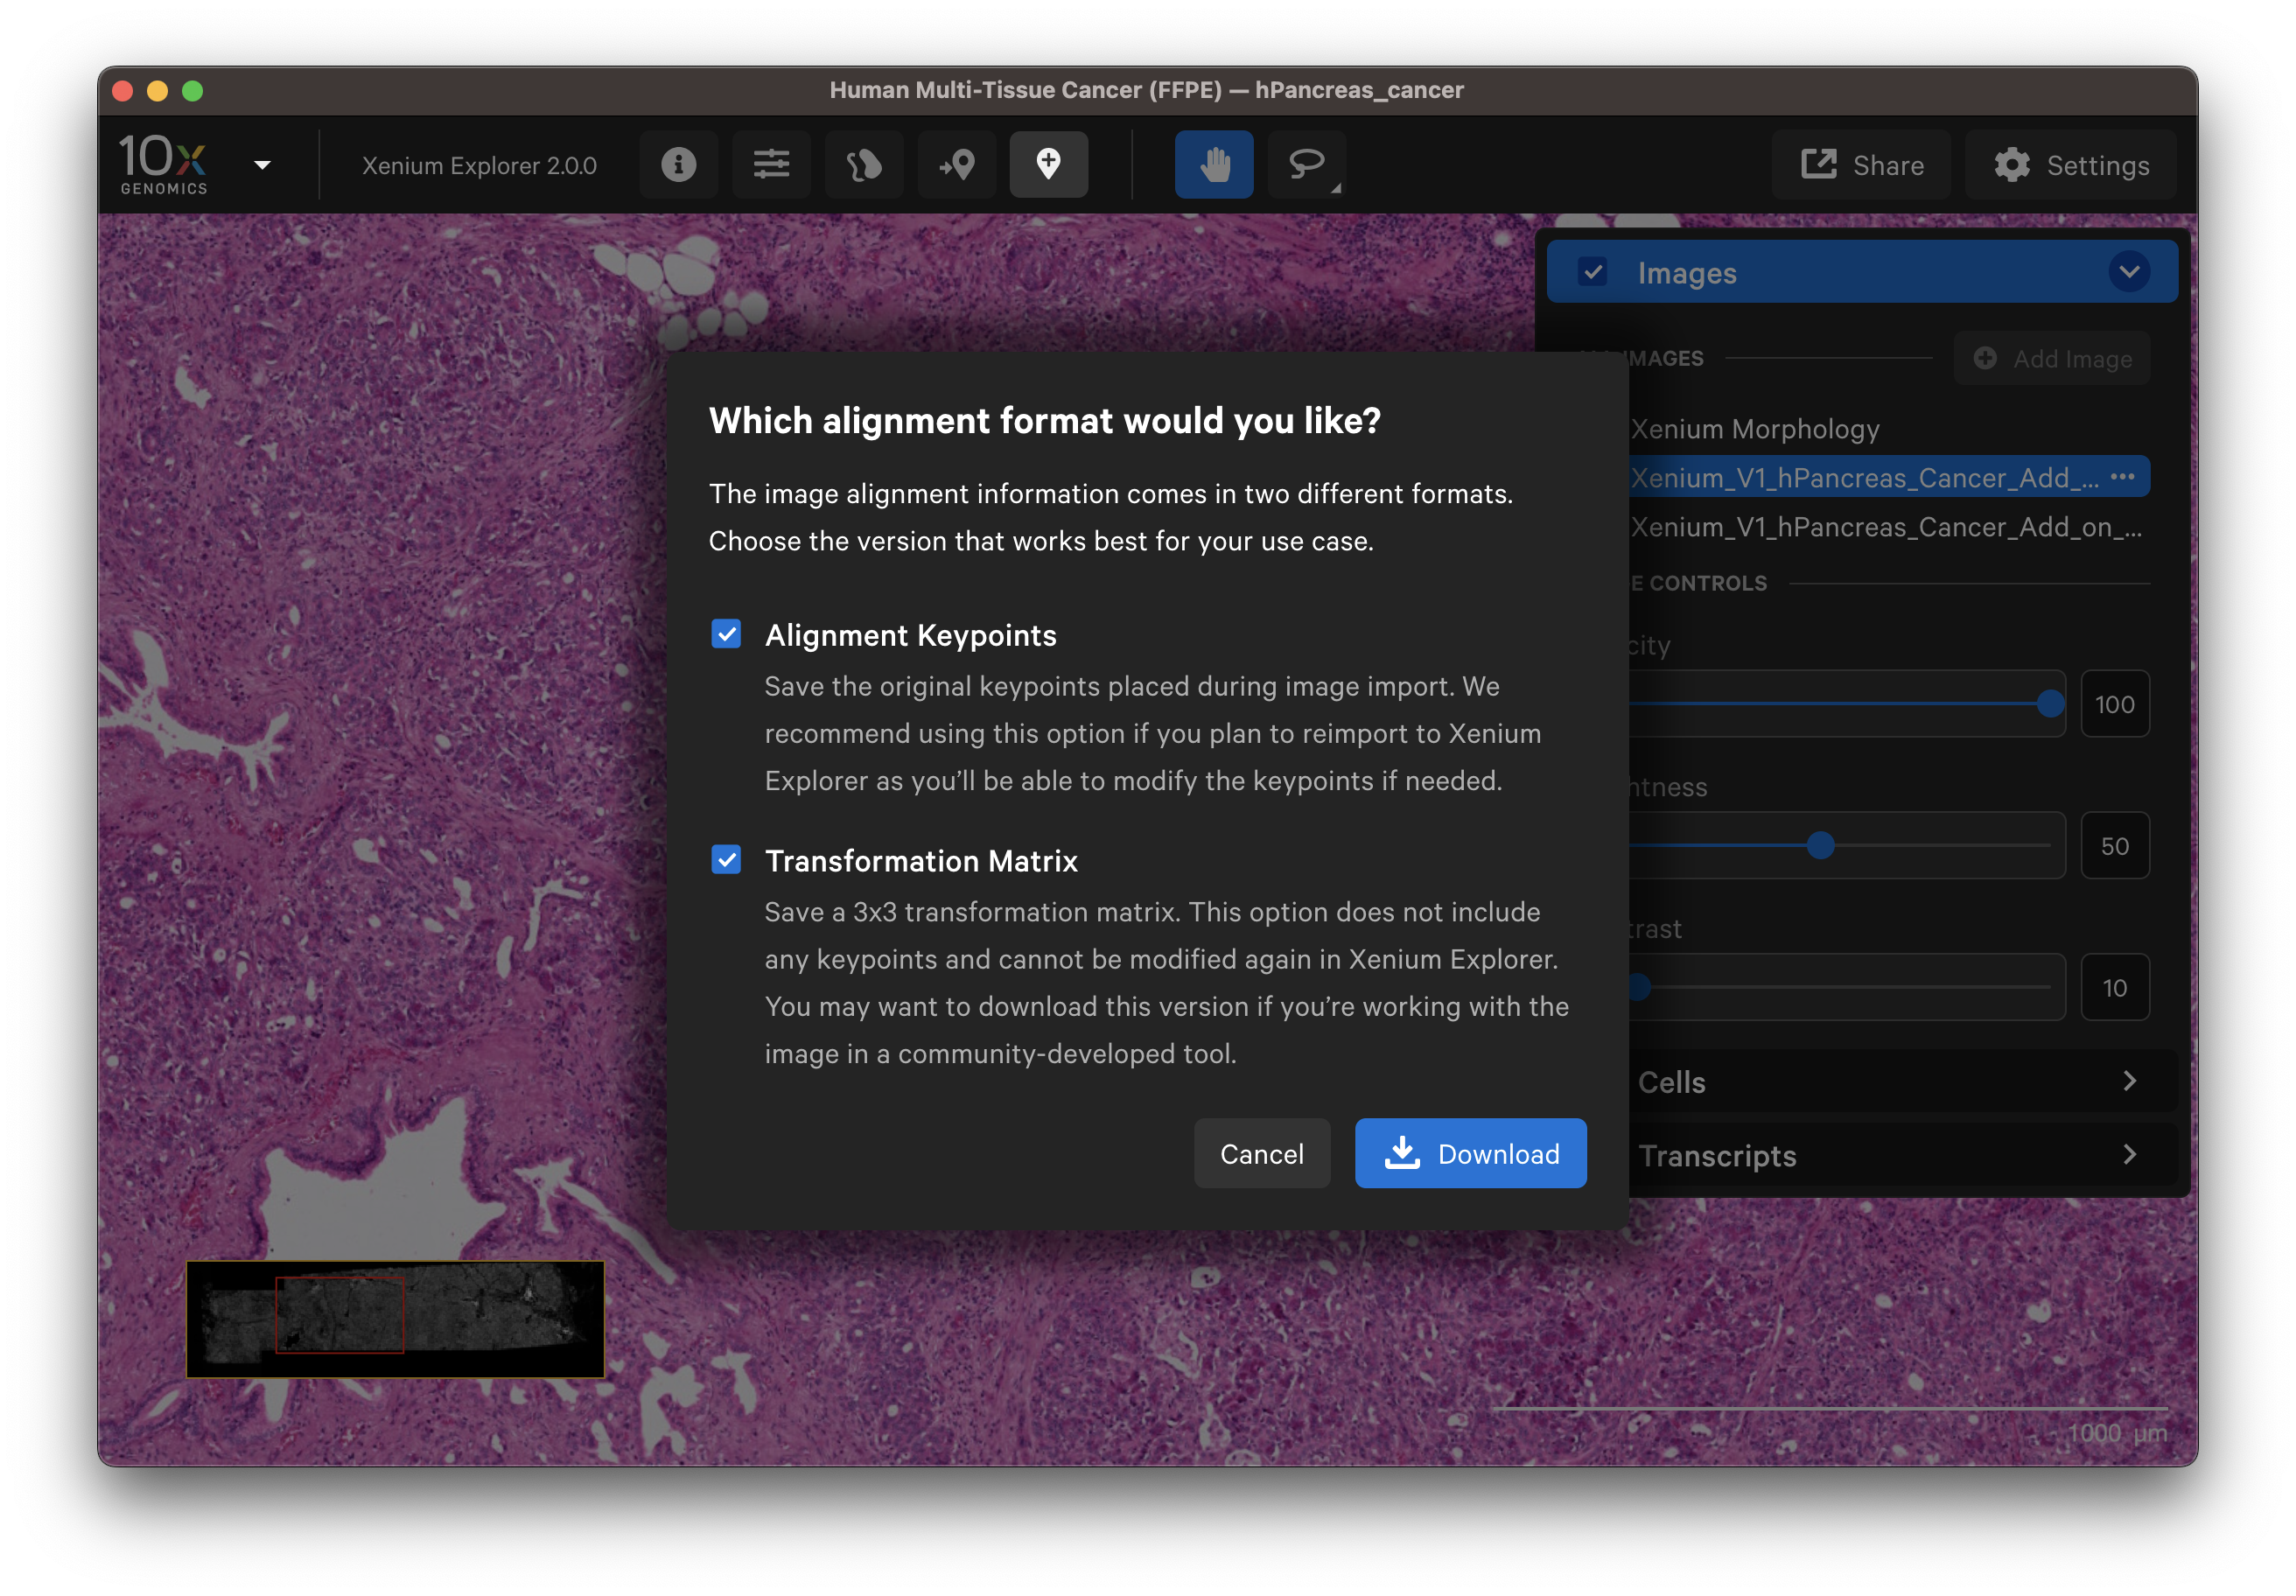
Both files can be shared with collaborators and used to import an existing alignment to Xenium Explorer.
- The transformation matrix represents the final alignment algorithm result.
- The keypoints coordinates are an intermediate output of the alignment workflow that enable further adjustment post-alignment. Uploading the keypoints in the same version of Xenium Explorer from which they were generated should produce the same alignment. However, alignments from keypoint coordinates generated by different software versions in the future may differ if the alignment algorithm changes.
The file contains affine transformation values and is saved as <image name>_imagealignment.csv (defaults to imagealignment.csv if downloaded with the keypoints CSV). It captures the translation, scaling, rotation, and reflection applied to the imported image (see algorithm section). The image alignment file is a 3x3 transformation matrix (row-major order), where the last row is [0,0,1]. The transformation value units are in pixels, and the image coordinates and its annotations are in microns. The (0,0) position is in the top left corner of the image.
This file can be used to align the post-Xenium image to the Xenium dataset in other instances of Xenium Explorer or community-developed tools, such as SpatialData. It is also used by the Xenium Ranger import-segmentation pipeline.
This KB article demonstrates how to use the transformation matrix to convert coordinates between Xenium image data and H&E images. Read more about downstream analysis in our Analysis Guide.
For images aligned in Xenium Explorer, the alignment file can also be downloaded for the keypoint coordinates. This file contains XY positions for the keypoints on the DAPI image (fixed) and aligned post-Xenium image (alignment) and is saved as <image name>_keypoints.csv (defaults to keypoints.csv if downloaded with the transformation matrix CSV). Note that this file is only available for image alignments generated in Xenium Explorer v1.3+.
The format looks like this:
fixedX,fixedY,alignmentX,alignmentY
13009.314432717101,8637.339186313684,17373.885034107483,11717.265623852345
9334.719821791328,4256.7251087277955,12695.071448237277,5994.609340981323
...
The manual alignment process finds the best similarity transform, in a least-squares sense, that aligns corresponding pairs of keypoints chosen from two images. That transform is then used for display purposes to overlay one image onto the other. This transform is able to account for differences in translation, scale, rotation, and reflection between two images. The algorithm used by Xenium Explorer is a version of the algorithm presented in (Horn, 1987), with minor changes to work in two dimensions instead of three.
Our use of this transform assumes that translation, scaling, rotation, and reflection (equally applied to both axes), can account for the differences between the two images. Data may not align perfectly where the tissue is different between the two images, for instance due to changes in tissue morphology after the Xenium run. As a least-squares solution, adding more (correct) keypoint pairs helps to minimize error due to keypoint placement and refine the overall solution.
- Horn, B. Closed-form solution of absolute orientation using unit quaternions. J. Opt. Soc. Am. A. 4, 629-642: 1987. PDF available from the author’s website (search for "absolute orientation").