Note: 10x Genomics does not provide support for community-developed tools and makes no guarantees regarding their function or performance. Please contact tool developers with any questions. If you have feedback about Analysis Guides, please email analysis-guides@10xgenomics.com.
10x-developed Xenium Explorer is a desktop application that allows you to interactively visualize data generated by the Xenium Analyzer instrument.
We recognize the diversity of scripts, tools, and packages in the single cell analysis ecosystem and the interest in using them. For instance, you may want to import clustering results from other tools into your Xenium Analyzer analysis for further data exploration.
The following tutorial details steps to create customized files based on clustering results from community-developed tools, which can then be visualized in Xenium Explorer.
In order to customize the Xenium Explorer file, a basic understanding of the file structure is necessary.
The experiment.xenium manifest file contains metadata about the experiment, including the file paths to the input files. This tutorial details the steps to create a customized secondary analysis file (named custom_analysis.zarr.zip in this tutorial), which will replace the default analysis.zarr.zip file (fourth line of the xenium_explorer_files section) and enable visualization in Xenium Explorer.
[...]
"xenium_explorer_files": {
"transcripts_zarr_filepath": "transcripts.zarr.zip",
"cells_zarr_filepath": "cells.zarr.zip",
"cell_features_zarr_filepath": "cell_feature_matrix.zarr.zip",
"analysis_zarr_filepath": "analysis.zarr.zip",
"analysis_summary_filepath": "analysis_summary.html"
}
Additional details on Xenium Explorer input files can be found on this support page. Additional details on the zarr file format can be found on this support page.
This tutorial utilizes the Tiny subset dataset from a fresh frozen mouse brain sample (XOA v1.0.2). The Xenium Output Bundle can be downloaded from this link. The customized clustering result is from a Seurat vignette on the same dataset: Mouse Brain: 10x Genomics Xenium In Situ
This tutorial includes code/scripts written in Python, R, and Bash. Therefore, some familiarity with the three programming languages is recommended in order to successfully run the tutorial. There are three main steps:
- Prepare cell clustering from Seurat [R]
- Create a customized cluster directory [Optional: Bash]
- Generate a customized
analysis_custom.zarr.zipfile [Python]
You can generate customized clustering using any of your favourite community-developed tools. Regardless of the tool you are using, you will need to generate a cluster file to be used in later steps of the tutorial. The cluster file is a CSV file with two columns: Barcode and Cluster.
Barcode,Cluster
1,6
2,6
3,2
4,4
5,6
...
The tutorial uses clustering results from Seurat as an example. Please follow this Seurat vignette to create the Seurat object: Mouse Brain: 10x Genomics Xenium In Situ. As shown in the vignette, Seurat identified 25 clusters for this dataset, which we will later import into Xenium Explorer.
Once the Seurat object (xenium.obj) is generated, we use the R code below to generate the cluster CSV file.
# The following code is written in R
# The `xenium.obj` was generated with this vignette: https://satijalab.org/seurat/articles/seurat5_spatial_vignette_2#mouse-brain-10x-genomics-xenium-in-situ
cell_clusters = as.data.frame(Idents(xenium.obj))
cell_clusters$Barcode = as.integer(rownames(cell_clusters))
cell_clusters$Cluster = as.integer(cell_clusters[,1])
cell_clusters = cell_clusters[,2:3]
write.csv(cell_clusters, "clusters.csv", quote=FALSE, row.names = F)
The Cluster numbering must start from 1 instead of 0. Below is an example of the new clusters.csv:
Barcode,Cluster
1,6
2,6
3,2
4,4
5,6
6,4
7,4
Cluster column can only be in integer format, characters are not accepted by Xenium Explorer.In Xenium Onboard Analysis v1.3 and later, the Cell ID (cell_id) data type has been changed from integer to string (analogous to Cell Ranger cell barcode IDs). However, this tutorial has been written to handle the integer data type for Cell ID.
If the Barcode column of the clusters.csv contains characters such as:
Barcode,Cluster
aaaabjej-1,15
aaaaildf-1,15
aaabioba-1,15
aaabmmgk-1,15
aaabphei-1,3
...
You will need to convert the Barcode from string to integer using the R code below:
# The following code is written in R
cluster_cell_char = read.csv("cluster.csv", header=TRUE)
cluster_cell_char$Barcode = as.integer(rownames(cluster_cell_char)) - 1
cluster_cell_char = cluster_cell_char[,1:2]
write.csv(cluster_cell_char, "cluster.csv", quote=FALSE, row.names = F)
The converted CSV file looks like below. Barcode 0 represents the first cell in the cell-feature matrix, Barcode 1 represents the second cell, and so forth.
Barcode,Cluster
0,15
1,15
2,15
3,15
4,3
...
In the previous step, we created the cluster.csv file containing the information from customized analysis with community-developed tools. In this step, we will create a new directory within the Xenium output directory so that we can add the customized cluster.csv file.
We use bash commands below to create the new folder at the correct location, and then place the cluster CSV file within it:
# The following code is written in bash
# Navigating to the correct folder:
cd /outs/analysis/clustering/
# Create a new custom directory in the clustering folder
mkdir gene_expression_custom_clusters
# copy the custom clusters.csv into the new folder
# Remember to change the `/path/to/` below to your actual path for the clusters.csv file
cp /path/to/clusters.csv gene_expression_custom_clusters
Alternatively, you can create the gene_expression_custom_clusters directory (folder) and add clusters.csv using Windows or MacOS, as long as the final directory structure looks like the following:
├── clustering
│ ├── gene_expression_custom_clusters
│ │ └── clusters.csv
As mentioned in the background section, we need to generate a custom_analysis.zarr.zip file in order to view the Seurat custom clustering results in Xenium Explorer. The steps and code below detail how to generate the customized zarr file.
We begin by importing required packages and functions into Python.
Required Python packages:
Copy and paste the code below to load the packages and functions.
# The following code is written in Python
import zarr
import numpy as np
from zarr.storage import ZipStore
from pathlib import Path
from typing import Final, NamedTuple
OUTPUT_ZIP_FILENAME = "custom_analysis.zarr.zip"
# Filenames
CELL_GROUPS_ZARR_FILENAME = "cell_groups"
# Common array names
INDICES_ARRAY: Final[str] = "indices"
INDPTR_ARRAY: Final[str] = "indptr"
# Clustering names
custom_clusters: Final[str] = "gene_expression_custom_clusters"
CLUSTERING_NAMES: Final[list[str]] = [
custom_clusters,
]
# Attribute names
MAJOR_VERSION_ATTR: Final[str] = "major_version"
MINOR_VERSION_ATTR: Final[str] = "minor_version"
NUMBER_GROUPINGS_ATTR: Final[str] = "number_groupings"
GROUPING_NAMES_ATTR: Final[str] = "grouping_names"
GROUP_NAMES_ATTR: Final[str] = "group_names"
class CellGrouping(NamedTuple):
name: str
group_names: list[str]
indices: np.ndarray[int, np.dtype[np.uint32]]
indptr: np.ndarray[int, np.dtype[np.uint32]]
def __eq__(self, other):
return (
(self.name == other.name)
& (self.group_names == other.group_names)
& (self.indices == other.indices).all()
& (self.indptr == other.indptr).all()
)
class CellGroupDataset:
def __init__(self, cell_groupings: list[CellGrouping]):
self.cell_groupings = cell_groupings
def __eq__(self, other):
return self.cell_groupings == other.cell_groupings
@staticmethod
def from_analysis_path(analysis_csv: Path) -> "CellGroupDataset":
cell_groupings = []
first_cell_ids = None
for clustering_name in CLUSTERING_NAMES:
cell_indices, cluster_assignments = CellGroupDataset.read_clustering(
analysis_csv, clustering_name
)
if first_cell_ids is None:
first_cell_ids = cell_indices
assert np.all(cell_indices == first_cell_ids)
num_cells = cell_indices.shape[0]
max_cluster_ix = np.max(cluster_assignments)
num_clusters = max_cluster_ix + 1
indices = np.zeros(num_cells, dtype=np.uint32)
indptr = np.zeros(num_clusters, dtype=np.uint32)
curr_indptr = 0
for cluster_ix in range(num_clusters):
indptr[cluster_ix] = curr_indptr
assigned_to_cluster = cell_indices[cluster_assignments == cluster_ix]
num_cells_assigned = assigned_to_cluster.shape[0]
next_indptr = curr_indptr + num_cells_assigned
indices[curr_indptr:next_indptr] = assigned_to_cluster
curr_indptr = next_indptr
group_names = [
f"Cluster {cluster_ix+1}" for cluster_ix in range(num_clusters)
]
cell_groupings.append(
CellGrouping(
name=clustering_name,
group_names=group_names,
indices=indices,
indptr=indptr,
)
)
return CellGroupDataset(cell_groupings=cell_groupings)
@staticmethod
def read_clustering(
analysis_csv: Path, clustering_type: str
) -> tuple[
np.ndarray[int, np.dtype[np.uint32]], np.ndarray[int, np.dtype[np.uint32]]
]:
csv_path = analysis_csv + "/clustering/" + clustering_type + "/clusters.csv"
with open(csv_path) as csv_handle:
csv_contents = np.loadtxt(
csv_handle, delimiter=",", skiprows=1, dtype=np.uint32
)
return csv_contents[:, 0] - 1, csv_contents[:, 1] - 1
def store_cell_groups_zarr(cell_groupings: list[CellGrouping]) -> None:
with zarr.ZipStore(OUTPUT_ZIP_FILENAME, mode='w') as store:
g = zarr.group(store=store)
group = g.create_group(CELL_GROUPS_ZARR_FILENAME)
grouping_names = [grouping.name for grouping in cell_groupings]
group_names = [grouping.group_names for grouping in cell_groupings]
number_groupings = len(grouping_names)
group.attrs.update(
{
MAJOR_VERSION_ATTR: 1,
MINOR_VERSION_ATTR: 0,
GROUPING_NAMES_ATTR: grouping_names,
GROUP_NAMES_ATTR: group_names,
NUMBER_GROUPINGS_ATTR: number_groupings,
}
)
for cell_grouping_ix, cell_grouping in enumerate(cell_groupings):
subgroup = group.create_group(cell_grouping_ix)
indices_arr = subgroup.zeros(
INDICES_ARRAY,
shape=cell_grouping.indices.shape,
chunks=cell_grouping.indices.shape,
dtype=np.uint32,
)
indices_arr[:] = cell_grouping.indices
indptr_arr = subgroup.zeros(
INDPTR_ARRAY,
shape=cell_grouping.indptr.shape,
chunks=cell_grouping.indptr.shape,
dtype=np.uint32,
)
indptr_arr[:] = cell_grouping.indptr
if isinstance(group.store, ZipStore):
group.store.close()
Next, we import the analysis path using the from_analysis_path function we defined above. Note that this analysis directory should include the customized clusters.csv we generated and placed in step 1 and step 2.
# The following code is written in Python
analysis_path = "/outs/analysis"
dataset = CellGroupDataset.from_analysis_path(analysis_path)
Then we run store_cell_groups_zarr to update the cell_groups (clustering information) in the customized zarr file.
# The following code in written in Python
store_cell_groups_zarr(dataset.cell_groupings)
Successfully running this function will generate a new example.zarr in the working directory. The new example.zarr folder will contain a subfolder called cell_groups, where the updated clustering information is stored.
A few additional steps are needed to complete generating customized input for Xenium Explorer:
- Place the
custom_analysis.zarr.zipin the original/outsdirectory. - Make a copy of
experiment.xenium, and name itexperiment_modified.xenium. - In the new
experiment_modified.xeniumfile, rename"analysis.zarr.zip"to"custom_analysis.zarr.zip"(as mentioned in the background section of the tutorial). - This will generate a new Xenium Explorer file with your customized cluster information.
The following bash code is provided if you prefer using bash scripts to perform the steps above:
# The following code is written in bash
# Place the `custom_analysis.zarr.zip` in the original the `/outs` directory
mv custom_analysis.zarr.zip /path/to/outs
# Make a copy of the .xenium file
cd /path/to/outs
cp experiment.xenium experiment_modified.xenium
# Use your favourite text editor to open the `experiment_modified.xenium`
# Then rename `analysis.zarr.zip` to `custom_analysis.zarr.zip`
This section provides screenshots to confirm that we have replaced the default clustering results with the customized clustering from Seurat.
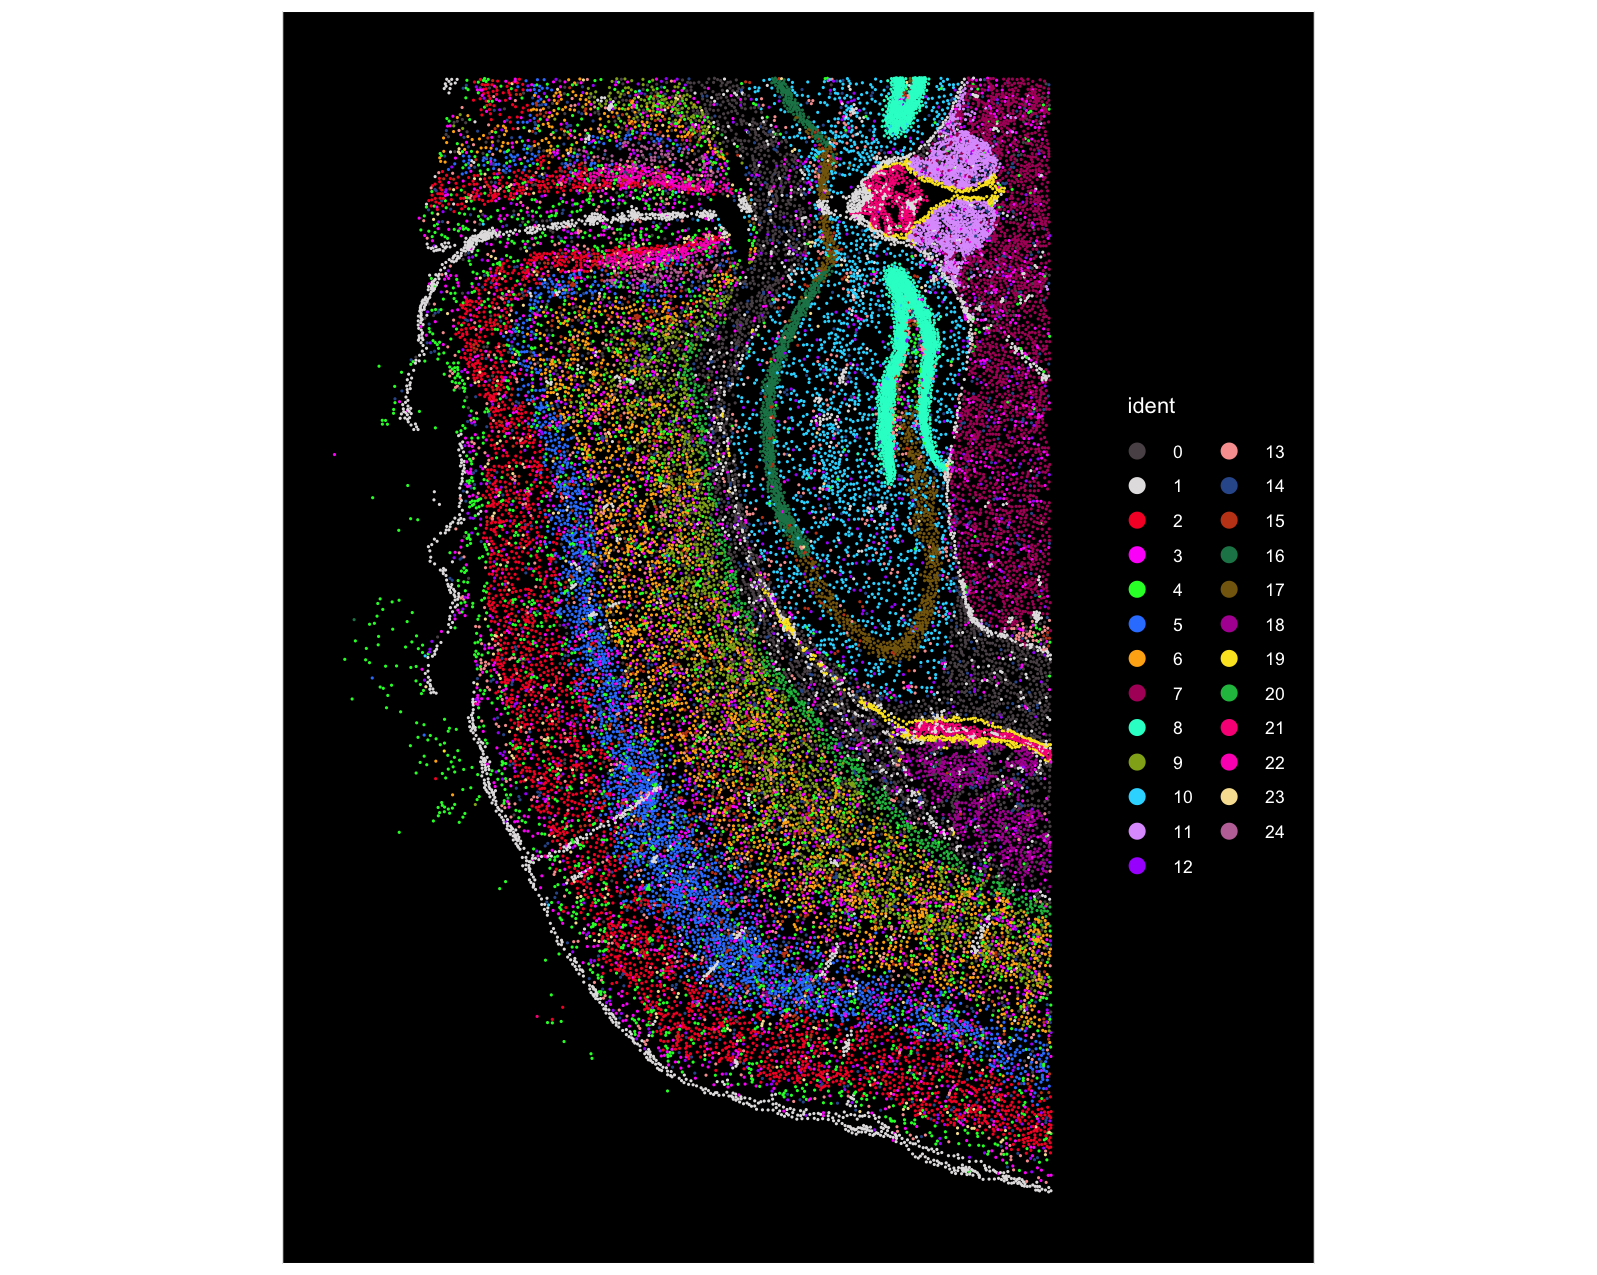
The first screenshot is from Seurat. We can see that there are 25 clusters in total (note the cluster numbering starts from 0), and the dentate gyrus region (bright green) corresponds to Cluster 8:
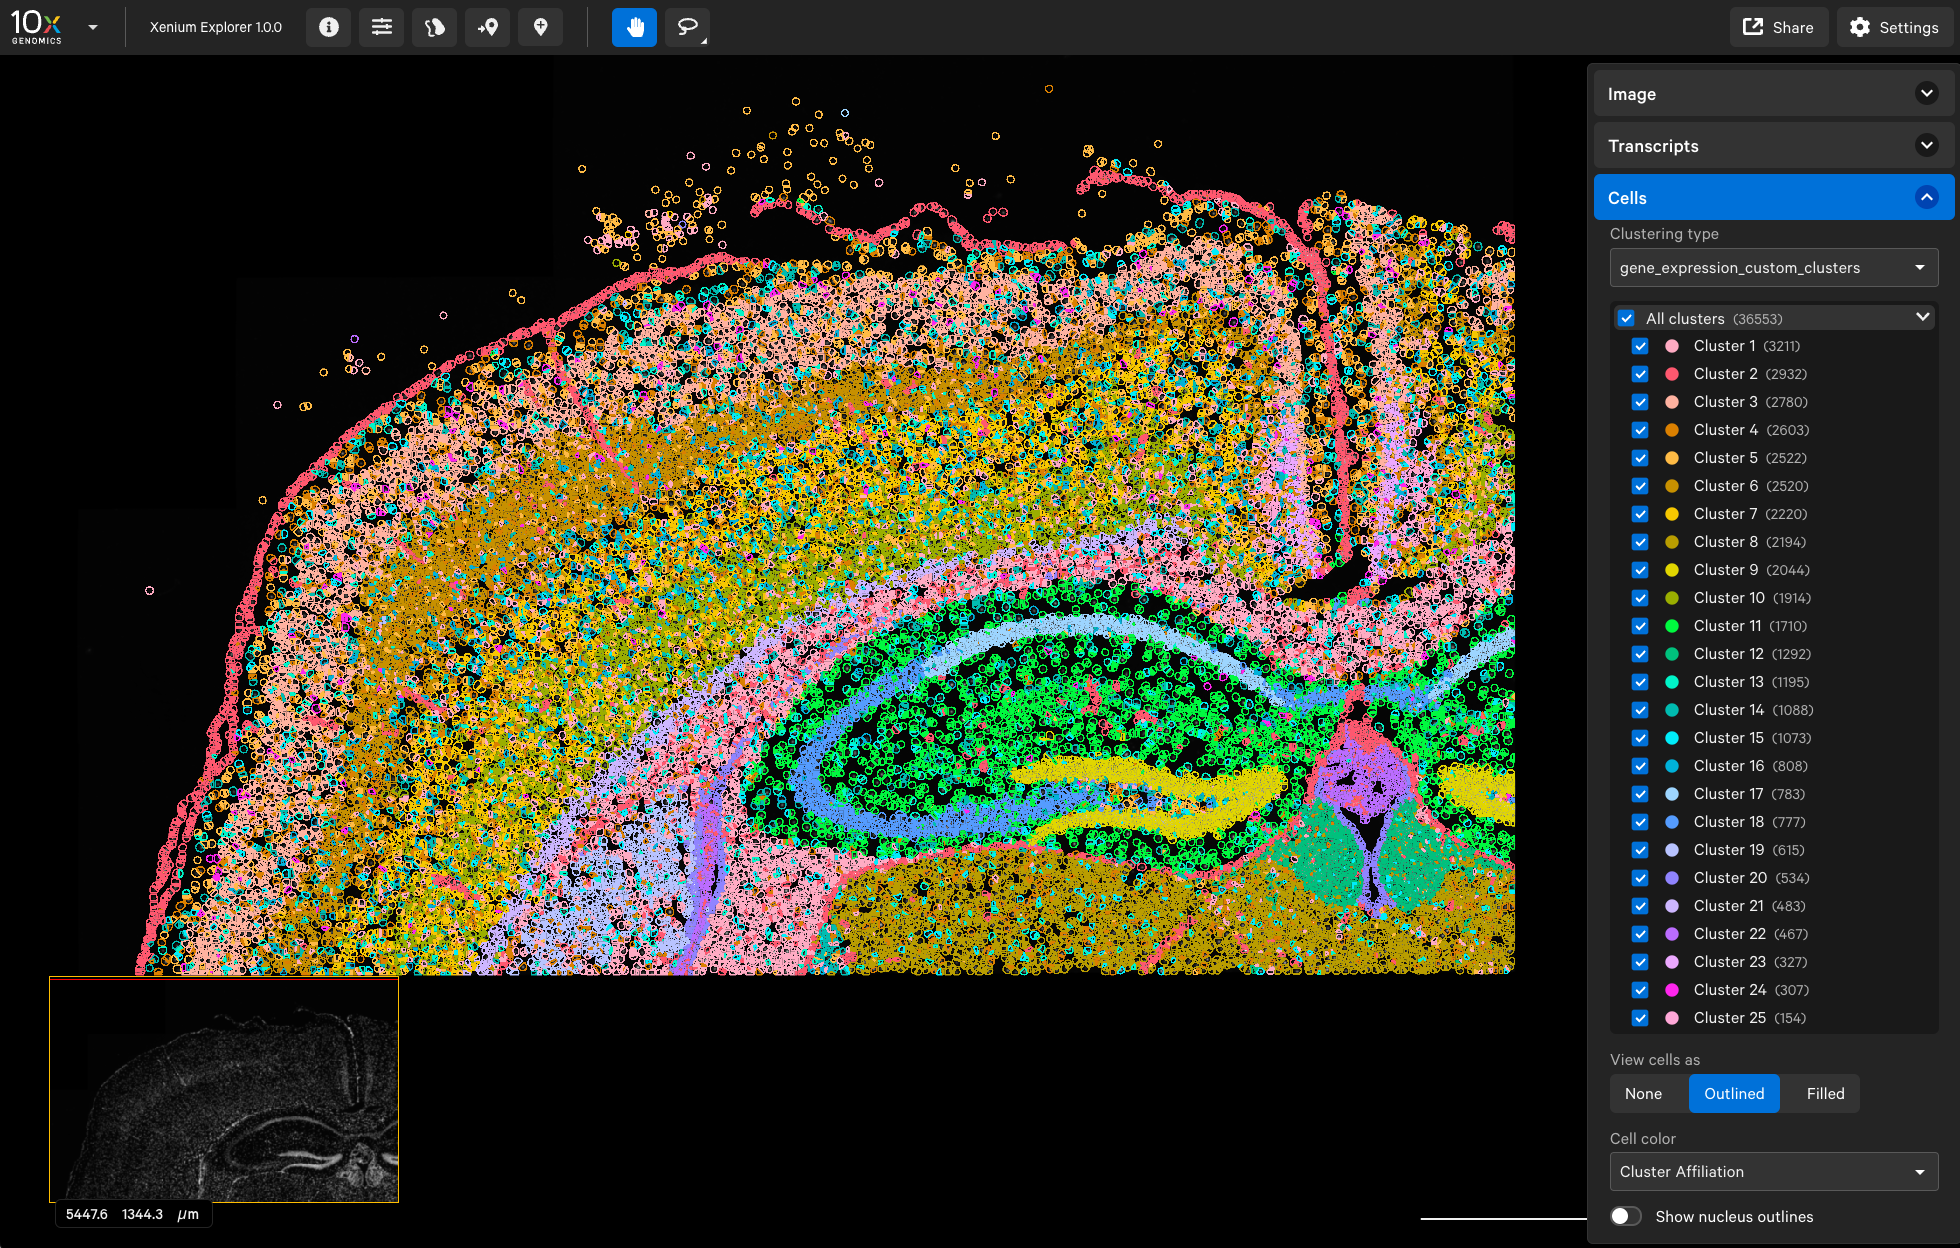
When we open the experiment_modified.xenium file in Xenium Explorer, we can see 25 clusters, and the dentate gyrus region (bright yellow) corresponds to Cluster 9 (cluster numbering starts from 1 in Xenium Explorer).
In summary, we have demonstrated how to load customized clustering results into Xenium Explorer. We hope this tutorial can be useful in your Xenium data exploration journey.